Replacing Concrete Porch with Wood: 7 Powerful Benefits in 2025
Why Transform Your Concrete Porch into a Warm Wood Oasis
Replacing concrete porch with wood gives you a warmer, more inviting entrance that’s comfortable underfoot and adds instant curb appeal to your home.
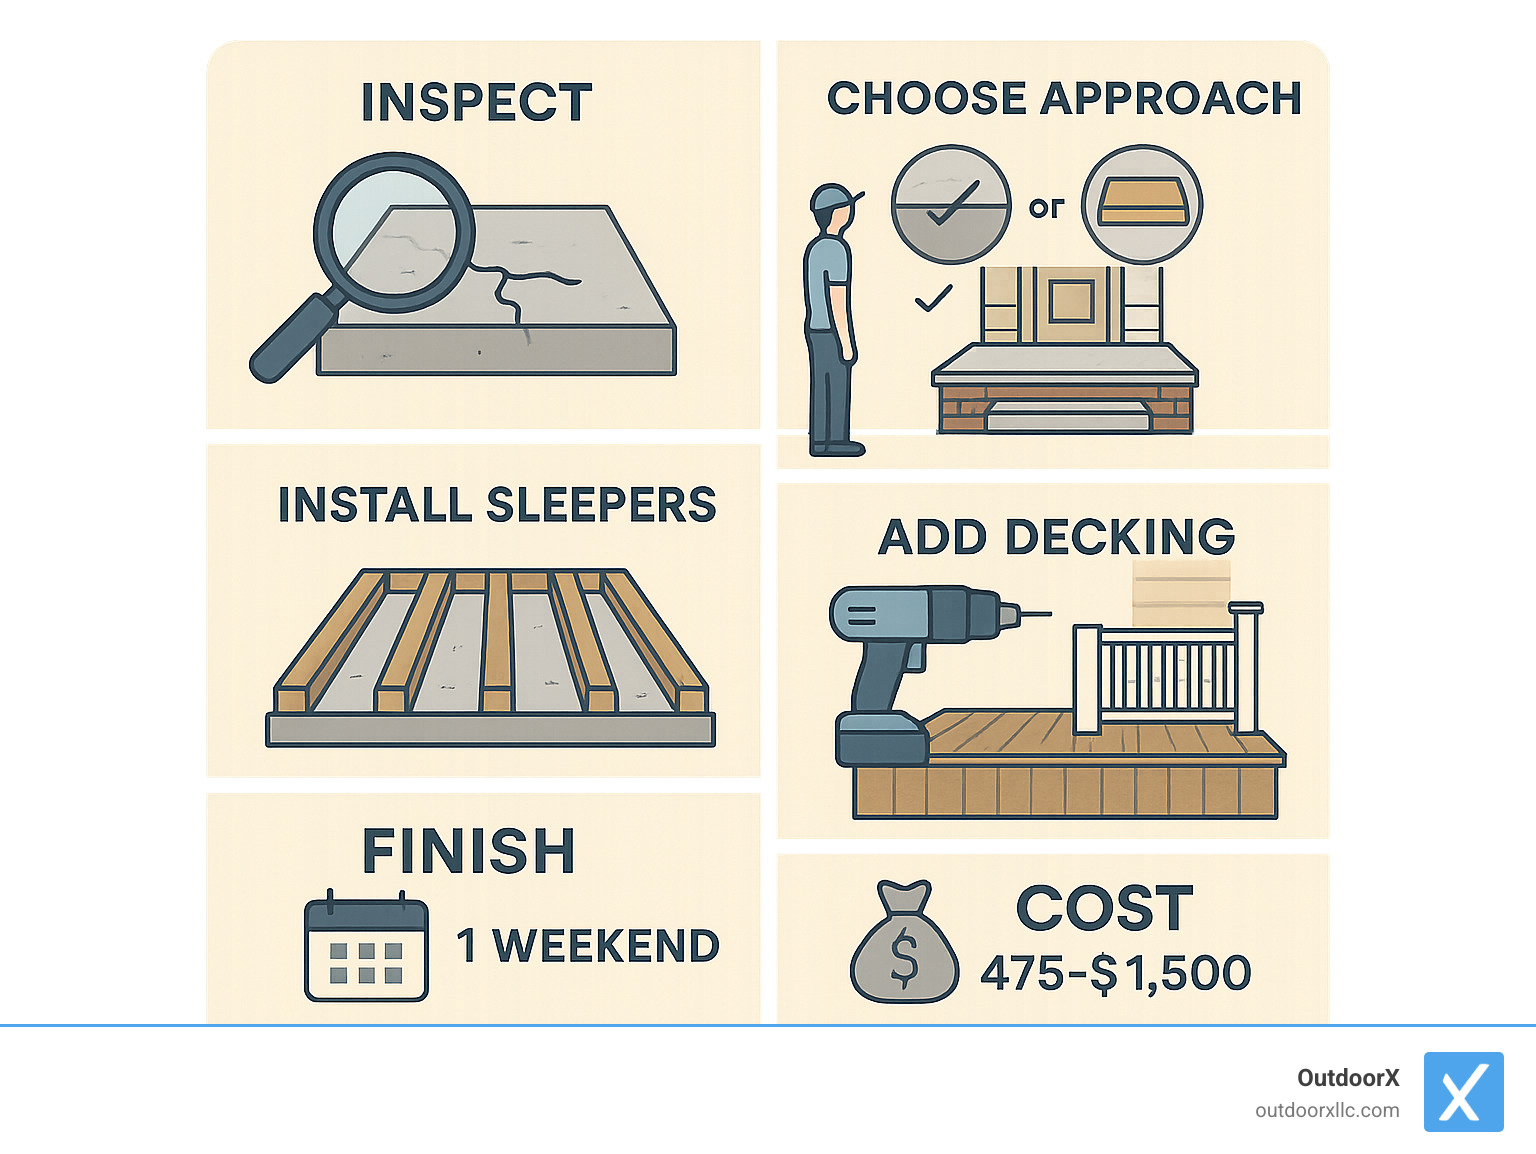
Quick Answer for Replacing Concrete Porch with Wood:
- Inspect your concrete slab for cracks and structural soundness
- Choose your approach – build over existing concrete (saves time) or remove it completely
- Install sleepers – pressure-treated 2x4s spaced 16″ apart as your base frame
- Add decking – wood, composite, or PVC boards secured to sleepers
- Finish touches – skirting, railings, and protective stain or sealant
- Timeline – Most porches under 150 sq ft can be completed in a weekend
- Cost – DIY projects range from $475-$1,500 vs contractor quotes of $2,000-$7,500
If you’ve ever walked barefoot on concrete and winced, you know why homeowners are ditching their cold, hard porches for wood alternatives. One DIY enthusiast shared: “I avoided using the porch for two years because it was cold and uninviting” – a common frustration that a wood overlay solves beautifully.
The good news? You don’t need to demolish your existing concrete. Building over it saves time on foundations and can transform your entrance in just one weekend. Whether you choose traditional pressure-treated lumber, low-maintenance composite, or premium hardwood tiles, you’ll create a space that actually invites you to sit and stay awhile.
The reality check? This project does require careful attention to drainage, proper materials, and local building codes. But with the right approach, you’ll have a porch that lasts 10-30 years depending on your material choice.
Quick replacing concrete porch with wood definitions:
– replacing a deck with a patio
– replacing brick patio
– laying landscape pavers
Why Homeowners Love Replacing Concrete Porch with Wood
Let’s be honest – nobody gets excited about their concrete porch. It’s cold, hard, and about as welcoming as a parking lot. But the moment you start replacing concrete porch with wood, everything changes.
The difference in warmth is like night and day. While concrete acts like a giant ice cube that steals heat from your feet, wood stays comfortable to walk on barefoot even on cool mornings. One of our Essex County clients put it perfectly: “I used to sprint across my concrete porch in summer because it was either scorching hot or freezing cold. Now I actually linger out there with my coffee.”
Design flexibility opens up a whole new world once you ditch the concrete. Suddenly you can create diagonal board patterns, build in cozy seating areas, or extend your porch beyond its original boring rectangle. We’ve helped homeowners increase their usable outdoor space by half just by thinking beyond the concrete boundaries.
Safety gets a major upgrade too. Slip resistance improves dramatically with wood decking, especially when boards are properly spaced for drainage. No more ice-skating across your porch when it’s wet or worrying about that slick algae buildup that concrete loves to collect.
The resale value story is compelling when you look at the numbers. A concrete resurfacing job might look decent for 2-3 years before cracking and staining return. A properly built wood deck keeps adding value for 10-20 years with basic maintenance. That’s a much better return on your investment.
| Approach | Upfront Cost | Lifespan | Maintenance | Best For |
|---|---|---|---|---|
| Concrete Resurfacing | $200-800 | 2-3 years | Minimal until failure | Temporary fix |
| Wood Overlay | $475-1,500 DIY | 10-20 years | Regular staining | Long-term value |
Key Benefits of Replacing Concrete Porch with Wood
Replacing concrete porch with wood transforms your entrance from functional to fantastic. The barefoot comfort alone makes the project worthwhile – no more tiptoeing across burning concrete in summer or shivering on icy surfaces in winter.
Customization becomes limitless once you switch to wood. Want herringbone patterns? Built-in planters? Integrated lighting? Wood makes it all possible. We’ve created porches with hidden storage compartments, curved edges that follow garden beds, and multi-level designs that concrete could never accommodate.
The quick install timeline surprises most homeowners. While concrete work involves mixing, pouring, and days of curing time, wood installation happens fast. Most porches under 150 square feet transform in a single weekend.
Potential Drawbacks and How to Mitigate Them
Moisture risk tops the concern list when replacing concrete porch with wood. Concrete naturally releases moisture that can cause wood to rot, warp, or develop mold. Smart installation prevents these issues by using PVC spacers to create airflow gaps, applying waterproof flashing tape, and choosing pressure-treated lumber rated for ground contact.
Clearance limits can create headaches if your door sits too close to the existing concrete. Solutions include ripping sleepers to custom heights, using low-profile composite systems, or adding attractive transition strips that bridge height differences gracefully.
Ongoing maintenance requires more attention than concrete’s “set it and forget it” approach. Plan for annual cleaning and restaining every 2-3 years. But here’s the thing – this maintenance keeps your porch looking fresh and extends its life significantly.
For more information about professional hardscaping options, check out our hardscaping services or review scientific research on moisture barriers for technical details.
Planning, Permits & Materials Checklist for Replacing Concrete Porch with Wood
The excitement of changing your concrete porch can quickly turn into frustration if you skip the planning phase. Trust us – we’ve seen too many weekend warriors find permit requirements on Sunday afternoon when it’s too late to call the building department.
The 18-inch rule is your best friend when replacing concrete porch with wood. Most building codes treat structures under 18 inches from ground level as patios rather than decks. This magical number means no permits required, no railing requirements, and far fewer structural headaches. Since you’re building over existing concrete, you’ll typically stay well within this height limit.
But here’s the catch – “most” doesn’t mean “all.” Every town writes their own rules, and we’ve worked across Essex County long enough to know that neighboring communities can have completely different requirements. Always call your local building department first – it’s a five-minute phone call that can save you thousands in fines or redo work.
Your concrete slab needs attention before you start building. Fill any cracks with concrete crack filler and seal the surface to prevent moisture from wicking up into your new wood frame. Even small cracks can become big problems once water freezes and expands.
Pressure-treated sleepers form the backbone of your project – these 2×4 or 2×6 boards create the frame that supports your new deck surface. Choose lumber rated for ground contact, even though you’re not technically touching ground. The concrete will transfer moisture, so this extra protection matters.
PVC spacers lift your sleepers off the concrete surface, creating crucial air circulation. Cut these from PVC trim boards – they won’t rot and provide consistent spacing. Joist tape goes on top of every sleeper to create a moisture barrier between your frame and deck boards.
For fasteners, stainless steel or ACQ-rated screws resist corrosion from pressure-treated lumber chemicals. Regular screws will fail within a few years. Masonry screws (like Tapcons) anchor your sleepers directly to the concrete – pair these with construction adhesive for extra holding power.
Drainage slope preservation is non-negotiable. Your existing concrete likely slopes 1/8 inch per foot away from the house – maintain this angle when installing sleepers. Fighting proper drainage leads to standing water and premature wood failure.
For complex projects or when you want professional results without the learning curve, our hardscaping services handle everything from permits to final cleanup. We also recommend checking out this scientific research on moisture barriers for detailed technical guidance on preventing moisture problems.
Budgeting & Average Costs
These are average costs based on internet data and not actual costs for OutdoorX LLC.
DIY replacing concrete porch with wood projects start around $475 for basic materials and can reach $1,500 for premium setups. The wide range reflects your material choices and project complexity more than actual difficulty.
Budget-conscious homeowners typically spend $475-$800 covering about 120 square feet with pressure-treated lumber throughout. This includes basic sleepers, standard deck boards, necessary fasteners, and a simple stain or sealer.
Mid-range projects running $800-$1,200 upgrade to cedar lumber or composite decking boards while keeping pressure-treated sleepers. You’ll also get premium fasteners, proper flashing materials, and decorative skirting.
Premium DIY builds at $1,200-$1,500 feature hardwood deck tiles, high-end composite materials, or integrated storage features. These projects often include built-in seating, decorative trim work, and premium stains.
Professional installation costs vary dramatically from $2,000-$7,500 for standard projects, with custom work reaching $15,000 or more. This massive range reflects material choices, project complexity, regional labor costs, and the level of customization you’re seeking.
Tool rental adds $100-$300 to DIY budgets if you need a hammer drill for masonry anchors, circular saw for cutting lumber, or other specialized equipment.
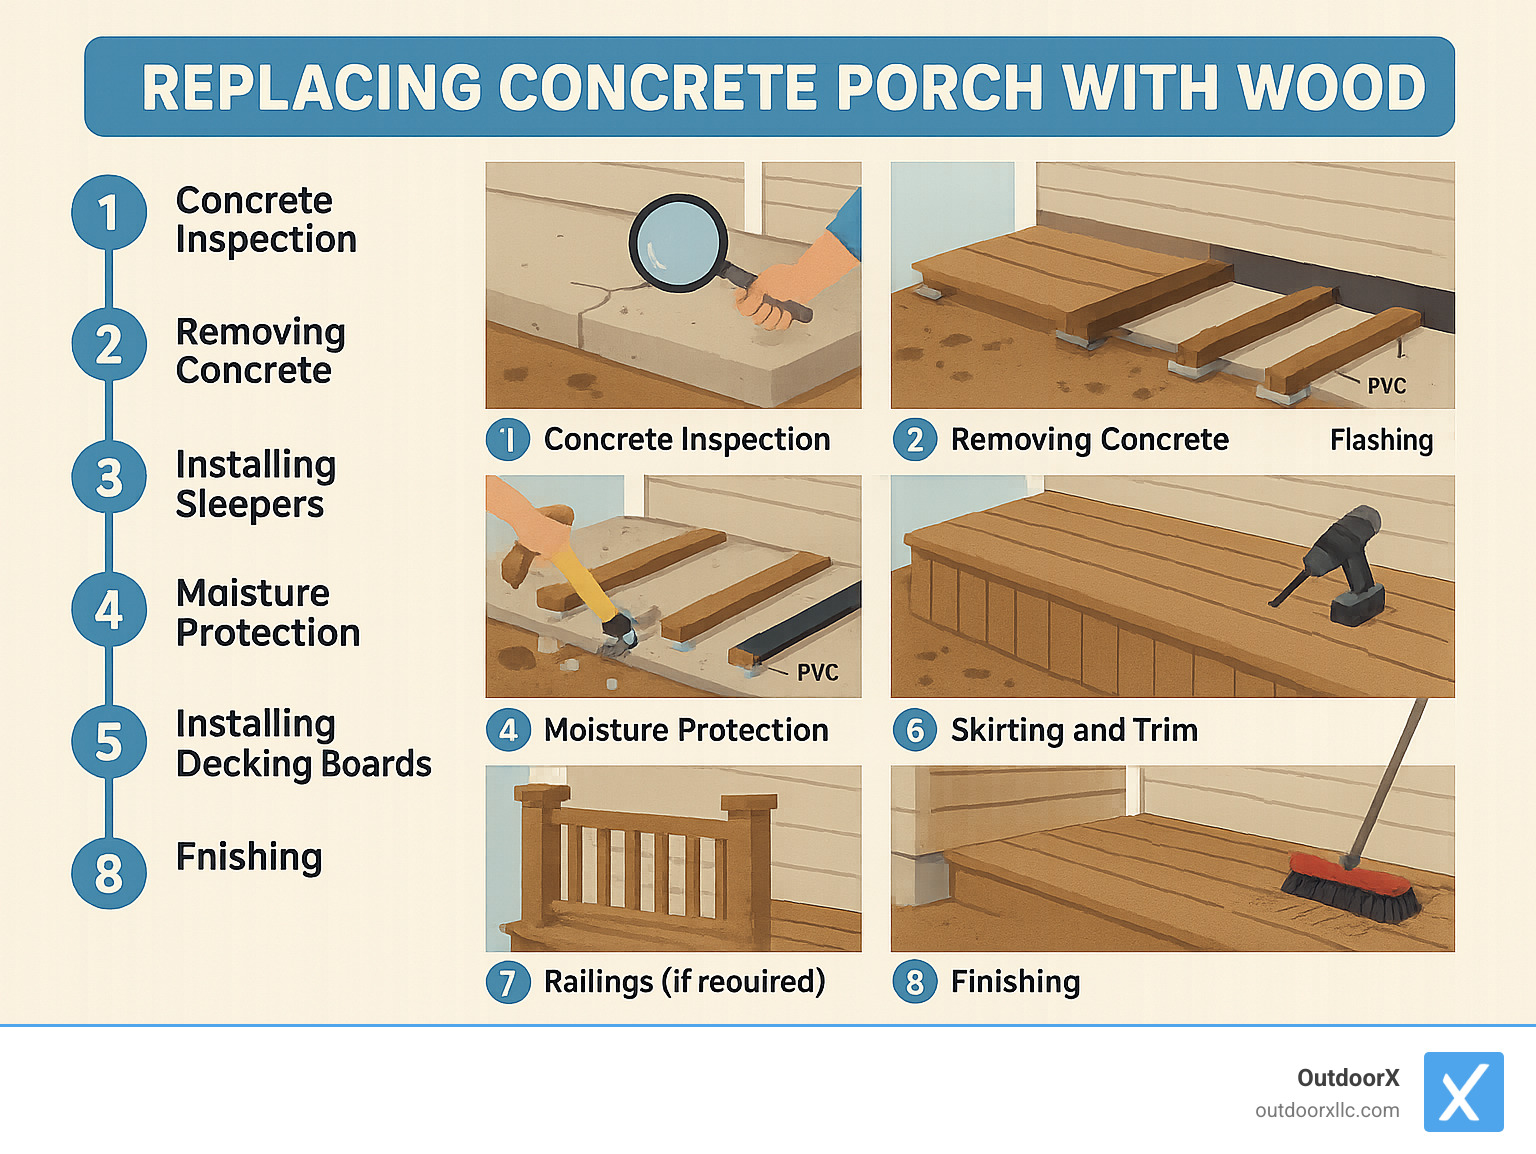
Step-by-Step Guide: Replacing Concrete Porch with Wood
Replacing concrete porch with wood might seem daunting, but breaking it down into manageable steps makes the project surprisingly straightforward. Most weekend warriors can tackle this change with basic carpentry skills and the right approach.
Start with a thorough inspection of your concrete slab. You’re looking for any major cracks, settling, or chunks of missing concrete that could compromise your new deck. Small hairline cracks are totally normal and can be filled with concrete caulk, but if you can stick your finger into a crack, you might want to get a professional opinion first.
Clean that concrete like your life depends on it. Use a stiff brush or pressure washer to remove every bit of dirt, algae, and loose debris. One homeowner learned this lesson the hard way when his “clean” concrete turned out to have a layer of grime that prevented proper adhesion – his sleepers started shifting within months.
Measure twice, cut once applies here more than anywhere. Map out your sleeper locations with chalk lines, keeping them 16 inches on center and running perpendicular to your planned deck board direction. Don’t forget to account for that doormat spot or the area where your grill sits – these details matter when you’re actually using the space.
Here’s where math becomes your friend: calculate the height difference between the back and front of your porch. That concrete slope exists for good reason, and you’ll need to maintain it while creating a level deck surface. This means ripping your sleepers to different heights – the back ones taller than the front ones.
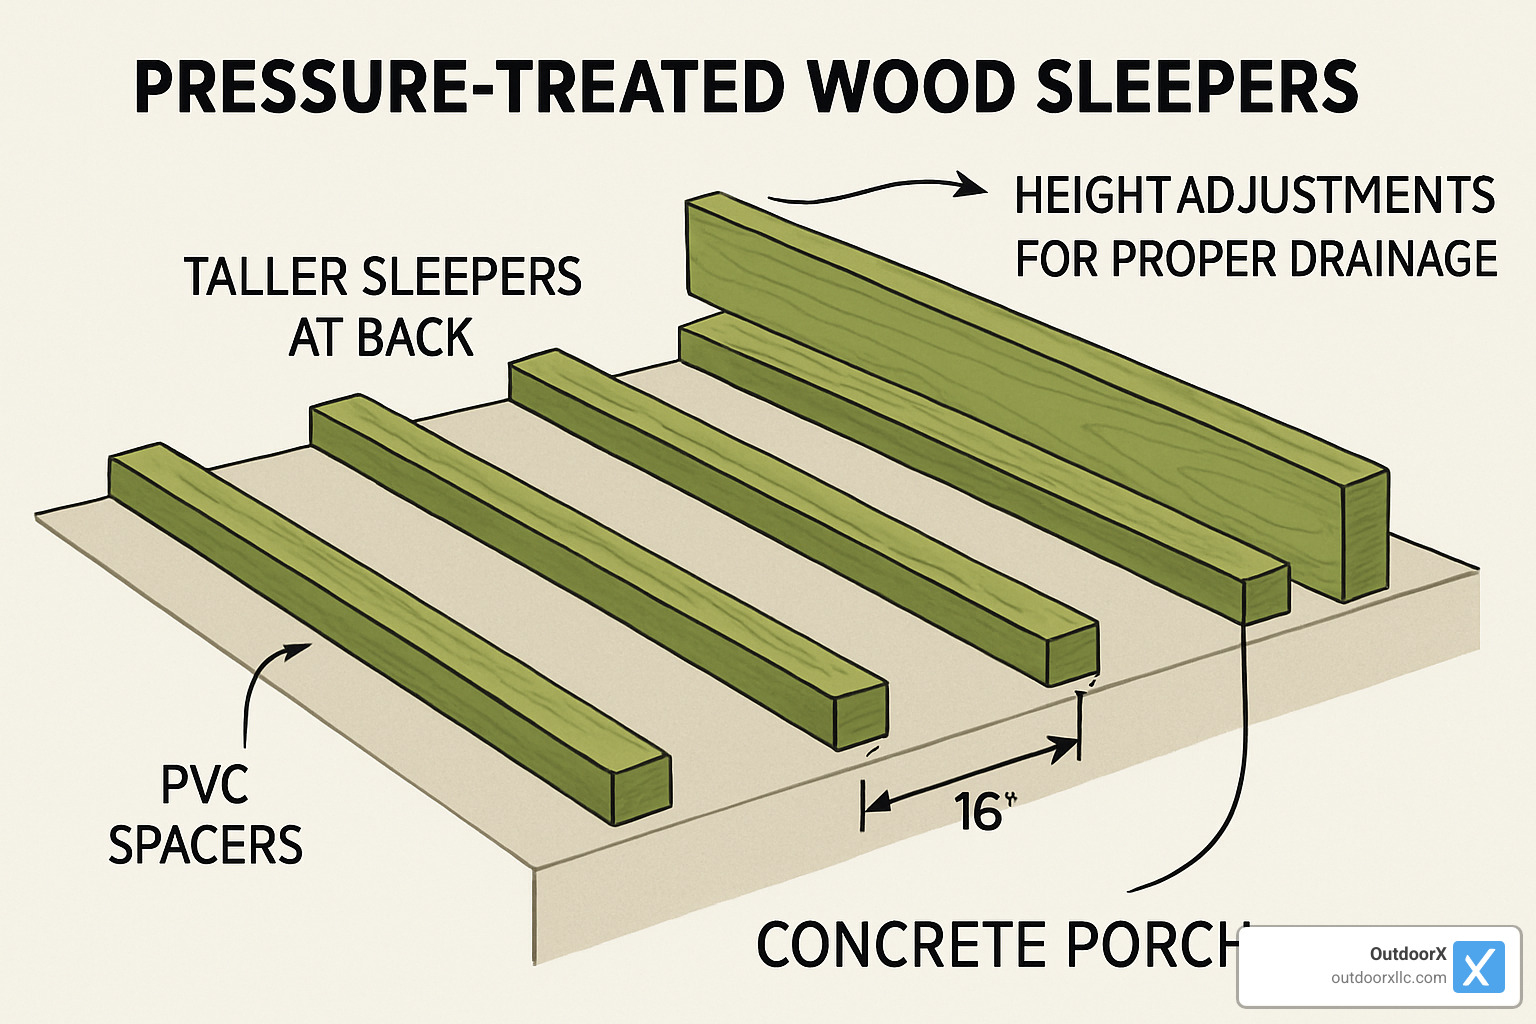
Installing sleepers requires patience and precision. Cut your pressure-treated 2x4s to length, then rip them to the heights you calculated. Those PVC spacers we mentioned? Cut them from 1/2-inch trim board and place them under every sleeper. These little heroes prevent direct wood-to-concrete contact and allow crucial air circulation.
Apply construction adhesive generously to each sleeper bottom, position it over the spacers, and secure with masonry screws every 18 inches. Pre-drill those holes – concrete doesn’t forgive aggressive drilling, and a cracked slab means starting over.
Joist tape is your secret weapon against moisture damage. Apply this self-adhesive flashing to the top of each sleeper before installing deck boards. It costs maybe $30 for a whole project but can save you thousands in rot repairs.
Flashing where the deck meets your house prevents water from sneaking behind the structure and causing foundation problems. This isn’t optional – it’s insurance against expensive damage.
Installing deck boards requires steady hands and attention to detail. Cut boards to length with proper overhang, leaving 1/8-inch gaps between boards for expansion and drainage. For composite or PVC materials, pre-drill screw holes to prevent that mushroomed look around fasteners.
Start with a full board at the house and work toward the front edge. Use a chalk line to keep rows straight, and measure frequently – small errors compound quickly over multiple boards. Stainless steel or ACQ-rated screws are non-negotiable here; standard screws will corrode when touching pressure-treated lumber.
Skirting adds the professional touch that separates DIY projects from contractor work. Install boards around the perimeter to hide your sleeper structure, but leave small gaps at the bottom for drainage and airflow. Solid skirting looks clean but traps moisture like a sponge.
The finishing stage determines how your project looks in five years. Clean the deck surface thoroughly and apply your chosen finish. Here’s a critical point: wait 3-6 months before staining pressure-treated lumber to allow proper drying and weathering. Composite and PVC materials might need specific cleaners or protectants – check manufacturer recommendations.
Ensuring Drainage & Preventing Rot
Water management separates successful wood-over-concrete projects from expensive failures. Proper drainage when replacing concrete porch with wood isn’t just important – it’s absolutely critical for long-term success.
Maintain that existing concrete slope of 1/8 inch per foot away from your house. This slope needs to carry through your entire sleeper installation and final deck surface. Use a long level and shims throughout installation to verify you’re maintaining proper drainage flow.
Weep gaps in your skirting every 4-6 feet allow trapped water to escape and fresh air to circulate under the deck. Without ventilation, even the best pressure-treated lumber will eventually succumb to rot.
Ground-contact rated lumber isn’t optional for components touching or near concrete. Standard pressure-treated lumber lacks the chemical treatment necessary for this harsh environment and will fail prematurely.
Attaching Wood Framing to Concrete Like a Pro
Securing sleepers to concrete properly requires specific techniques that differ completely from standard wood-to-wood connections. Tapcon screws are the professional standard – these self-tapping masonry screws come with matching drill bits and create reliable, long-lasting connections.
Use 3-inch Tapcons for 2×4 sleepers to ensure adequate embedment in the concrete. Here’s the professional sequence: mark screw locations on the sleeper, drill pilot holes through the wood, position the sleeper and mark concrete through those holes, switch to a hammer drill with the Tapcon bit, drill concrete holes to specified depth, apply construction adhesive, then position and drive screws until snug.
Don’t overtighten – concrete can crack under excessive pressure, and Tapcon screws can strip if forced. Snug is sufficient for proper holding power.
Door Threshold & Height Solutions
Managing the transition between your new deck and existing doorways requires careful planning and sometimes creative solutions. The goal is maintaining proper door operation while creating comfortable step heights and preventing water infiltration.
Measure the distance from your concrete surface to the door threshold carefully. Your finished deck should ideally sit 1-2 inches below the threshold to prevent water from entering your home and ensure doors can swing freely.
When clearance is tight, you have several options that maintain structural integrity. Rip sleepers to minimal thickness while ensuring they can still support loads, use thinner deck boards like 5/4-inch instead of standard 2-inch material, or create a slight step down from the threshold for better proportions.
Costs, Lifespan & Maintenance
Let’s talk about the real numbers behind replacing concrete porch with wood – both the upfront investment and what you can expect down the road.
The lifespan of your new wood porch depends heavily on your material choice. Pressure-treated lumber gives you a solid 10-15 years with proper care, while cedar and other naturally resistant woods stretch that to 15-20 years. If you’re thinking long-term, composite decking delivers 25-30 years of service, and PVC decking can last 30+ years.
Here’s what we’ve learned from maintaining porches across Essex County: well-cared-for decks often outlast these estimates, while neglected ones fail much sooner. The difference? Consistent, simple maintenance.
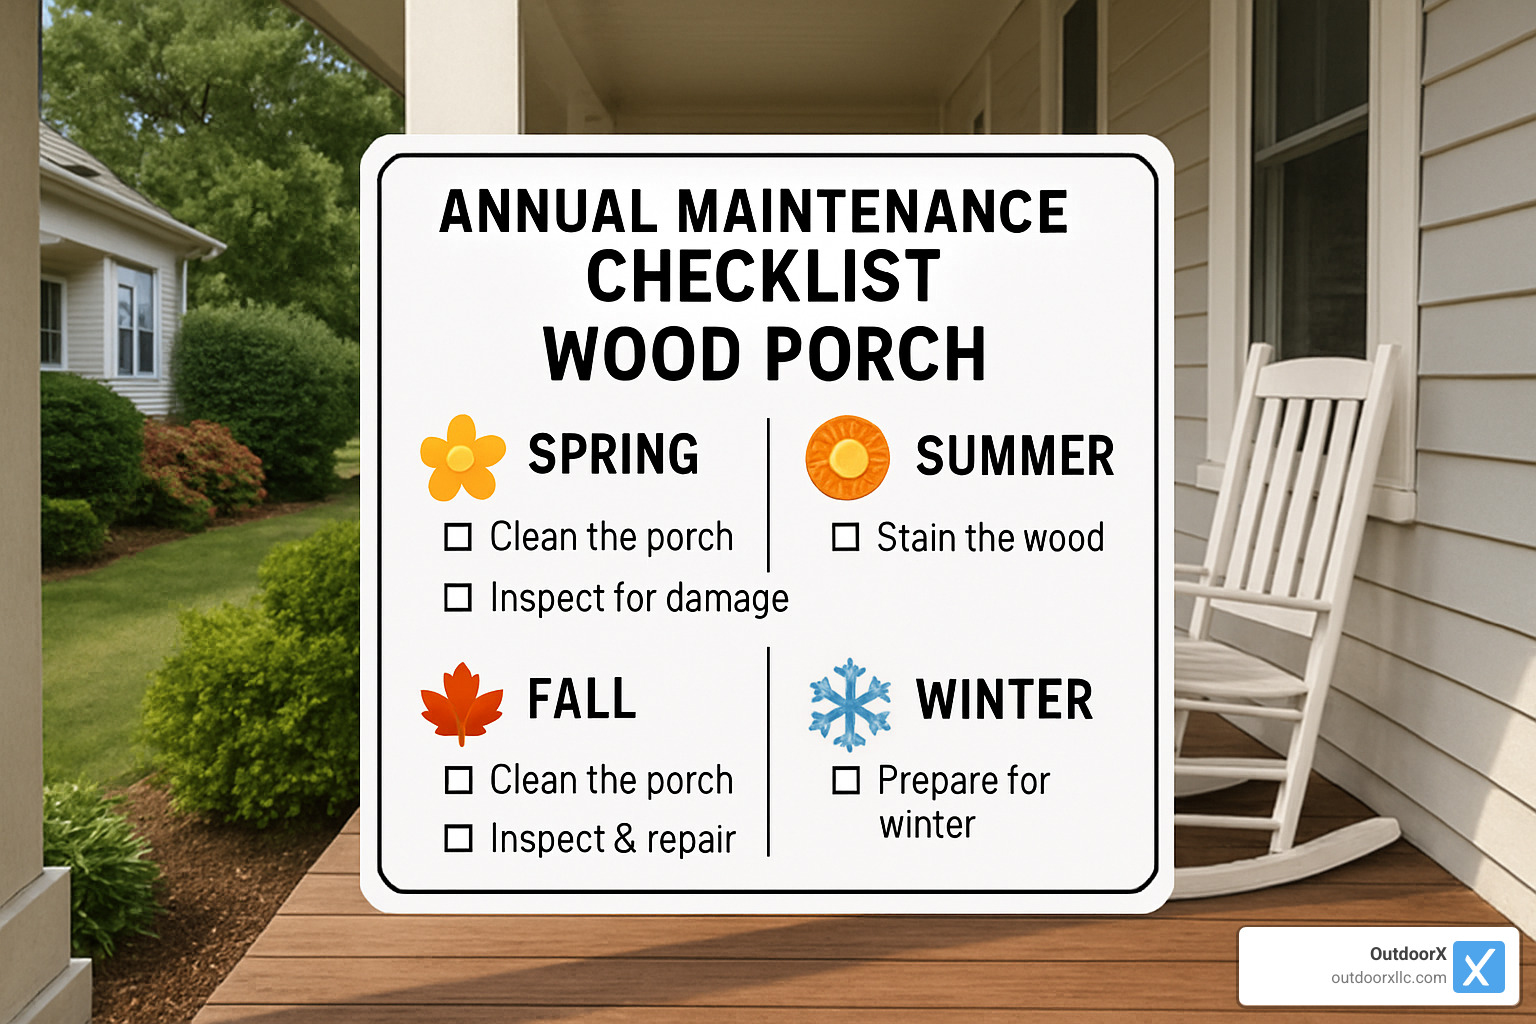
Your annual maintenance routine should become as regular as raking fall leaves. Give your porch a thorough cleaning with deck cleaner, inspect for loose fasteners or damaged boards, clear debris from drainage gaps, and check caulk joints around the house connection. This takes maybe two hours once a year but prevents thousands in premature replacement costs.
Every 2-3 years, plan for a more intensive maintenance weekend. Power washing (with appropriate pressure settings), staining or sealing wood materials, replacing any damaged boards, and tightening all fasteners keeps everything solid and attractive.
Winter care deserves special attention in our New England climate. Remove snow promptly to prevent ice dams from forming, and never use rock salt or ice melt directly on wood surfaces. These chemicals accelerate deterioration faster than anything else we see. Instead, use sand for traction or specialized wood-safe ice melts.
Our landscape installation services include ongoing maintenance programs that take this worry off your plate. We’ve found that homeowners who stay on top of maintenance enjoy their porches longer and spend less on repairs over time.
DIY vs Hiring a Contractor
Deciding whether to tackle replacing concrete porch with wood yourself or hire professionals comes down to honest self-assessment and project scope.
DIY makes perfect sense when your porch sits under 150 square feet, the existing concrete looks solid, and you’re comfortable with basic carpentry. If you enjoy weekend projects and learning new skills – plus budget is your main concern – this project offers great satisfaction. Most homeowners with basic power tool experience can complete a straightforward porch overlay in one weekend with proper preparation.
We often hear from DIY enthusiasts who say the project was easier than expected. One recent client told us: “I was intimidated at first, but once I understood the sleeper system, it was just methodical work.”
Professional installation becomes worthwhile for larger or complex porches, when you find structural concerns with existing concrete, or when you want custom features like built-in seating or storage. Time constraints and physical limitations are perfectly valid reasons to call professionals too.
Professional installation costs based on internet data range from $2,000-$7,500, with high-end custom work reaching $15,000-$25,000 or more. This wide range reflects material choices, regional labor costs, and project complexity.
At OutdoorX, we regularly work with homeowners who started DIY projects but want professional finishing touches or encountered unexpected challenges. Sometimes the best approach combines DIY preparation work with professional installation and finishing.
Frequently Asked Questions about Replacing Concrete Porch with Wood
Is it better to remove the concrete or build over it?
Building over your existing concrete is almost always the smarter choice – and we say this from years of experience helping homeowners in Essex County transform their porches. The concrete becomes your foundation, saving you thousands in excavation and footings while delivering excellent results.
Think about it this way: you already have a perfectly stable, level base that’s been supporting your porch for years. Why tear it out when you can work with it? One experienced DIYer put it perfectly: “If I were doing it myself, I’d leave the existing stoop and build over it” – and that wisdom rings true for most projects.
The math is compelling too. Concrete removal can cost $2-6 per square foot just for demolition, plus disposal fees and the time to rebuild proper foundations. Building over the existing slab typically adds just $1-2 per square foot in materials for sleepers and spacers.
Consider removal only when you’re facing serious problems – like major settling, extensive cracking that goes through the full thickness, or when you need to dramatically change the porch size or shape.
Do I need a permit if my new porch is low to the ground?
The 18-inch rule is your friend when replacing concrete porch with wood. Most building codes treat structures under 18 inches high without railings as patios rather than decks, which means no permit headaches and fewer structural requirements.
This works beautifully for concrete overlays because you’re typically adding just 3-4 inches of height with sleepers and decking. Your finished surface usually stays well under the 18-inch threshold, keeping the project simple and permit-free.
But here’s the important part – always make that quick call to your local building department. Regulations can vary significantly even within Essex County, and some towns have stricter rules. The five-minute phone call could save you major headaches later.
What are common mistakes to avoid?
Moisture management mistakes top our list of problems we see when homeowners tackle replacing concrete porch with wood projects. Skipping the PVC spacers under sleepers, forgetting joist tape, or using regular lumber instead of ground-contact rated material leads to rot within just a few years.
We’ve seen beautiful porches fail because someone saved $20 on proper flashing. Always lift those sleepers off the concrete, use moisture barriers religiously, and maintain proper drainage gaps. Water is wood’s biggest enemy, and concrete naturally holds moisture – you need every advantage you can get.
Fastener failures are another heartbreaker. Using regular wood screws instead of masonry fasteners means your sleepers will work loose over time. Standard screws corrode rapidly when used with pressure-treated lumber, creating weak connections that eventually fail. Always use ACQ-rated or stainless steel fasteners – they cost a bit more but prevent expensive repairs later.
Height miscalculations create door operation nightmares. Measure the distance from concrete to your door threshold carefully, accounting for sleeper height, decking thickness, and proper clearance.
The good news? These mistakes are all preventable with proper planning and materials. Take time to do it right the first time, and your wood porch will provide decades of enjoyment.
Conclusion
Replacing concrete porch with wood transforms your home’s entrance from cold and uninviting to warm and welcoming. The difference is immediately noticeable – from that first barefoot step on summer mornings to the improved curb appeal that makes neighbors stop and take notice.
Whether you tackle this as a weekend DIY project for porches under 150 square feet or prefer professional installation for more complex designs, you’re creating a space that actually invites you to linger. The investment pays dividends in comfort, aesthetics, and home value for years to come.
Success comes down to three key elements: proper planning that accounts for drainage and local codes, quality materials that can handle our New England weather, and meticulous attention to moisture management. Skip any of these, and you’ll face problems down the road. Get them right, and your wood porch will provide 10-30 years of enjoyment depending on your material choice.
The numbers speak for themselves. While concrete resurfacing might need redoing every 2-3 years, a properly installed wood overlay delivers decades of reliable performance. That’s real value that goes beyond the initial investment.
At OutdoorX, we’re your one-stop design-build partner for stunning wood porches throughout Essex County. Our team handles the entire process – from initial design concepts and permit applications to final installation and ongoing maintenance programs. We understand the unique challenges of our local climate and building codes, ensuring your project succeeds from day one.
We proudly serve homeowners across Andover, Beverly, Boxford, Danvers, Essex, Georgetown, Gloucester, Ipswich, Lynnfield, Manchester-by-the-Sea, Marblehead, Newburyport, North Andover, North Reading, Peabody, Rockport, Rowley, Salem, Swampscott, Topsfield, and Wenham. Each project is custom to your specific needs, preferences, and budget.
Ready to step up your porch game? Contact us for a custom quote and find how we can transform your concrete porch into the warm, inviting entrance your home deserves. Visit our patio designing and installation page to explore more outdoor change possibilities and see how we can bring your vision to life.
