Bluestone walkway installation: 7 Powerful Tips for Stunning Results 2025
Why Bluestone Walkway Installation Creates Lasting Curb Appeal
Bluestone walkway installation involves excavating 6-8 inches deep, creating a stable base with crushed stone and stone dust, then laying and leveling natural bluestone slabs to create a durable pathway. Here’s what you need to know:
Essential Steps for Bluestone Walkway Installation:
- Excavate – Dig 6-8 inches deep, extending 6 inches beyond walkway edges
- Base Layer – Install 3 inches of compacted ¾-inch crushed stone
- Setting Bed – Add 1-1.5 inches of stone dust mixed with water
- Lay Stones – Position bluestone slabs with consistent gaps
- Level & Adjust – Use rubber mallet and check with level
- Fill Joints – Complete with gravel, sand, or moss between stones
Timeline: 1-2 days for average walkway | Cost Range: $25-$75+ per square foot*
Nearly 400 million years ago, ancient mountain ranges created the dense, durable stone that’s now your ideal paving material. Bluestone offers best durability and natural beauty, resisting wear while providing excellent slip resistance.
But bluestone walkway installation isn’t just about laying stones. Proper base preparation determines whether your walkway lasts decades or fails within years. Poor drainage, inadequate compaction, or skipping the setting bed leads to settling, shifting, and costly repairs.

*Average costs based on internet data, not actual OutdoorX LLC pricing.
Bluestone walkway installation terms to know:
What You’ll Learn
In this comprehensive guide, we’ll walk you through every aspect of bluestone walkway installation, from selecting the right stone finish to achieving professional-level results. You’ll find when to tackle this as a DIY project versus hiring professionals, essential safety considerations, and cost-saving strategies.
We recommend DIY installation for homeowners with moderate construction experience and access to proper tools like plate compactors and wet saws. However, projects involving significant grading, drainage issues, or areas with challenging soil conditions benefit from professional expertise.
Safety is paramount – bluestone slabs can weigh 50-100 pounds each, and cutting requires proper dust protection and wet-saw techniques. Always wear safety glasses, dust masks, and work gloves throughout installation.
Bluestone Basics: Benefits, Drawbacks & Design Options
When you’re considering bluestone walkway installation, you’re choosing a material that’s been around for nearly 400 million years. This sedimentary stone formed when ancient mountain ranges eroded, creating the dense, layered structure that makes bluestone so incredibly durable.
What really sets bluestone apart is its stunning rich color variations. You’ll find deep blues, subtle grays, and even soft greens with natural patterns that make each slab unique. No two pieces are exactly alike, which means your walkway will have character that manufactured materials simply can’t match.
The durability factor is where bluestone truly shines. We’re talking about withstanding decades of foot traffic, harsh New England winters, and summer heat without breaking a sweat. The stone’s natural slip-resistance comes from its textured surface, giving you excellent grip even when wet.
Here’s something interesting: bluestone actually absorbs and retains heat, which helps melt snow and ice faster than other materials. Your winter maintenance becomes much easier when Mother Nature gives you a helping hand.
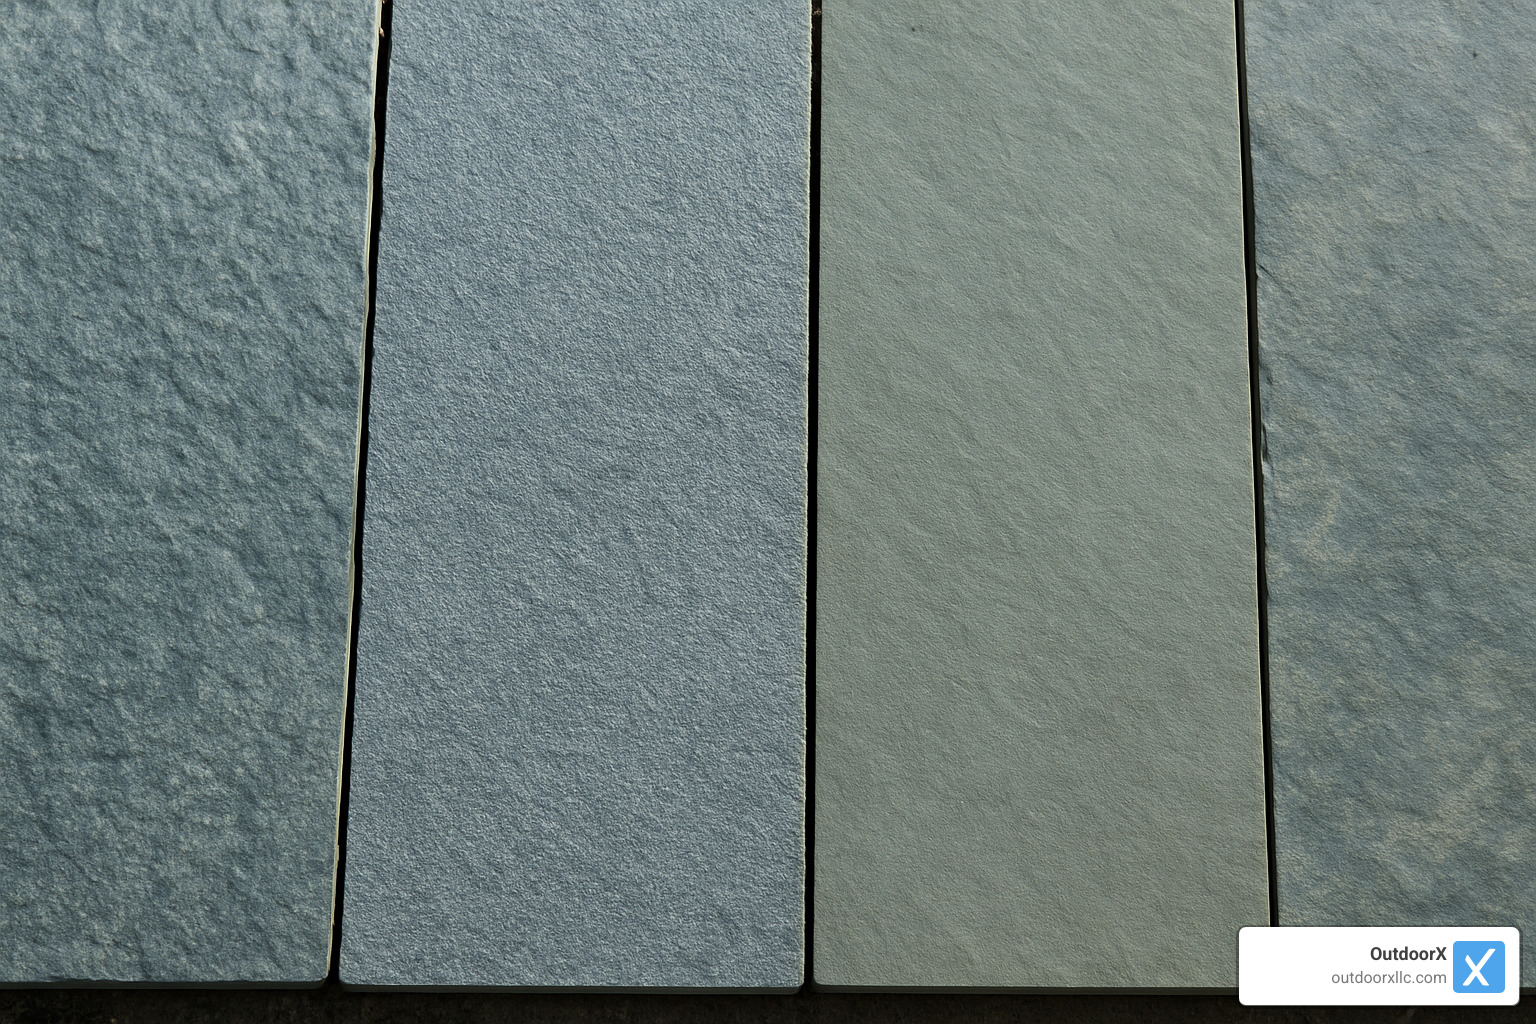
You’ll have three main finish options to choose from. Natural cleft gives you that raw, textured surface straight from the quarry – perfect for traditional or rustic styles. Thermal finishing uses heat treatment to create improved grip and a more uniform appearance, while honed surfaces offer smooth, polished looks for modern home designs.
For pattern options, you can go with a random layout using irregular shapes for that organic, cottage-garden feel. Running bond patterns use rectangular stones in offset rows for more formal appeal, or try stepping stones with grass or gravel between for a casual, natural look.
Now, let’s be honest about the drawbacks. Bluestone isn’t cheap – materials alone run $5-$12 per square foot, and that’s before installation costs. The weight is another consideration; these slabs can be 50-100 pounds each, so proper lifting techniques and equipment are essential. The stone’s natural porosity means you might need sealing in freeze-thaw climates.
Bluestone vs Other Materials
| Material | Initial Cost | Lifespan | Maintenance | Slip Resistance | Aesthetic Appeal |
|---|---|---|---|---|---|
| Bluestone | $25-$75/sq ft | 50+ years | Low-Medium | Excellent | High |
| Concrete | $8-$25/sq ft | 20-30 years | Medium | Poor-Good | Medium |
| Brick | $15-$35/sq ft | 25-40 years | Medium-High | Good | High |
*Average costs based on internet data, not actual OutdoorX LLC pricing.
The longevity comparison really tells the story. While concrete might crack and need replacement within decades, properly installed bluestone walkways can last centuries. Maintenance is surprisingly simple with bluestone. Unlike brick that needs regular repointing or concrete that requires sealing and crack repairs, bluestone mostly needs occasional cleaning and joint maintenance.
Creative Design Ideas to Lift Your Walkway
Modern bluestone walkway installation goes way beyond basic straight paths. Curved walkways create natural flow that feels like water moving through your landscape – much more interesting than rigid lines that fight against nature’s organic patterns.
Gravel accents between stones add wonderful texture while improving drainage. Choose colors that complement your bluestone – charcoal gravel with blue-gray stone creates sophisticated contrast, while lighter gravels brighten the overall look.
For cottage-style gardens, moss joints create magic. Remove soil between stones and press in water-dampened moss for a living carpet effect that gets more beautiful each year.
Lighting integration transforms your path into evening art. Solar LED lights are maintenance-free, while low-voltage systems offer more control. Place lights every 6-8 feet for safety without overdoing the effect.

Edging styles finish the look professionally. Steel edging (3/16-inch thickness) provides clean lines and keeps your base materials contained. Granite cobblestones offer decorative borders that naturally complement bluestone’s color palette.
For expert guidance on hardscape design services, professional consultation can help you avoid costly mistakes and create a walkway that improves your property for decades to come.
Planning & Preparing for Bluestone Walkway Installation
Think of planning your bluestone walkway installation like mapping out a road trip – you wouldn’t just hop in the car and start driving, right? The same careful approach applies here, and spending time upfront saves you from headaches later.
Start by grabbing your measuring tape and walking the route where you envision your new walkway. For comfortable two-person passage, aim for 36-48 inches wide – though you can go narrower for those charming side paths that wind through your garden beds.
Here’s where things get technical, but stick with me. Your walkway needs a gentle slope of ¼-inch per foot away from your house or any structures. This isn’t just a suggestion – it’s what keeps water from pooling and potentially freezing into a skating rink come winter.
Now for the digging part. You’ll need to excavate 6-8 inches deep total, which breaks down to 3 inches for your crushed stone base, plus 1-1.5 inches for the setting bed, plus the thickness of your bluestone slabs. In our New England climate, make sure that base extends below the frost line.
Before you touch a shovel, though, call 811 to mark underground utilities. I can’t stress this enough – even shallow digging can hit gas, electric, or water lines. Nobody wants to explain to their spouse why the neighborhood lost power because of a weekend project gone wrong.
Check with your local building department about permits too. Some towns and homeowner associations have specific requirements for hardscape projects. More info about hardscape design services can help steer these permit requirements if you’re feeling overwhelmed.
Site Assessment for Bluestone Walkway Installation
Walking your property with a critical eye reveals secrets that could make or break your project. Soil type tells the whole story – stick a shovel in the ground and see what comes up. Clay soil holds water like a sponge, which means you’ll need extra drainage measures. Sandy soil drains beautifully but might need deeper excavation for stability.
Once utilities are marked, grab some stakes and mason’s line to outline your walkway. This step feels almost ceremonial – you’re literally drawing the blueprint of your future path. Allow extra width for edging installation, and don’t worry about perfect precision yet.
Gathering Materials & Tools
Shopping for bluestone walkway installation materials feels a bit like preparing for a small construction project – because that’s exactly what it is. Calculate your bluestone needs carefully, then add 10% extra for cuts and the inevitable breakage.
Your base layer needs ¾-inch crushed stone, followed by stone dust for the setting bed. For joints between stones, you can choose gravel for a rustic look, polymeric sand for clean lines, or moss for that cottage garden charm. Don’t forget edging material – steel edging gives crisp, modern lines while stone edging blends naturally with your landscape.
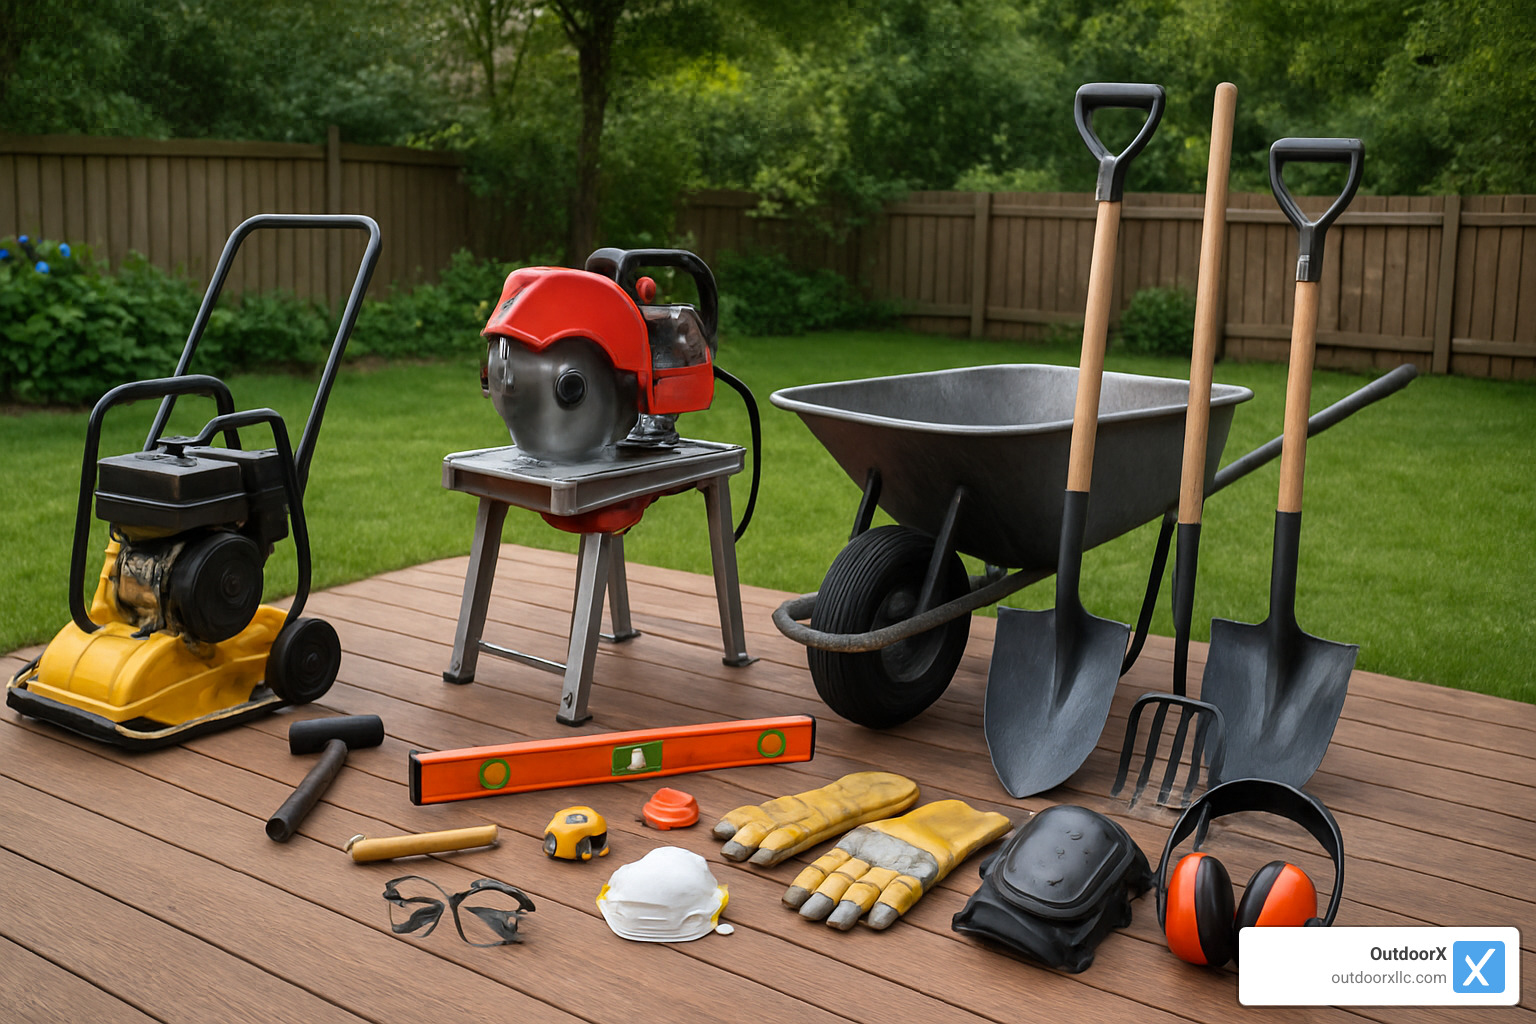
Tool rental becomes your best friend for this project. A plate compactor runs about $60-$80 per day, and you’ll need it for proper base preparation. The wet masonry saw costs $100-$150 daily but makes clean cuts that hand tools simply can’t match.
Your tool arsenal should include a rubber mallet for gentle adjustments, a 4-foot level for checking your work, and plenty of measuring tape and mason’s line. A sturdy wheelbarrow saves your back when moving materials.
Safety gear isn’t negotiable – safety glasses and dust masks protect you during cutting, while work gloves and knee pads make the physical work bearable.
Here’s a pro tip that makes a real difference: rent a plate compactor with a water tank. The water suppresses dust clouds and actually improves compaction effectiveness.
Bluestone Walkway Installation: Step-by-Step Guide
Ready to get your hands dirty? This bluestone walkway installation process might seem intimidating at first, but breaking it down into manageable steps makes it totally doable for most homeowners.
The excavation phase is where your walkway’s future success gets decided. Strip away all grass, weeds, and organic material within your marked area – you want to dig down to clean soil. Your excavation should be 6-8 inches deep and extend 6 inches beyond where your stones will sit.
Here’s the part that separates the pros from the weekend warriors: proper soil compaction. Fire up that plate compactor and make at least three overlapping passes across your excavated area. The soil should feel rock-solid when you’re done – no squishy spots allowed.
Building your base layer comes next, and this is where patience pays off. Spread 3 inches of ¾-inch crushed stone evenly across your excavated space. This “crusher run” material contains just the right mix of stone sizes and dust to lock together when compacted.
Level everything with a garden rake, then bring out the plate compactor again. Add water if your machine has a tank – it helps the stone dust bind and cuts down on clouds of dust. Your base should be so firm that walking on it doesn’t leave footprints.
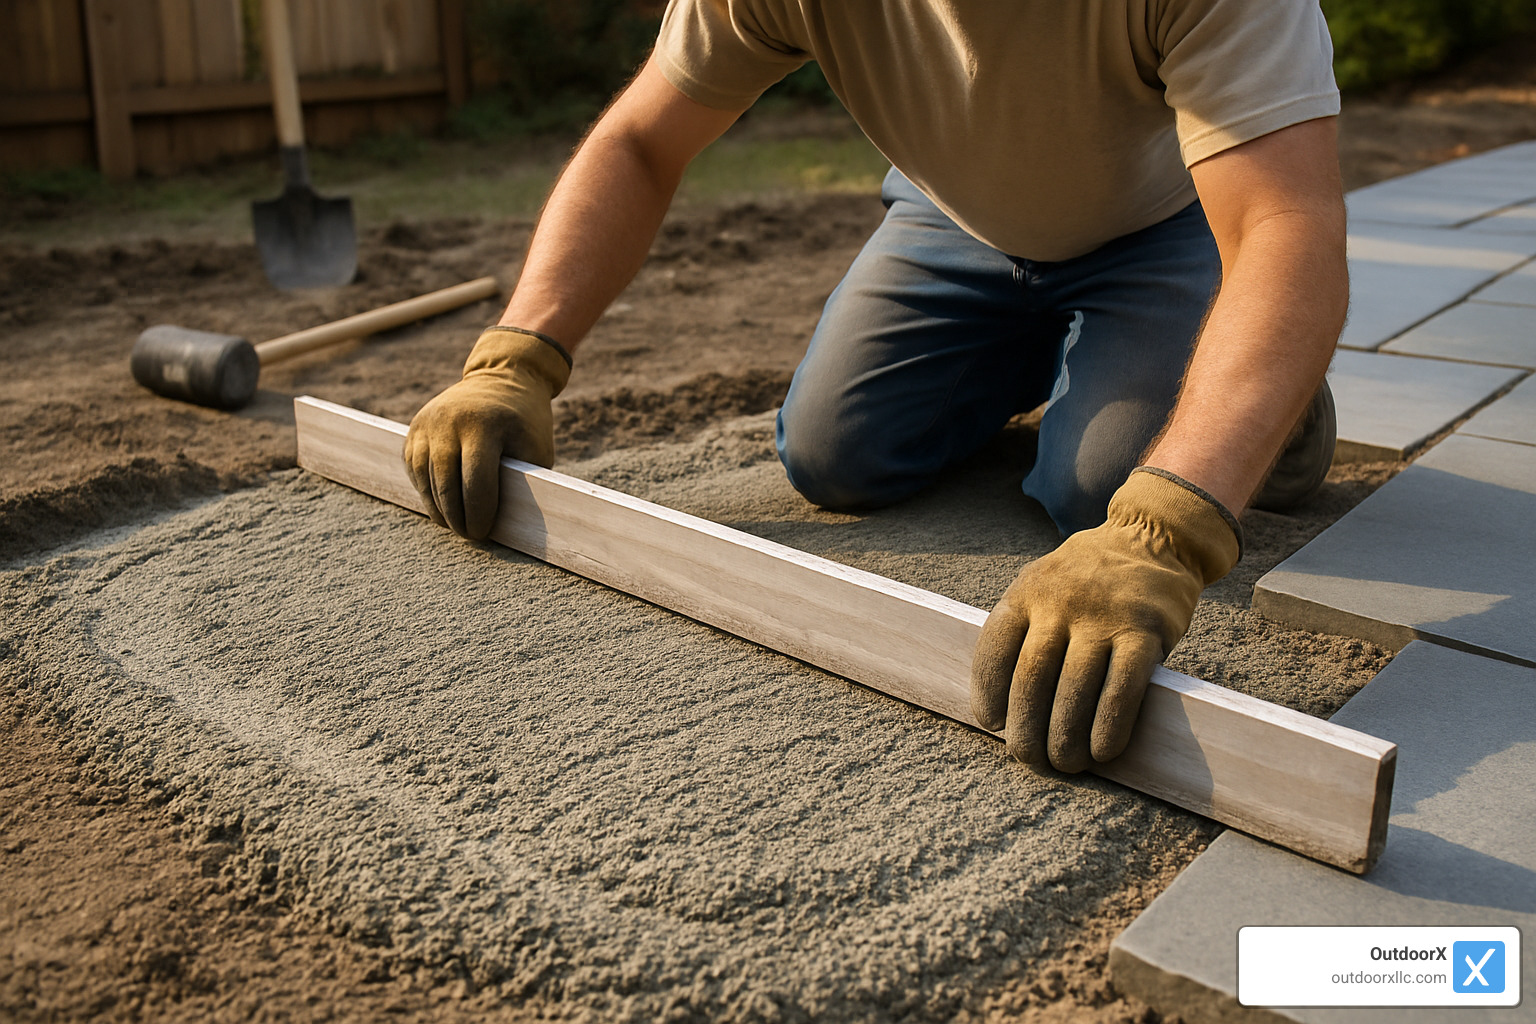
Creating the setting bed requires a bit of chemistry. Mix 7 parts stone dust with 1 part Portland cement, then add water until it feels like damp cookie dough. This semi-rigid mixture gives your stones a stable foundation while allowing just enough flexibility to prevent cracking.
Spread this mixture about 1-1.5 inches thick, then smooth it with a straight board. You want an even surface that follows your planned slope.
Stone layout is like putting together a giant puzzle. Before you set anything permanently, arrange all your bluestone pieces in your desired pattern. Number each stone with chalk and snap a photo – trust me, you’ll thank yourself later.
Start with a full stone at your walkway’s beginning. This becomes your reference point for keeping everything straight and level. Maintain consistent gaps of ¼ to ½ inch between stones – these joints aren’t just for looks, they’re essential for drainage.
Leveling each stone takes patience but isn’t rocket science. Place each piece carefully onto your setting bed, giving it a slight twist to ensure full contact. Your rubber mallet becomes your best friend here – gentle taps to nudge stones level without overdoing it.
Check constantly with your 4-foot level in both directions. Add or remove setting bed material as needed under each stone. Scientific research on dust suppression shows that keeping things damp during this process protects your lungs and makes the work easier.
Cutting stones intimidates many DIYers, but it’s manageable with the right approach. Mark your cut lines clearly with chalk, accounting for joint spacing. Fire up that wet masonry saw and keep water flowing over the blade – this prevents overheating and eliminates dangerous dust clouds.
For thick stones, make multiple passes rather than trying to cut through in one go. Score the stone with ½-inch deep cuts, then gradually deepen them to about three-quarters of the stone’s thickness before breaking it along the line.
Joint filling gives your walkway its finished look. ¾-inch gravel creates permeable joints that need minimal maintenance. Polymeric sand locks together when wet, preventing weeds but requiring more upkeep. Stone dust offers a traditional appearance, while moss creates that charming cottage garden vibe.
Sweep your chosen material into the joints, then mist lightly with water to help everything settle. You’ll probably need to add more material as it compacts – this is totally normal.
Installing edging might seem optional, but it’s what keeps your walkway looking crisp for decades. Place edging about 6 inches from your stone edges to contain all that base material. Steel edging gives clean, modern lines, while granite cobblestones add decorative flair that complements the bluestone beautifully.
Ensuring Proper Drainage & Stability
Drainage isn’t optional – it’s what separates walkways that last decades from those that heave and crack within a few winters. Maintain that ¼-inch per foot slope throughout installation, checking frequently with your level.
Your plate compactor should make at least three passes on each layer, with 6-inch overlaps between passes. Properly compacted material won’t show footprints when you walk on it – that’s your visual test for adequate compaction.
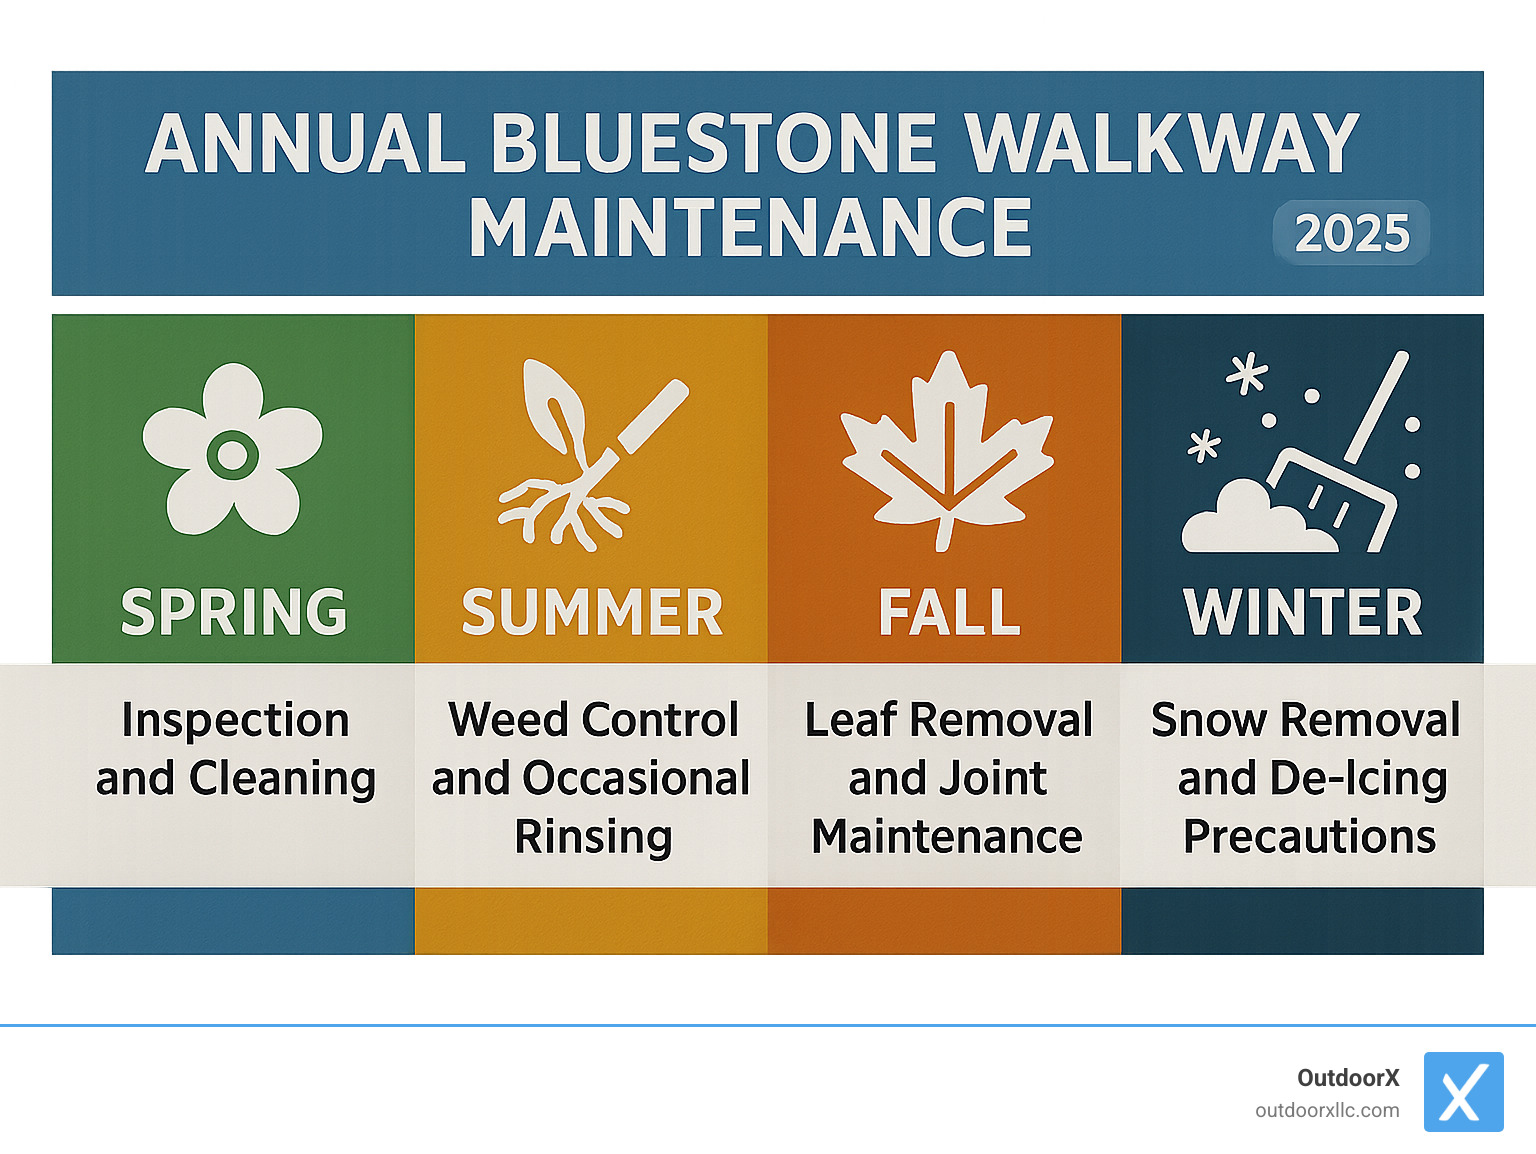
Finishing Touches, Maintenance & Costs
Your bluestone walkway installation doesn’t end when the last stone is set. The right finishing touches and maintenance plan will keep your investment looking stunning for decades to come.
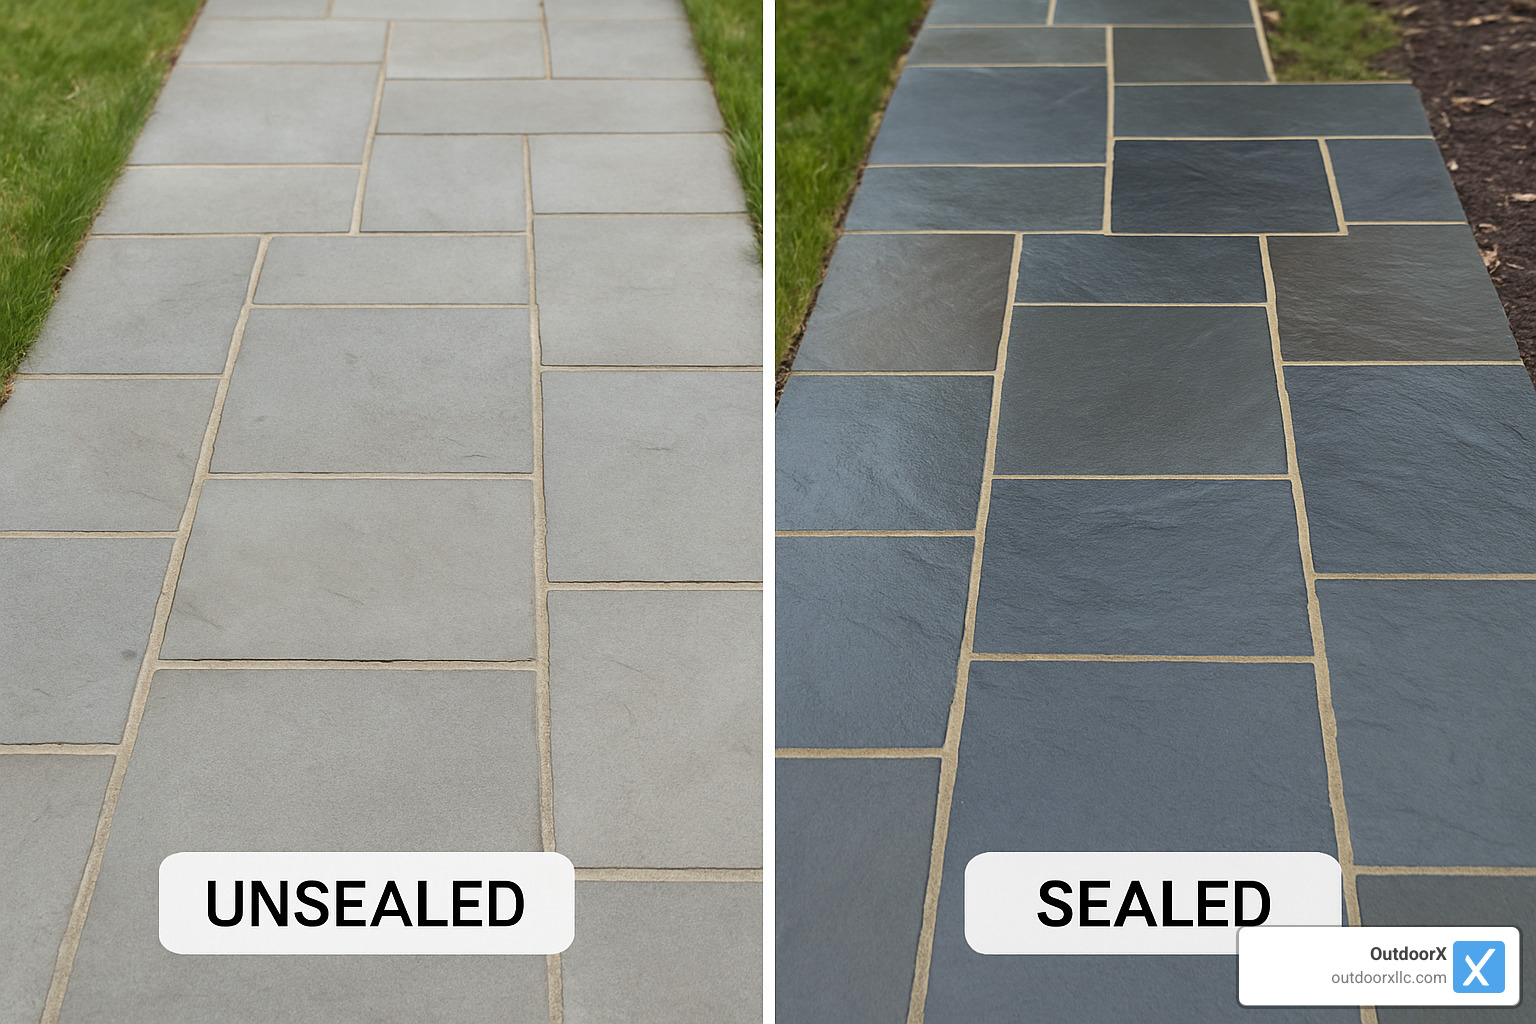
Should you seal your bluestone? It’s one of the most common questions homeowners ask, and the answer depends on your climate and preferences. In New England’s freeze-thaw climate, a quality penetrating sealer offers real protection against moisture damage while enhancing the stone’s natural color depth.
The benefits of sealing include improved stain resistance, reduced freeze-thaw damage, and richer color that makes your walkway pop. However, sealing isn’t without drawbacks – it adds upfront cost, requires reapplication every 2-3 years, and can create an uneven appearance if poorly applied.
If you choose to seal, wait at least 30 days after installation to allow the setting bed to cure completely. Use a penetrating sealer rather than a topical coating, which can create a slippery surface and trap moisture beneath.
Regular maintenance keeps your walkway looking its best with minimal effort. Weekly sweeping removes debris that can stain stones or clog drainage. A monthly rinse with your garden hose prevents buildup of dirt and organic matter.
Seasonal deep cleaning with mild detergent and a soft brush removes stubborn stains and brightens the stone’s appearance. Avoid pressure washers, which can erode joint material and damage the stone surface over time.
Weed control becomes much easier when you’ve used proper joint filling materials. Polymeric sand creates a barrier that prevents most weeds from taking root, while traditional stone dust joints may require occasional hand-weeding.
Winter brings its own challenges, but bluestone handles cold weather beautifully. The stone’s natural heat absorption helps melt snow and ice, reducing slip hazards. When de-icing is necessary, choose calcium chloride or magnesium chloride over rock salt, which can damage both the stone and surrounding vegetation.
Cost considerations often surprise homeowners – both the initial investment and long-term value. Material costs alone range from $8-$20 per square foot, depending on stone grade and finish. Professional installation typically runs $25-$32 per square foot for standard projects, while premium custom work with intricate patterns or challenging site conditions can reach $50-$75+ per square foot.*
DIY installation can reduce costs by 40-60%, but requires significant time investment and proper equipment rental. Factor in tool rental costs – a plate compactor runs $60-$80 per day, while wet saws cost $100-$150 daily.
The most expensive mistakes happen during installation, not after. Inadequate base preparation leads to settling and uneven stones within the first year. Skipping soil compaction creates voids that eventually cause stones to shift or crack. Ignoring drainage requirements results in frost heaving and costly repairs.
Aesthetic upgrades can transform a basic walkway into a landscape feature. Solar path lights improve safety while creating evening ambiance. Strategic plantings along walkway edges provide seasonal color and soften hard edges.
The beauty of bluestone lies in its longevity – while other materials require replacement within decades, properly installed bluestone walkways can last centuries. This makes the initial investment more reasonable when viewed over the walkway’s lifetime.
*Average costs based on internet data, not actual OutdoorX LLC pricing.
Frequently Asked Questions About Bluestone Walkways
Is bluestone walkway installation a DIY-friendly project?
Bluestone walkway installation sits right in that sweet spot where ambitious DIYers can succeed, but it’s definitely not a weekend warrior project. Think of it like building a deck – doable with the right skills, but demanding respect for the process.
The biggest reality check? Those gorgeous bluestone slabs weigh 50-100 pounds each. Your back will remind you of every stone you move, so having a helper isn’t just nice – it’s essential.
You’re probably ready for DIY if you have:
- Previous experience with landscaping or concrete work
- Access to a plate compactor and wet masonry saw (rentals work fine)
- A strong helper who won’t disappear after the first hour
- At least 2-3 full days to complete the project properly
Consider calling the pros when:
- Your yard has drainage issues or significant slope changes
- You’re dealing with clay soil that turns into concrete when dry
- The design involves curves, multiple levels, or intricate patterns
- You’d rather spend your weekend relaxing instead of wrestling with heavy stones
The truth is, bluestone walkway installation rewards patience and precision. Rush the base preparation, and you’ll be fixing settled stones next spring.
What base do I need under bluestone?
Getting the base right is like building a house – everything depends on that foundation. For bluestone walkways that last decades, you need two distinct layers working together perfectly.
Start with 3 inches of compacted ¾-inch crushed stone as your foundation layer. This isn’t regular gravel from the garden center – you want “road bond” or “crusher run” that contains stone dust to help everything bind together when compacted.
Proper compaction requires at least three passes with a plate compactor, overlapping each pass by 6 inches. Add water if your compactor has a tank – it suppresses dust and improves compaction dramatically.
You’ll know it’s properly compacted when you can walk across it without leaving footprints. If you’re sinking into the material, keep compacting.
The second layer is your stone dust setting bed – about 1-1.5 inches of finely crushed stone mixed with just enough water to make it moldable. Some pros add a bit of Portland cement to this mix for extra stability, especially in freeze-thaw climates like ours here in New England.
Should I seal my bluestone walkway?
Sealing bluestone is one of those “it depends” situations that keeps homeowners up at night researching online forums. The honest answer? It’s beneficial but not mandatory – kind of like waxing your car.
Here in New England, where winter throws everything it has at our outdoor spaces, sealing does provide real protection. Quality penetrating sealers soak into the stone’s pores, helping prevent moisture from getting trapped and causing freeze-thaw damage.
Sealing makes sense if you want:
- Improved natural colors that pop, especially when wet
- Protection from leaf stains and organic debris
- Easier cleaning when muddy boots track across your walkway
- Peace of mind during harsh winter weather
Skip the sealer if:
- You love the natural weathered look that develops over time
- Budget is tight (professional sealing runs $2-4 per square foot)
- You don’t mind occasional staining from leaves and debris
- You prefer low-maintenance, set-it-and-forget-it solutions
The catch with sealing? It’s not a one-and-done deal. Most sealers need reapplication every 2-3 years, and poor application can create uneven, blotchy appearance that’s worse than no sealer at all.
Conclusion
A well-executed bluestone walkway installation transforms your front yard from ordinary to extraordinary. This ancient stone, formed 400 million years ago, brings a timeless elegance that makes your neighbors pause and admire. Unlike concrete that cracks or pavers that fade, bluestone actually gets more beautiful with age.
The secret to success lies in the details most people skip. Proper base preparation makes the difference between a walkway that lasts decades and one that starts settling within a year. When you take time to excavate properly, compact thoroughly, and create that perfect stone dust setting bed, you’re building something your grandchildren will still be walking on.
DIY installation can save you thousands – sometimes 40-60% off professional costs. But let’s be honest: moving 100-pound stones and achieving that perfectly level surface isn’t everyone’s idea of a fun weekend. The physical demands alone send many homeowners searching for professional help halfway through the project.
At OutdoorX, we’ve seen it all in Essex County – from ambitious DIY projects that needed rescue to stunning custom installations that become the neighborhood showpiece. Our team understands New England’s challenging climate, from frost heave prevention to proper drainage that keeps your investment protected year-round.
Expert craftsmanship means more than just laying stones. We know which base materials work best in different soil conditions, how to handle tricky drainage issues, and those little finishing touches that separate amateur work from professional results. When you choose quality installation, you’re not just buying a walkway – you’re investing in decades of worry-free curb appeal.
The math is simple: spend wisely now, or spend repeatedly later. A properly installed bluestone walkway adds real value to your home while eliminating the headaches of constant repairs and replacements.
Ready to create your own stunning entrance? More info about hardscaping services can help you explore design options and professional installation. Let’s discuss how we can transform your outdoor space with the lasting beauty and durability that only natural bluestone provides.
Your future self will thank you for choosing quality over shortcuts – and your guests will remember the neat welcome your new walkway provides.
