Base for Paver Walkway: 7 Powerful Tips for Lasting Success 2025
Building Your Paver Walkway Foundation: The Critical First Step
Ever notice how some paver walkways look perfect for years while others start to wobble and shift after just one winter? The difference isn’t luck or magic—it’s all about what you can’t see beneath the surface.
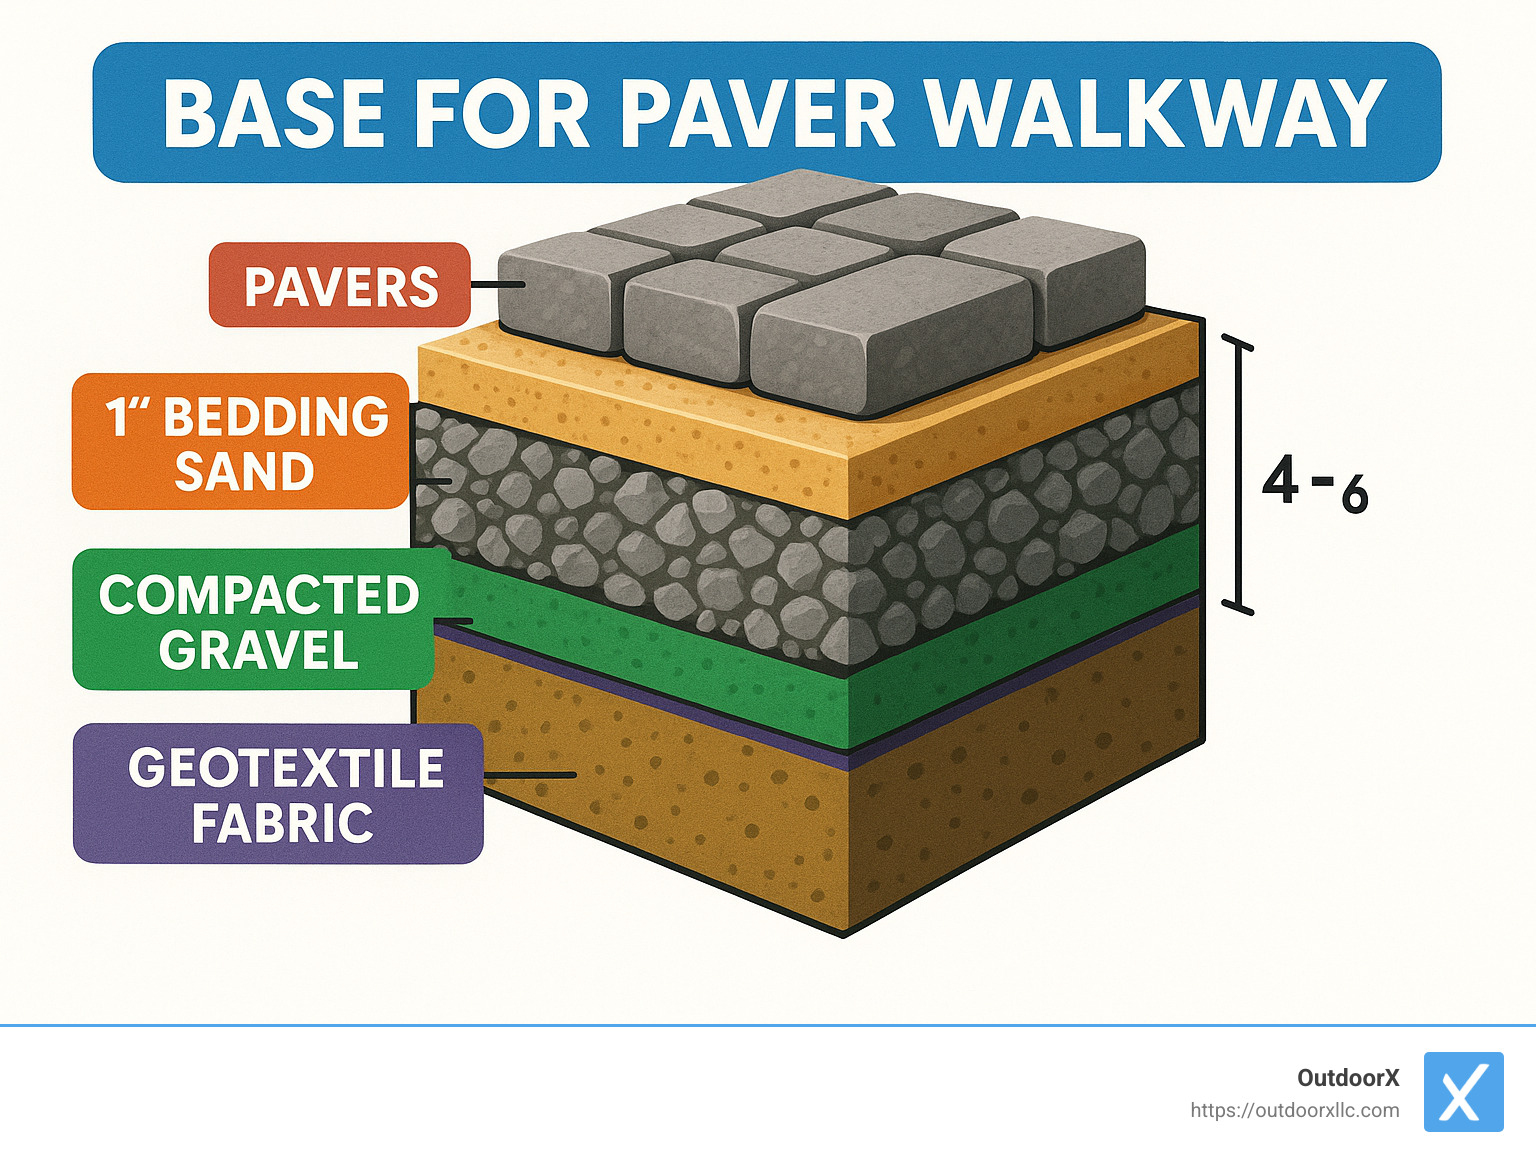
A proper base for paver walkway construction is truly the backbone of your entire project. Think of it as the foundation of your house—skimp here, and you’ll pay for it later. For Massachusetts homeowners, understanding this foundation is especially important given our freeze-thaw cycles.
| Base Component | Recommended Depth | Purpose |
|---|---|---|
| Excavation | 7-10″ total | Provides space for all base materials |
| Gravel/Crushed Stone | 4-6″ (pedestrian), 6-8″ (cold climates) | Stability and drainage |
| Bedding Sand | 1″ | Creates smooth surface for pavers |
| Slope | 1/4″ per foot away from structures | Ensures proper drainage |
I was chatting with one of our veteran installers last week who put it perfectly: “You simply can not have enough base, properly compacted, it’s the foundation that supports the entire project!” After 15 years of installing walkways across Essex County, he’s seen how cutting corners on base preparation leads to callbacks and unhappy homeowners.
When we build a base for paver walkway projects at OutdoorX, we’re not just preparing for today’s weather—we’re building for decades of Massachusetts seasons. A properly constructed base prevents frost heave during our bitter winters, directs water away from your foundation during spring downpours, and provides stability that resists settling when summer heat dries everything out.
For homeowners who’ve already experienced the frustration of wobbly or sunken pavers, the lesson is clear: investing a little more time and resources in proper base preparation pays enormous dividends in durability and appearance. Your walkway shouldn’t just look beautiful on installation day—it should maintain its charm and function for generations.
Why the Base Is the Backbone of Every Walkway
Ever noticed how some walkways start to sink or crack after just a few seasons, while others look perfect for decades? The secret isn’t in those beautiful pavers on top—it’s what’s underneath that counts. A proper base for paver walkway works silently beneath the surface, much like the foundation of your home.
Load Distribution
When you stroll along your walkway, each step creates pressure. A well-built base spreads this weight across a wider area, preventing those annoying dips and wobbles that make walking hazardous. Here in Essex County, where we experience dramatic seasonal changes, this load distribution becomes even more crucial as the ground shifts beneath our feet.
Drainage Management
Water is both a friend and foe to your landscape. Without proper drainage, it becomes the enemy of your walkway’s longevity.
“If you are concerned about water collecting underneath your base rock, you can slope the bottom of your excavation away from the house,” suggests industry experts. This simple technique creates a natural pathway for water to follow, keeping it moving away from both your walkway and home foundation.
Frost Heave Prevention
Massachusetts winters can be brutal, and they’re particularly hard on outdoor hardscaping. When moisture in the soil freezes, it expands upward, potentially pushing your pavers into an unsightly, uneven mess. A deep, properly compacted base gives that expanding frost somewhere to go without disrupting your walkway’s clean lines and level surface.
Weed Suppression
Nothing ruins the pristine look of a beautiful walkway faster than persistent weeds poking through every crack. A properly installed base, especially when paired with quality geotextile fabric, creates an environment where weeds struggle to establish themselves. This means less time pulling weeds and more time enjoying your outdoor space.
Extended Lifespan
The numbers tell the story: a professionally installed paver walkway with proper base preparation typically lasts 25-30 years (sometimes much longer). Cut corners on the base, and you might be looking at repairs within just 2-5 years. That initial investment in quality materials and proper techniques isn’t just about immediate aesthetics—it’s about protecting your long-term investment.
“Most important for drainage is the surface slope of the walkway away from the house with a continued surface slope of the lawn going away further,” notes a hardscaping professional. This comprehensive approach to water management creates multiple layers of protection for your property.
For the latest guidance on proper base preparation techniques and materials, check out this comprehensive guide. The industry continues to evolve, and staying current with best practices ensures your walkway will stand strong through whatever New England weather throws at it.
Picking the Perfect Base Materials for Massachusetts Soil
The soil conditions in Essex County present unique challenges for hardscaping projects. Clay-heavy soils in areas like Danvers and Salem retain moisture, while sandy soils in coastal towns like Gloucester and Manchester-by-the-Sea drain quickly but may lack stability. Selecting the right base materials for your specific location is crucial.
Traditional Gravel Base Materials
The gold standard for base for paver walkway is crushed stone or gravel. Here’s what works best in our region:
When it comes to creating a solid foundation, crusher run (also called “process gravel”) is your best friend. This 3/4″-0 crushed stone mixture contains various sizes from larger pieces down to fine dust. What makes it special? The angular shapes lock together when compacted, creating a rock-solid base that won’t budge under pressure.
For areas with drainage concerns, ASTM #57 stone is worth considering. This clean, uniformly-sized crushed stone allows water to flow through easily, making it perfect for permeable paver systems or those tricky spots where water tends to pool.
Your final layer before the pavers—the bedding—requires concrete sand. This coarse material creates that smooth, level surface that makes installing your pavers a breeze. Think of it as the perfect cushion between your compacted base and beautiful pavers.
Bill Bencker from Ace Avant Concrete Construction offers this practical advice: “Round stones or pea gravel don’t interlock like crushed stone. Even though they might look similar, the round shape doesn’t provide a solid base because they don’t compact well. Over time, they’ll shift and settle, causing the surface to become uneven.”
Alternative Base Options
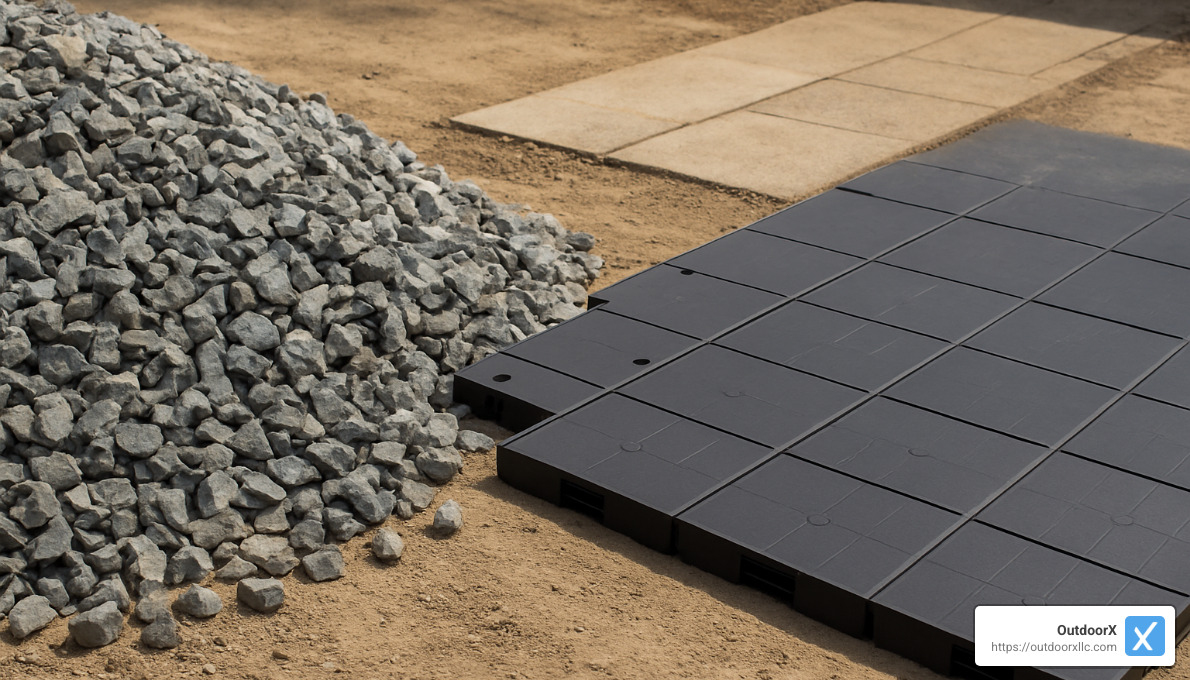
Sometimes traditional isn’t always the answer, especially in areas with space constraints or challenging access. That’s where alternative base systems come into play.
Open-graded base materials consist of clean, washed stone with uniform sizing and no fine particles. Think of it as the premium drainage solution. This option shines in areas with high water tables or where frost heave is a major concern. The consistent stone size creates plenty of voids for water to flow through, and it requires less compaction than traditional bases. For many Massachusetts homeowners dealing with wet spring conditions, this can be a game-changer.
Synthetic base panels have been gaining popularity, especially among DIY enthusiasts. Made from recycled plastic with clever interlocking edges, these panels can significantly reduce your excavation depth—typically to just 3-4″ total. This means less digging, faster installation, and consistent performance. For that narrow side yard walkway or small patio project, synthetic panels might be just what you need.
However, these panels do come with a higher upfront cost and aren’t ideal for areas that will see heavy vehicle traffic. They’re perfect for pedestrian walkways but might not hold up under your SUV in a driveway application.
Comparative Analysis of Base Options
| Base Type | Pros | Cons | Best For | Cost Range* |
|---|---|---|---|---|
| Dense-Graded (Sand-Set) | Proven durability, traditional approach, cost-effective | Labor-intensive, requires proper compaction equipment | All applications, especially vehicular | $4-12/sq ft |
| Open-Graded | Excellent drainage, reduced frost heave, easier installation | Higher material cost, requires edge restraints | Poor-draining areas, permeable systems | $5-15/sq ft |
| Synthetic Panels | Reduced excavation, faster installation, DIY-friendly | Higher upfront cost, limited load capacity | Pedestrian walkways, space-constrained areas | $6-18/sq ft |
*Cost ranges reflect internet data for materials and do not represent OutdoorX’s pricing. Actual costs may vary based on project specifics.
The right base for paver walkway depends on your specific soil conditions, budget, and project goals. Not sure which is best for your Massachusetts home? Check out Unilock’s latest guide to proper base prep for more detailed information, or reach out to our team for personalized recommendations custom to your Essex County property.
Step-By-Step Preparation: Building the Base for Paver Walkway
Creating a rock-solid base for paver walkway doesn’t happen by accident. It’s a methodical process that pays enormous dividends in the long run. Let’s walk through how the pros do it:
1. Plan and Mark Your Layout
Before the first shovel hits the dirt, proper planning saves countless headaches. Grab some stakes and string to outline where your walkway will go. Make your outline about 6 inches wider than the finished walkway on all sides—this extra space accommodates your base extension and edge restraints.
Safety first! Always call 811 before digging anywhere in Massachusetts. This free service marks underground utilities so you don’t accidentally cut into gas, electric, or water lines. Use white marking paint for your layout since other colors are reserved for utility marking.
2. Excavate to the Proper Depth
Now comes the real work. Remove all grass, topsoil, and debris from your marked area. Dig to the appropriate depth (we’ll cover exactly how deep in the next section), making sure the bottom of your excavation slopes gently away from your home or other structures.
“If you lay a strong base, installing pavers is easy,” as experienced installers often say. This couldn’t be more true. The time you invest in proper excavation pays off in the decades of trouble-free enjoyment you’ll get from your walkway.
3. Prepare the Subgrade
Think of the subgrade as the foundation for your foundation. Take time to inspect the soil at the bottom of your excavation. Remove any soft spots and fill them with material that can be compacted properly. Then use a plate compactor to firm up the native soil. For clay-heavy areas in Essex County, this is where you’d lay down geotextile fabric (more on that shortly).
4. Install and Compact the Base Material
This is where patience really matters. Rather than dumping all your crushed stone in at once, spread it in layers (called “lifts”) of 3-4 inches. Lightly dampen each layer with water if the material is dry—this helps it compact more effectively. Then run your plate compactor over each lift before adding the next.
Keep checking your slope during this process. A proper base for paver walkway should maintain that critical 1/4″ per foot slope away from structures. When you’re finished, the surface should be within 1/8″ of your desired grade—precision matters!
5. Add the Bedding Layer
Now for some finesse work. Place 1″ PVC pipes across your compacted base as screeding guides. Spread concrete sand between these pipes, then use a straight board to screed (level) the sand by pulling it across the pipes with a sawing motion. Once the sand is level, carefully remove the pipes and fill those spaces with additional sand.
Important: Don’t compact this bedding sand! It needs to remain loose to allow the pavers to nestle in properly.
6. Install Edge Restraints
Edge restraints are the unsung heroes that keep your pavers from spreading outward over time. Place them along the perimeter of your prepared area, securing them with 10-12″ spikes every foot or so. These restraints should sit flush with your planned paver height.
7. Lay Pavers and Add Joint Sand
With your base for paver walkway properly prepared, you can finally lay your pavers in your chosen pattern. Cut pavers as needed using a masonry saw (wear appropriate safety gear!). Once all pavers are in place, sweep polymeric sand into the joints, compact the surface with a rubber-matted plate compactor, add more sand as needed, and mist according to the manufacturer’s instructions.
How Deep Should the Base for Paver Walkway Be?
The depth of your base depends on several factors, and getting it right is crucial for long-term performance:
For Pedestrian Walkways in Standard Conditions:
Your total excavation should be about 7-8 inches deep, with 4-6 inches dedicated to your crushed stone base, 1 inch for bedding sand, and 2-3 inches for the pavers themselves.
For Cold Climate Areas (Like Massachusetts):
Our New England winters demand more protection. Go deeper with a 9-10 inch excavation, allowing for 6-8 inches of base material. As one local hardscaping expert explains, “In cold climates with frost, a deeper base provides both drainage and frost protection.” This extra depth gives frost heave somewhere to go without disturbing your walkway.
For Poor Soil Conditions:
If you’re dealing with problematic soil (common in parts of Essex County), you’ll want to dig even deeper—11-13 inches total, with 8-10 inches of base material.
Based on internet data, the materials for a properly constructed base for a 100 square foot walkway typically costs between $400-$1,200, depending on material quality and site conditions. This investment protects the much larger investment of the entire walkway.
Always remember to slope the bottom of your excavation away from structures. This subsurface slope provides additional insurance against water pooling beneath your walkway.
Should Geotextile Fabric Go Under the Base for Paver Walkway?
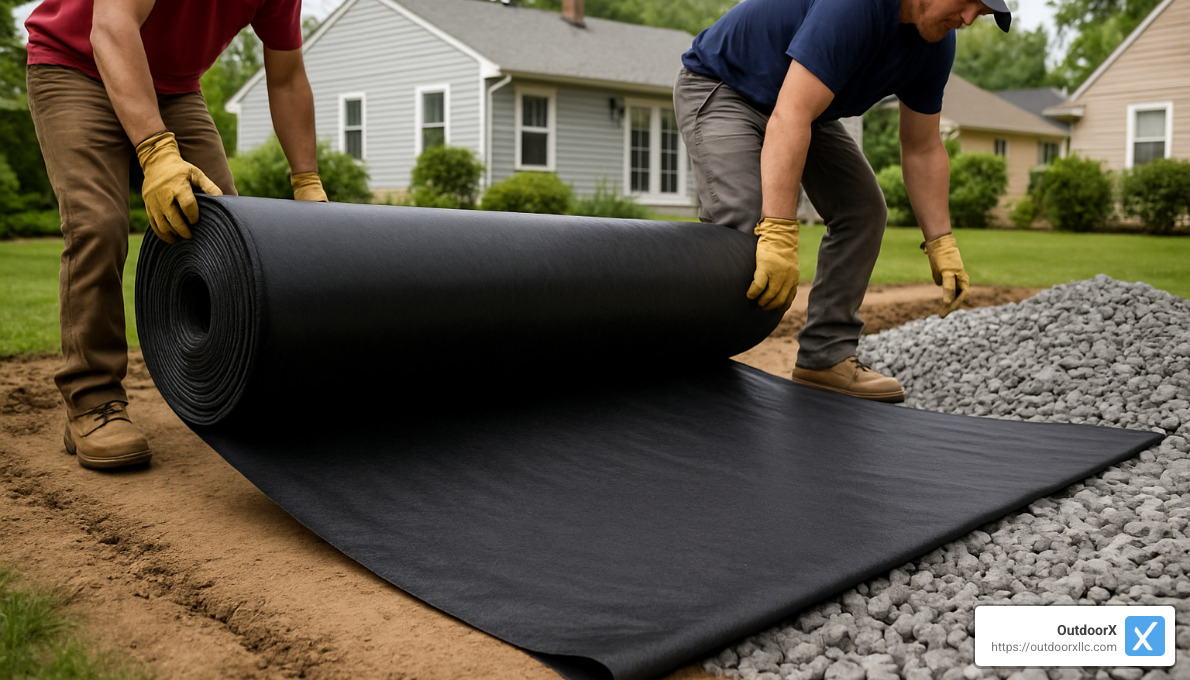
Geotextile fabric is one of those items that seems optional but can make a world of difference. It’s particularly valuable in these situations:
Clay Soils: Common in many parts of Essex County, clay tends to mix with your base material over time. Fabric creates a clear separation.
Poor Drainage Areas: If your yard tends to hold water, fabric helps maintain the integrity of your base layers.
Weed-Prone Areas: While no solution is perfect, fabric provides an additional barrier against persistent vegetation.
Wet Sites: In areas with high moisture content, fabric helps maintain separation between your base and the native soil.
As one hardscaping professional aptly puts it, “It’s one of those things that you could easily leave out. However, it’s the details that make the difference between a good base and a great base.”
When installing geotextile fabric, lay it directly on your compacted subgrade and extend it up the sides of your excavation. Overlap seams by at least 12 inches and avoid wrinkles that could create uneven spots. In windy conditions, secure the fabric with landscape pins until you get your base material on top.
Installing Edge Restraints & Screeding the Bedding Layer
These final preparation steps make the difference between amateur and professional results:
For edge restraints, position your plastic or metal edging along the perimeter of your prepared base. Secure it with 10-12″ spikes every 12 inches, ensuring the restraints sit at the correct height for your pavers. For curved sections, use flexible edging designed specifically for curves.
The 3-4-5 method is invaluable for ensuring square corners in your layout. Measure 3 feet along one side from the corner and 4 feet along the adjacent side. If your corner is perfectly square, the diagonal between these points will measure exactly 5 feet. If not, adjust until the measurements are correct.
When screeding your bedding layer, set up 1″ diameter PVC pipes as rails on your compacted base. Spread concrete sand between the pipes and use a straight 2×4 board to level the sand with a sawing motion. After removing the pipes, carefully fill those voids with additional sand.
When it’s time for polymeric sand, follow the manufacturer’s instructions precisely. Typically, you’ll sweep it into all joints, compact the surface with a rubber-padded plate compactor, add more sand as needed, and mist with water according to directions. Allow 24 hours of curing time before using your new walkway.
For professional hardscaping services that save you time and ensure lasting quality, visit our hardscaping services page to learn how OutdoorX can transform your outdoor space.
Compaction, Slope & Drainage Fundamentals
Creating a solid base for paver walkway is like building a three-legged stool—if any one leg fails, the whole thing topples over. Compaction, slope, and drainage work together to ensure your walkway stays beautiful for decades instead of sagging and shifting after just a few seasons.
Compaction Techniques
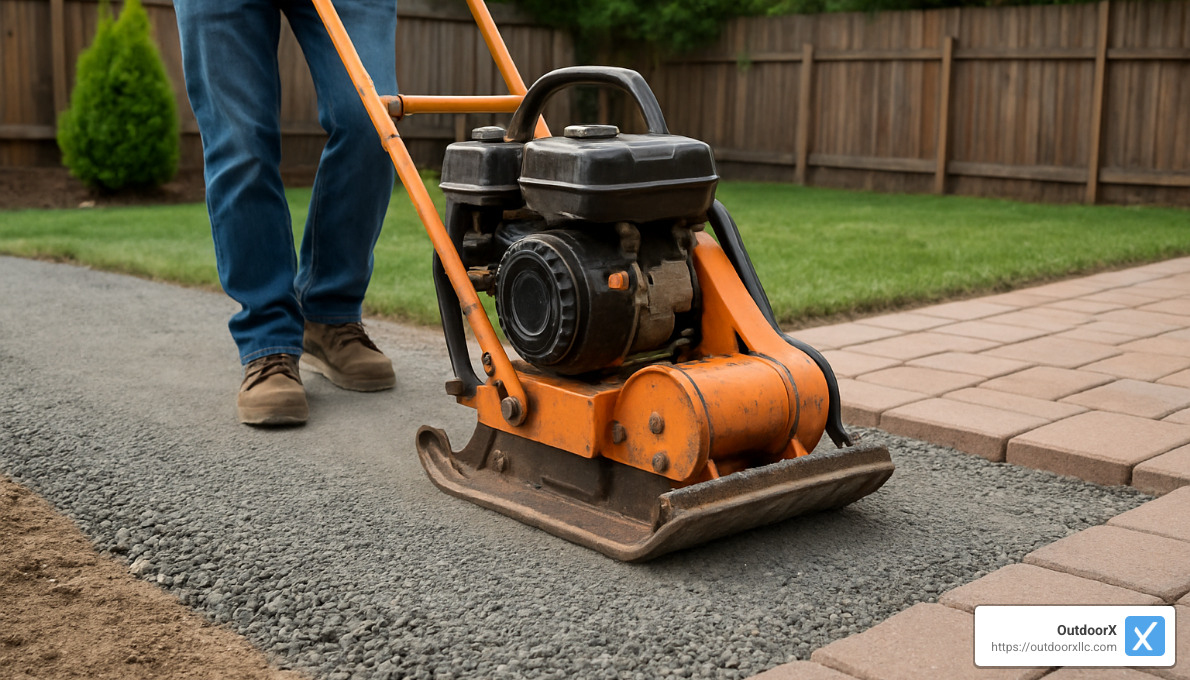
Ask any hardscaping pro what makes or breaks a paver project, and they’ll likely tell you the same thing: “The most important factor in the life of your paver project is the compaction of the base.”
When it comes to equipment, you’ve got options. A hand tamper works fine for tiny projects and tight corners, but for most walkways, you’ll want a plate compactor. For particularly tough or clay-heavy soils, a jumping jack compactor might be your best friend.
Here’s a practical tip we share with our Essex County clients: a plate compactor usually compacts as many inches of gravel as the number of people needed to lift it. So if it takes two people to move your compactor, you should work in 2-inch lifts for best results.
Never try to compact more than 3-4 inches at once—that’s a recipe for a sinking walkway later. If your material seems too dry and isn’t compacting well, lightly mist it with water. And don’t just make one pass—go over each section multiple times in different directions to ensure thorough compaction.
The edges of your walkway deserve special attention since they’ll receive less traffic and are more prone to settling. When you’re done, the surface should feel solid underfoot with virtually no give.
Slope Requirements
Water is both a friend and enemy to your paver walkway. When properly directed away, it keeps your walkway clean. When allowed to pool, it undermines everything you’ve built. That’s why getting the slope right is non-negotiable.
For walkways in Massachusetts, where freeze-thaw cycles are a fact of life, we recommend a surface slope of 1/4″ per foot (a 2% grade) away from your home or other structures. This gentle pitch is barely noticeable to the eye but makes all the difference in water management.
As a local Essex County landscaper puts it: “Most important for drainage is the surface slope of the walkway away from the house with a continued surface slope of the lawn going away further.” This creates a continuous drainage path that protects both your walkway and your home’s foundation.
Checking your slope doesn’t require fancy equipment. Simply place a 4-foot level on your base with a 1/2-inch spacer under the end closest to your house. When the bubble centers, you’ve achieved a 1/8″ per foot slope. For our recommended 1/4″ per foot, use a 1-inch spacer instead.
Don’t forget about the subsurface slope too. By digging the excavation slightly deeper at the downhill end, you create an additional drainage path beneath your base material.
Drainage Solutions
Even with perfect slope, some sites need extra help with water management. This is especially true in many parts of Essex County, where heavy clay soils and seasonal deluges can challenge even well-built hardscaping.
For walkways adjacent to your home, consider connecting to existing drainage systems. A French drain running alongside your walkway can intercept water before it becomes problematic. In severe cases, we sometimes incorporate drainage pipe directly into the base itself.
The surrounding landscape plays a crucial role too. Make sure the ground around your walkway continues the slope away from both the walkway and your home. For wider walkways, a slight crown (where the center is higher than the edges) helps shed water efficiently.
“If you are concerned about water collecting underneath your base rock, you can slope the bottom of your excavation away from the house,” notes one of our senior installers at OutdoorX. This extra step provides peace of mind, especially for walkways near foundations.
For properties with significant drainage challenges, permeable pavers might be worth considering. These specialized pavers allow water to filter through rather than run off, reducing puddles and easing the burden on your property’s drainage system.
At OutdoorX, we carefully assess each site’s unique drainage needs before beginning installation. Our experience with the varied soil conditions across Essex County helps us anticipate and prevent water-related issues before they start. More info about Landscape Design & Build
Avoiding Pitfalls & Ensuring Long-Term Durability
Let’s be honest—even the most beautiful paver walkway will eventually become an eyesore if you cut corners on the foundation. After installing hundreds of walkways across Essex County, we’ve seen what makes some thrive for decades while others fail in just a few seasons.
Common Mistakes to Avoid
The most frequent mistake homeowners make? Trying to save money in all the wrong places. Using dirt as base material might seem economical, but as one of our senior installers likes to say, “That’s not saving money—that’s just delaying the expense and doubling it.” Soil retains moisture, constantly shifts with temperature changes, and simply cannot provide the stable foundation your pavers need.
Inadequate compaction is another silent killer of paver walkways. You can’t rush this crucial step or try to compact too much at once. We follow the “lift rule” religiously: compact in 3-4″ layers with multiple passes in different directions. The slight vibration you feel under your feet when walking on a properly compacted base tells you it’s ready for the next step.
Here in Massachusetts, where frost heave is a genuine concern, insufficient base depth is particularly problematic. As one contractor bluntly puts it, “You simply can not have enough base, properly compacted.” In our climate, pedestrian walkways need at least 6-8″ of base material—and possibly more in areas with poor soil conditions.
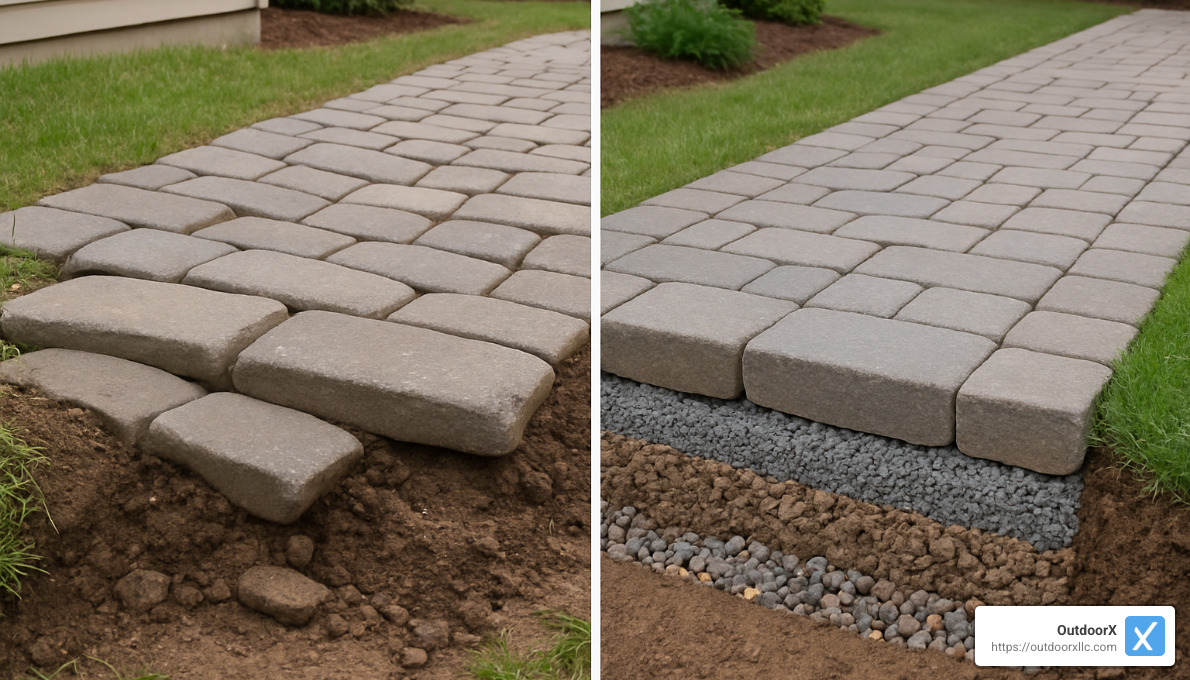
Without proper slope (that critical 1/4″ per foot away from structures), water becomes your enemy rather than simply passing through. Water pooling on or beneath your walkway leads to erosion, settling, and potentially serious foundation issues for adjacent buildings. The image above clearly shows the difference between properly and improperly prepared bases.
While it might seem like an unnecessary expense, skipping geotextile fabric is rarely a good idea, especially in our clay-heavy Essex County soils. This thin layer provides significant benefits for a minimal cost increase. Think of it as insurance for your walkway’s foundation—you hope you don’t need it, but you’ll be glad it’s there.
Ensuring Long-Term Durability
Proper joint sand maintenance isn’t complicated, but it’s often overlooked. Even the best polymeric sand isn’t permanent. We recommend inspecting the joints annually, especially after winter, and topping up as needed every 3-5 years. This simple maintenance step can dramatically extend your walkway’s lifespan.
Massachusetts weather puts unique stresses on hardscaping. Seasonal inspection helps catch small issues before they become costly repairs. After winter, look for any heaved or settled areas. Following heavy rains, check that water is draining properly away from the walkway. Small adjustments made early can prevent major headaches later.
While not required, sealing your pavers provides multiple benefits: improved color, stain resistance, and stabilized joint sand. Most sealants need reapplication every 3-5 years, but the protection and visual appeal they provide make this maintenance well worth considering.
Over time, you might notice slight settling in certain areas. Don’t panic—this is normal and usually easily fixed with re-tamping. Simply remove the affected pavers, add and compact additional base material, adjust the bedding sand, and reinstall. It’s a straightforward fix that can restore your walkway’s smooth, even surface.
Limitations of Synthetic Base Panels
While we’ve discussed synthetic base panels as an option, they’re not a universal solution. They work wonderfully for certain applications but have important limitations to consider. They generally aren’t suitable for vehicular traffic, may have reduced load-bearing capacity compared to traditional gravel bases, and typically come with a higher initial cost.
The traditional crushed stone base for paver walkway installations has decades of proven performance in our challenging New England climate. At OutdoorX, we carefully evaluate each project’s specific requirements before recommending the most appropriate base system for your needs, soil conditions, and budget.
The extra attention to these details might seem excessive, but it’s precisely this care that distinguishes a walkway that lasts for decades from one that needs repairs after just a few seasons. As we like to tell our clients: “Do it right the first time, and you’ll only have to do it once.”
Frequently Asked Questions about Paver Bases
What slope keeps water away from my foundation?
Water management is crucial for protecting your home’s foundation, and the right slope makes all the difference. Professional hardscapers recommend a slope of 1/4″ per foot (a 2% grade) to effectively direct water away from your foundation.
What does this look like in practice? For a standard 4-foot wide walkway running alongside your home, you’d want the surface to drop about 1 inch from the house side to the outer edge. This gentle slope works wonders for water management while remaining virtually unnoticeable to the naked eye.
“Most important for drainage is the surface slope of the walkway away from the house with a continued surface slope of the lawn going away further,” as one hardscaping expert puts it. This comprehensive approach ensures water continues its journey away from your foundation rather than pooling where it could cause damage.
For homes in Essex County where we often face heavy New England rains, we recommend taking extra precautions, especially if you have clay soil or known drainage issues. Consider sloping both the surface and the bottom of your excavation, ensuring your surrounding landscape maintains the drainage pattern, and adding French drains in particularly problematic areas.
Are synthetic base panels really as strong as gravel?
When it comes to strength, traditional gravel bases and newer synthetic panels serve different purposes with their own sets of advantages.
A conventional 6-8″ gravel base for paver walkway offers excellent load distribution and has decades of proven performance behind it. Synthetic panels, while innovative and increasingly popular, generally work best for pedestrian applications and have limitations when it comes to supporting vehicles.
For your typical family walkway that sees daily foot traffic, properly installed synthetic panels provide adequate support. However, if there’s any chance vehicles might occasionally cross the walkway (even for temporary parking), a traditional gravel base remains your best bet.
The real advantages of synthetic panels aren’t necessarily about strength, but rather convenience. They require less digging, speed up installation time significantly, perform consistently across various conditions, and are particularly DIY-friendly for homeowners tackling their own projects.
As one industry professional succinctly puts it: “Synthetic bases are easy to install but have higher upfront cost and lower longevity compared to rock and sand.” For many Essex County homeowners, this tradeoff makes perfect sense for straightforward walkway projects where ease of installation outweighs long-term durability concerns.
How often should I top up polymeric sand?
Polymeric sand isn’t a “set it and forget it” solution – it typically needs some attention every 3-5 years. Several factors influence how quickly your sand might erode or break down, including our Massachusetts freeze-thaw cycles, how much rain we get, the width between your pavers, the quality of the initial application, and how much foot traffic your walkway receives.
You’ll know it’s time for a refresh when you spot visible erosion in the joints, notice weeds popping up between pavers, feel pavers becoming loose or shifting, or spot ants making themselves at home in the joints.
When it’s time to reapply, the process is straightforward but requires attention to detail. Start by thoroughly cleaning existing joints with a pressure washer or leaf blower. Let everything dry completely – this is crucial for proper adhesion. Apply fresh polymeric sand according to the manufacturer’s instructions, carefully sweep it into all joints, and be meticulous about removing excess sand from paver surfaces before misting with water and allowing proper curing time.
This simple maintenance task pays big dividends in extending your walkway’s lifespan and keeping it looking fresh. At OutdoorX, we often remind our Essex County clients that small preventative measures like refreshing polymeric sand can prevent much costlier repairs down the road.
Conclusion
Creating a lasting paver walkway begins with understanding that what lies beneath the surface determines its longevity. A proper base for paver walkway isn’t just a technical requirement—it’s an investment in the future enjoyment and value of your outdoor space.
Throughout Essex County, from the coastal communities of Gloucester and Manchester-by-the-Sea to inland towns like Andover and North Reading, our team at OutdoorX has installed countless paver walkways built on solid foundations. We’ve seen how attention to base preparation makes the difference between walkways that become family favorites for decades and those requiring frustrating repairs after just a few seasons.
The process we’ve outlined may seem intensive, but there’s a reason professionals don’t take shortcuts with base preparation. Each step—from careful excavation to proper compaction—serves a critical purpose in creating a system that works harmoniously to support your pavers through New England’s challenging seasons.
When your walkway is built on a properly constructed base, you’ll enjoy benefits that far outweigh the initial investment. Your pavers will remain level and stable through countless freeze-thaw cycles, effectively direct water away from your home’s foundation, resist annoying weed growth, and maintain their beauty with minimal maintenance. Most importantly, you’ll have the peace of mind knowing your walkway is built to provide decades of reliable service.
Whether you’re a dedicated DIYer gathering materials for your weekend project or a homeowner seeking professional installation, remember what experienced contractors consistently emphasize: “You simply cannot have enough base, properly compacted—it’s the foundation that supports the entire project!”
At OutdoorX, we’re passionate about creating outdoor spaces that stand the test of time through proper techniques and quality materials. Our experienced team understands the unique challenges of Massachusetts soil and climate conditions, ensuring your paver walkway will become a lasting, beautiful addition to your landscape.
For a free consultation on your paver walkway project or to learn more about our hardscaping services throughout Essex County, contact us today. We’d be delighted to help you build from the ground up, turning your vision into a walkway that will welcome family and friends for generations to come!
