Building a Rock Fire Pit: 10 Powerful Tips for Success 2025
Why Building a Rock Fire Pit is the Perfect Weekend Project
Building a rock fire pit transforms any backyard into a cozy gathering spot where friends and family can create lasting memories. Whether you’re roasting marshmallows with kids or enjoying evening conversations under the stars, a custom stone fire pit becomes the heart of your outdoor living space.
Quick Answer: Essential Steps for Building a Rock Fire Pit
- Choose location – 10-20 feet from structures, check local codes
- Gather materials – Fire-safe stones (granite/limestone), gravel, sand, optional metal ring
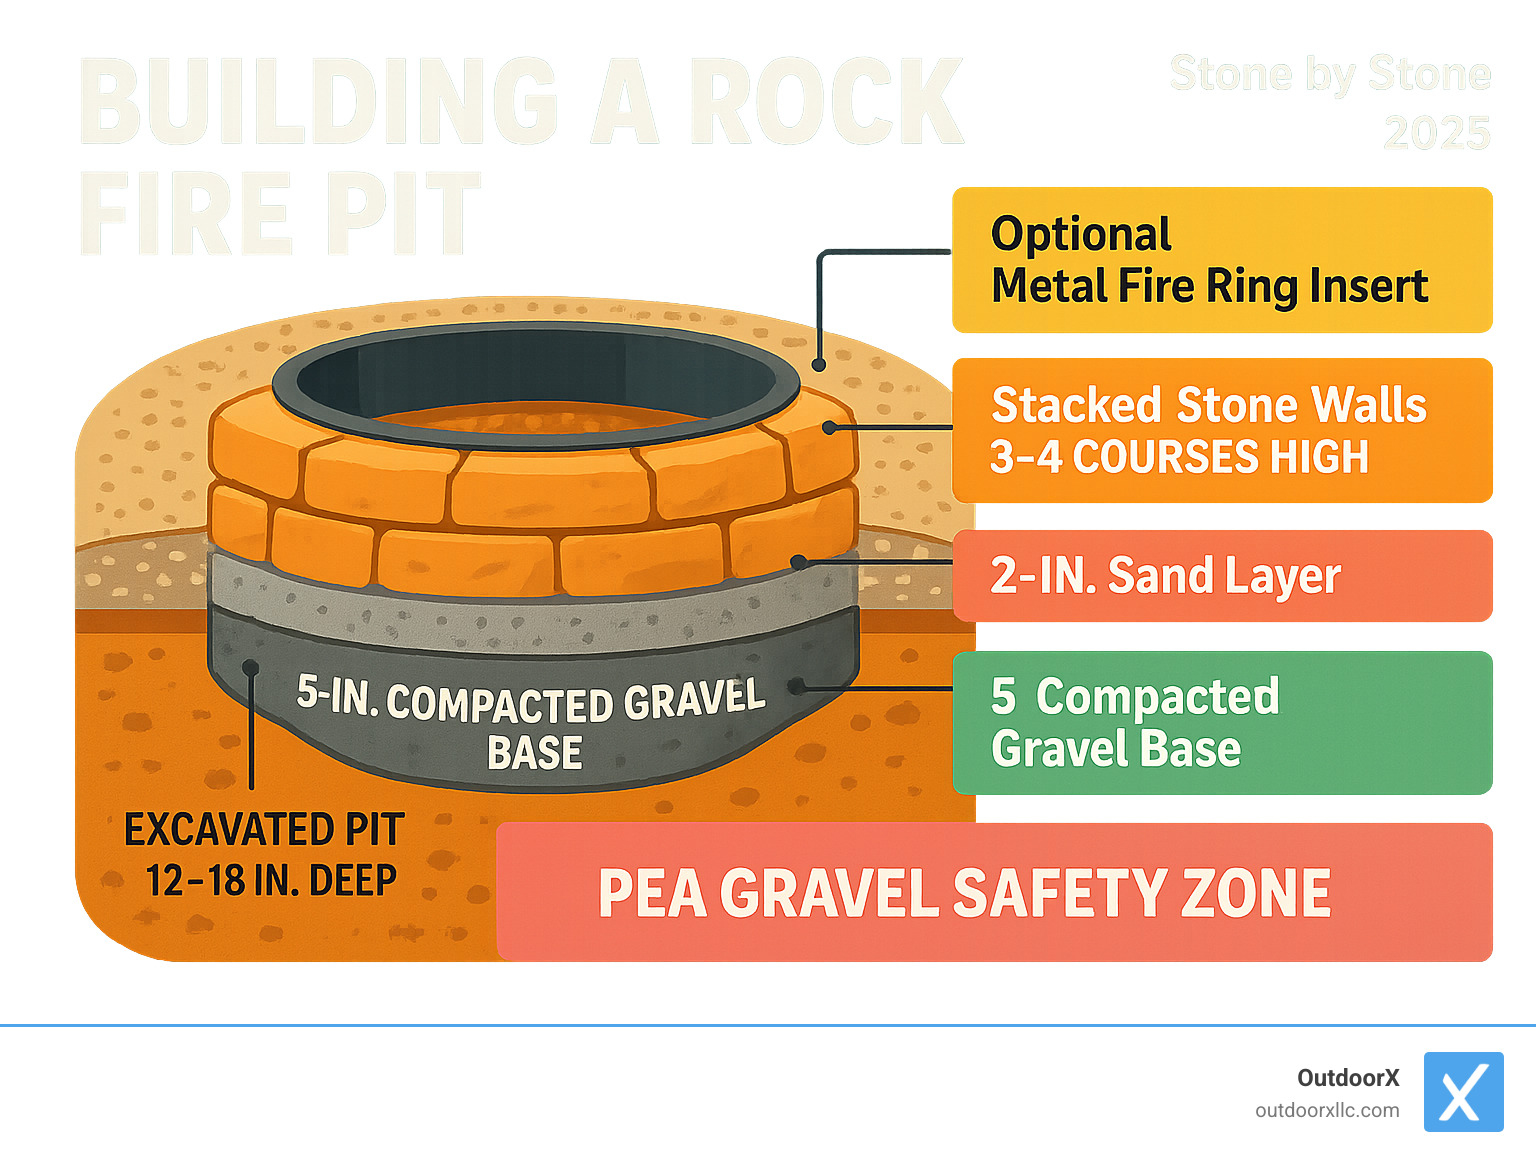
- Dig foundation – 12-18 inches deep, 4-5 feet diameter
- Build base – 5 inches compacted gravel, 2 inches sand
- Stack stones – 3-4 courses high, stagger joints, leave airflow gaps
- Add finishing touches – Seating area, gravel surround, safety features
You can complete this project in just 2-4 hours, making it perfect for a weekend build. A simple limestone fire pit costs as little as $60 using locally sourced materials, compared to $500+ for commercial kits.
“There is simply nothing quite like having a backyard fire pit,” notes one experienced DIY builder. “Stone is forever and more neat than metal rings.”
The process is surprisingly straightforward – even beginners can create professional-looking results with basic tools and careful planning.
Terms related to building a rock fire pit:
Benefits & Pre-Planning Essentials
Building a rock fire pit creates more than just a heat source – it becomes the beating heart of your backyard where memories are made and stories are shared. Your new fire pit will quickly become the social hub where friends naturally gravitate during parties and family members linger long after dinner ends.
The warmth extends your outdoor season well into fall and early spring, giving you months of extra enjoyment from your backyard. Plus, mature landscaping features like fire pits can increase property value by up to 17%.
Before you grab that shovel, essential planning steps separate successful builds from costly mistakes. The most critical first step is calling 811 before any excavation begins. This free service marks underground utilities and prevents potentially dangerous and expensive accidents.
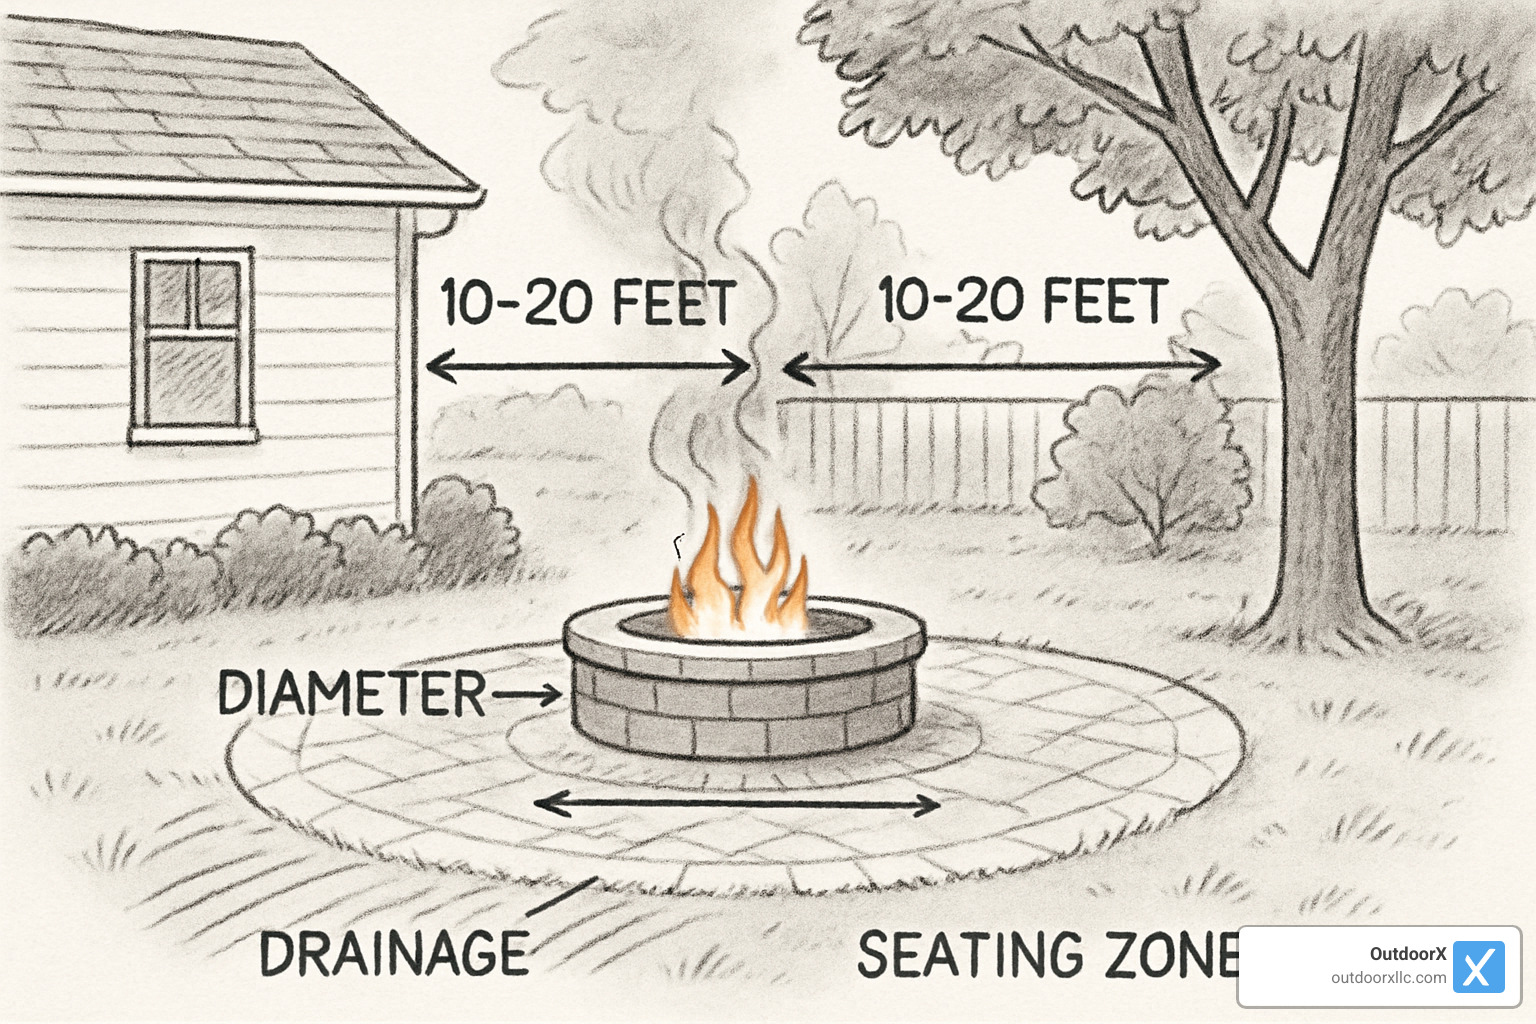
Local building codes typically require fire pits to be positioned at least 10-20 feet from any structure, though some areas demand even greater distances. A quick call to your local building department can save you from having to relocate your entire project later.
Don’t overlook drainage considerations. A fire pit that collects water becomes a mosquito breeding ground and can suffer freeze-thaw damage in colder climates. Choose a site with natural slope away from the pit, or plan to install proper drainage with a gravel sump system.
For professional fire pit installation and design ideas, explore our Outdoor Fire Pits services.
Why a DIY Rock Fire Pit?
A DIY stone fire pit can be built for as little as $60 using locally sourced limestone rock, compared to $500 or more for commercial kits. Most DIY builders spend between $60-$500 depending on materials chosen, while professional installations can range from $300-$1,500 or more.
Beyond cost savings, building your own fire pit offers creative freedom that pre-made kits can’t match. You get to select stones that complement your existing landscape, size the pit perfectly for your space, and add custom features like cooking bars or integrated seating.
Safety & Code Checklist
Call 811 for utility marking – it’s required by law in most areas and absolutely free. Check local fire codes since some areas prohibit open fires during certain seasons or require permits for permanent fire features.
Verify HOA restrictions if you live in a planned community. Contact your insurance company – some policies require notification when you add permanent fire features. Identify burn ban periods in your area, and always maintain proper clearances of 10-20 feet from structures, overhead branches, and property lines.
Choosing Location, Rocks & Tools
Site selection determines both the safety and enjoyment of your fire pit. Choose a location that’s naturally level or requires minimal grading, as this reduces both labor and drainage complications.
Consider prevailing wind patterns when selecting your site. Position the pit so smoke naturally blows away from your house and primary seating areas.
Rock selection is crucial for both safety and durability. The most important rule: never use stones that have been submerged in water, as they can absorb moisture and explode when heated. Granite, limestone, and fire-rated bricks are excellent choices, while river rock should be avoided unless lined with a steel fire ring.
| Material Type | Cost Range | Durability | Heat Resistance | Aesthetic Appeal |
|---|---|---|---|---|
| Limestone | $30-60/ton | Excellent | Very Good | Natural, rustic |
| Granite | $50-100/ton | Excellent | Excellent | Formal, varied colors |
| Fire Brick | $0.50-2.00/brick | Good | Excellent | Uniform, traditional |
| Concrete Blocks | $1-3/block | Good | Fair | Uniform, modern |
For professional hardscaping services including fire pit installation, explore our Hardscaping options.
Picking the Perfect Rocks
Non-porous stones are essential for fire pit construction. Porous rocks can trap moisture and crack or explode when heated. Limestone “D rock” – irregularly shaped quarry stone – offers an excellent balance of affordability and heat resistance at approximately $45 per fire pit.
Local quarry sourcing provides the best value and ensures stones suited to your climate. Fieldstone collected from your own property offers ultimate cost savings and natural integration, though always ensure collected stones haven’t been submerged in water.
Tools & Materials Checklist
Essential Tools:
- Shovel and spade for excavation
- String and rebar for layout
- Spray paint for marking
- Level (4-foot minimum)
- Hand tamper or plate compactor
- Rubber mallet
Materials List:
- Fire-safe stones (limestone, granite, or fire brick)
- Crushed gravel (1/2 ton minimum)
- Sand (1/2 ton)
- Construction adhesive (optional)
- Metal fire ring (optional)
- Pea gravel for surround area
Building a Rock Fire Pit: Step-by-Step Guide
Now comes the exciting part – actually building a rock fire pit from the ground up! This systematic approach ensures you’ll create a safe, durable, and beautiful gathering spot that your family will enjoy for years to come.
Most beginners can complete their fire pit in just 2-4 hours, making it perfect for a weekend build. The key is taking your time with each step, especially the foundation work.
Marking & Digging for building a rock fire pit
Start with the string-and-stake method for a perfectly round pit. Drive a rebar stake into the center of your chosen spot, then tie a string to it. Attach a can of spray paint at your desired radius – typically 2-3 feet for a comfortable 4-6 foot diameter fire pit.
Walk around the stake while keeping the string taut and spray paint to create your circle. Mark both your inner fire pit circle and a wider outer work area since you’ll need room to maneuver.
Dig down 12-18 inches, with deeper being better for drainage. The goal is reaching solid, undisturbed soil that won’t settle over time. In colder climates, that extra depth helps prevent freeze-thaw damage.
Create a drainage sump in the center by digging an additional 2 feet deeper in a small area about the size of a fence post. This central drain prevents water from pooling and gives you a perfect spot for ash disposal later.
Laying the Base for building a rock fire pit
Compact that soil thoroughly using a hand tamper, paying special attention to the edges where your stone walls will sit. Loose soil equals wobbly walls down the road.
Your gravel base needs to be 4-5 inches thick when compacted. Pour in crushed gravel and spread it evenly with a rake. Add a little water to help with compaction, then tamp it down thoroughly. Check your level frequently – an uneven base creates headaches throughout the entire build.
Top everything with 2 inches of sand for fine-tuning. This sand layer lets you make precise adjustments to individual stones and creates that perfectly level surface for your first course.
Stacking & Securing the Walls
Your first course of stones sets the tone for everything above it. Take your time here and use a 4-foot level to check each stone and the overall course.
Stagger your joints between courses just like a brick wall. This overlapping pattern creates incredible strength and prevents your wall from shifting over time. Leave small gaps between stones for airflow – your fires will thank you!
You can choose between dry-stacking or using construction adhesive. Dry-stacking allows for easy future repairs and adjustments, while adhesive provides extra stability.
Install your metal fire ring before the final course if you’re using one. These steel rings protect your stones from direct heat and can extend your fire pit’s life.
Adding Cooking & Fire Management Features
Transform your fire pit into an outdoor kitchen with a removable cooking grate. Standard grill grates work perfectly, or you can get creative with a custom iron-pipe cooking bar.
A spark screen adds safety without killing the ambiance. Choose one that covers the entire pit opening but lifts off easily when you want to add wood.
For detailed technical guidance on proper gravel base construction, check out this helpful Fine Homebuilding gravel base guide.
Seating, Surfacing & Personal Touches
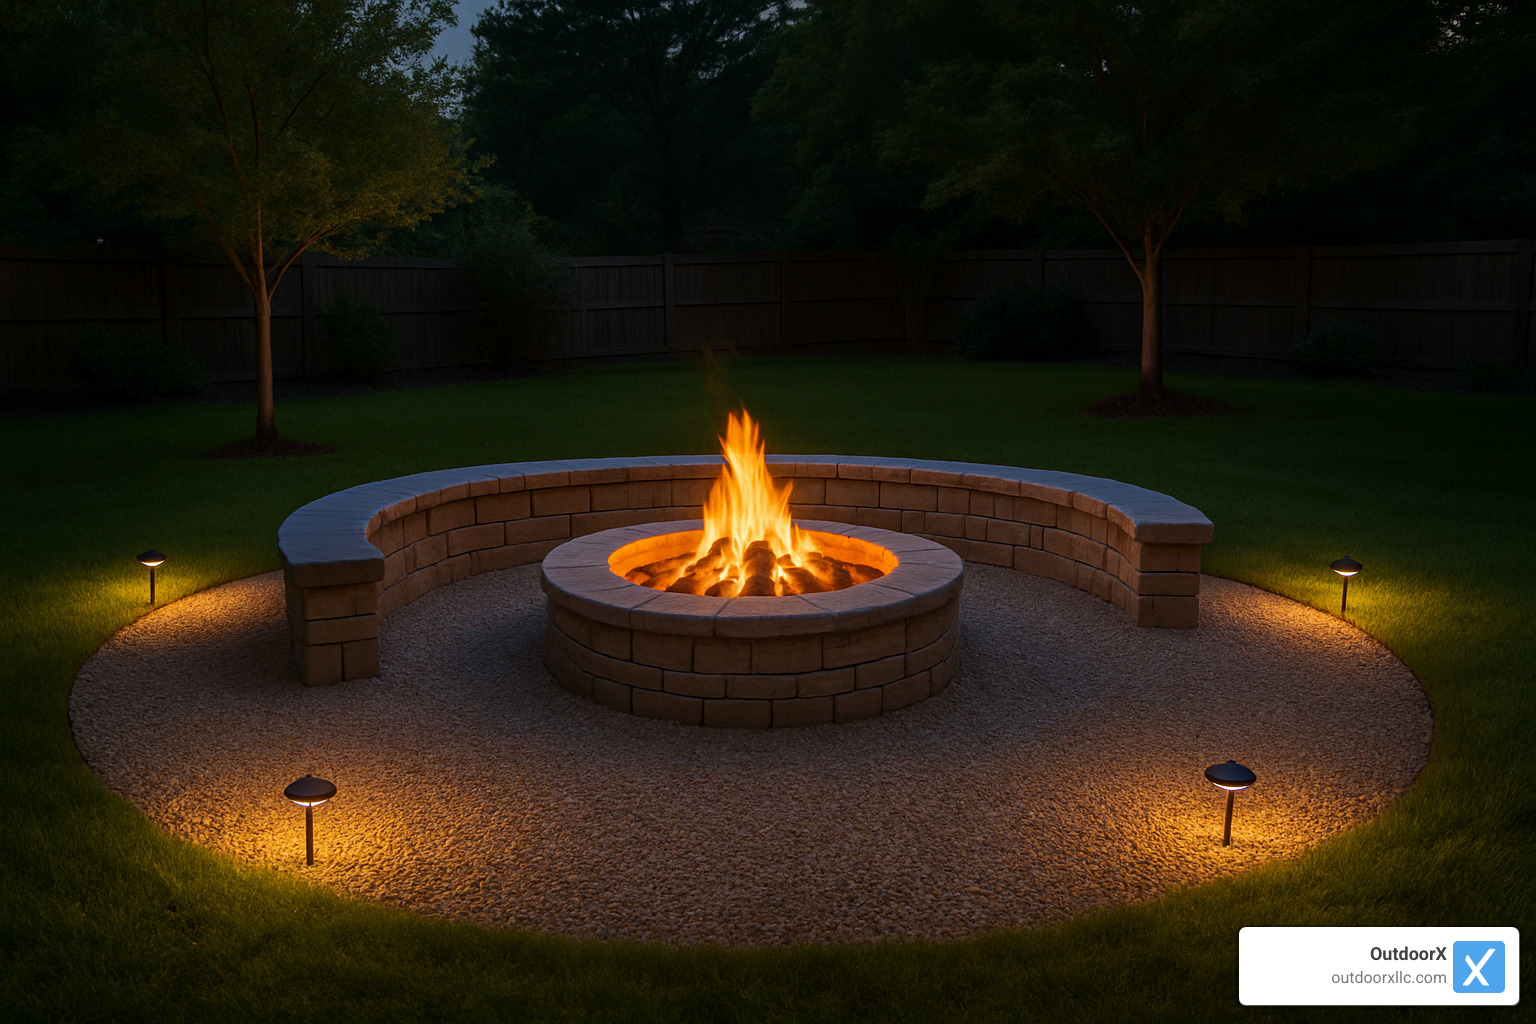
The magic of building a rock fire pit truly comes alive when you create a welcoming space around it. Think of your fire pit as the star of the show – but every star needs a great supporting cast to shine.
Pea gravel makes the perfect supporting player for your fire pit area. It’s naturally fire-resistant, feels comfortable underfoot, and makes cleanup a breeze when you’re dealing with ash and debris. Picture a 12-16 foot diameter circle around your pit – that’s your sweet spot for creating a defined gathering area.
Seating choices can make or break your fire pit experience. Adirondack chairs offer classic comfort and flexibility to rearrange as your group size changes. For a more permanent solution, built-in stone benches create a cohesive look that’ll have your neighbors asking for your secret.
Boulder stools are practically maintenance-free and blend beautifully with natural stone fire pits. Pathways deserve attention too – a 36-inch wide walkway feels comfortable for two people walking side by side, while a gently winding path builds anticipation as guests approach your fire pit.
For professional installation of complete fire pit and seating solutions, check out our Fire Pits with Seating page.
Finishing the Surround
Weed control starts before you spread the first handful of gravel. Remove every bit of grass and organic material from your surround area. A good vinegar spray or commercial weed killer followed by landscape fabric creates a barrier that’ll save you hours of maintenance later.
Edging transforms your project from amateur to professional with surprisingly little effort. Whether you choose concrete edging stones, metal landscape edging, or natural stone borders, install them before spreading gravel.
Integrated planters add life and color to what could otherwise feel like a stark hardscape. Using the same stone as your fire pit creates harmony, while contrasting materials can add visual interest. Native plants are your best friends here – they’ll thrive with minimal care.
Low-voltage lighting extends your fire pit season well into those chilly evenings when the stars come out. Solar path lights require zero electrical work, string lights create instant ambiance, and LED spotlights can highlight your beautiful stonework.
Costs, Maintenance & Long-Term Care
Understanding the real costs of building a rock fire pit helps you make smart decisions about your backyard investment. The good news? You can create a beautiful, functional fire pit without breaking the bank.
A basic DIY rock fire pit costs just $60-120 when you source materials locally and do the work yourself. Commercial fire pit kits run $300-900 and offer convenience if you prefer pre-cut stones and detailed instructions.
Professional installation averages $1,000-3,000+ based on internet data (these are not OutdoorX rates – we provide custom quotes based on your specific needs). Complex projects with integrated seating, lighting, and custom landscaping can reach $5,000 or more depending on size and features.
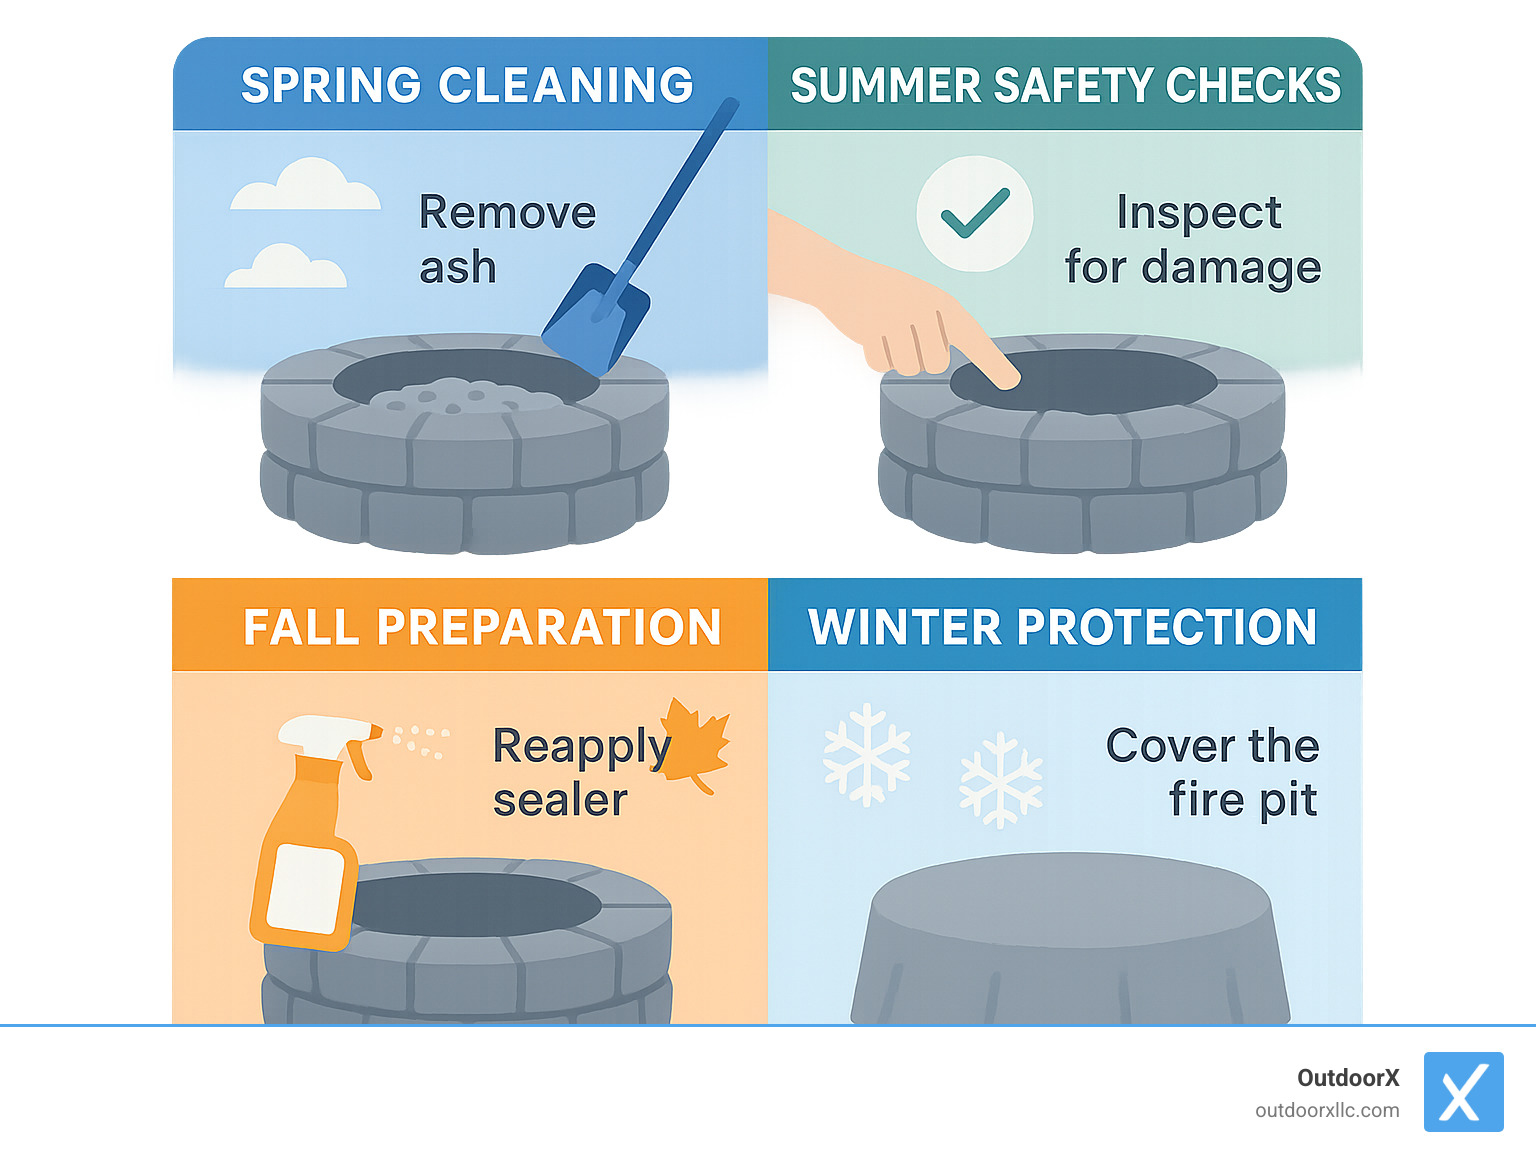
Maintenance is surprisingly simple when you build with quality materials. Remove ash regularly – never dispose of hot ash, and always wait 24 hours after your last fire. Inspect mortar joints each spring for cracks that need repair. Store metal grates and accessories indoors during winter to prevent rust.
For detailed cost guidance, check this How to Build a Fire Pit cost guide.
Common Mistakes to Avoid
Using river rock tops the list of dangerous mistakes. These smooth, water-worn stones can explode when heated because they often contain trapped moisture. Always choose quarry stone, fire brick, or other heat-resistant materials.
Skipping base compaction might save you 30 minutes today, but it creates years of headaches. Properly compact your soil and gravel layers.
Inadequate drainage causes multiple problems that get worse over time. Poor drainage leads to water accumulation, freeze-thaw damage in cold climates, and creates perfect mosquito breeding conditions.
Ignoring local permits and codes can result in expensive surprises. Some areas require permits for permanent fire features, and violations can mean fines or being forced to remove your fire pit.
Average Cost & Value Breakdown
| Build Type | Material Cost | Labor Cost | Total Cost | Lifespan | Cost per Year |
|---|---|---|---|---|---|
| DIY Basic | $60-120 | $0 | $60-120 | 15-20 years | $3-8 |
| DIY Improved | $150-300 | $0 | $150-300 | 20-25 years | $6-15 |
| Kit Installation | $300-900 | $200-500 | $500-1,400 | 10-15 years | $33-140 |
| Professional Custom | $500-1,500 | $1,000-3,000+ | $1,500-4,500+ | 25-30 years | $50-180 |
Note: Professional installation costs are internet averages and not OutdoorX rates. Contact us for accurate pricing.
When you look at cost per year, DIY builds offer incredible value – often less than $10 annually for decades of enjoyment.
Frequently Asked Questions about Building a Rock Fire Pit
After years of helping homeowners create their perfect outdoor gathering spaces, we’ve heard just about every question imaginable about building a rock fire pit. These three questions come up most often, and getting the answers right makes the difference between a fire pit that lasts decades and one that becomes a safety hazard.
How deep should I dig my fire pit?
The magic number is 12-18 inches deep for most installations, but your specific situation determines the exact depth. Think of it like building a house – the foundation needs to match the conditions it’ll face.
In areas with heavy clay soil that doesn’t drain well, you’ll want to dig closer to 18 inches and add extra gravel. Clay holds water like a sponge, and that water can freeze in winter, potentially cracking your stone walls. Sandy soil that drains naturally might only need 12 inches.
Cold climate folks should lean toward the deeper end too. Freeze-thaw cycles are brutal on fire pits, and that extra depth provides protection against frost heaving that can shift your carefully stacked stones.
Here’s a pro tip that saves headaches later: create a central drainage sump by digging a fencepost-sized hole 2 feet deeper than your main excavation. Fill this mini-well with gravel, and you’ve got a perfect spot for water to drain and ash to disappear. One builder told us this simple addition eliminated all their drainage problems.
Do I need a metal liner?
Metal fire rings are like insurance policies – not required, but they sure give peace of mind. Steel rings protect your stones from direct heat and help maintain that perfect circular shape year after year. They also create a clean edge for setting cooking grates, which is handy if you plan to grill over your fire.
The honest truth? Many successful fire pits operate beautifully without metal rings. If you choose quality heat-resistant stones like granite or fire brick and maintain proper airflow between stones, a metal ring becomes more of a convenience than a necessity.
That said, if you’re using concrete blocks or softer stones, a metal ring extends your fire pit’s life significantly. Think of it as protecting your investment – spending an extra $50-100 on a ring might save you from rebuilding the whole pit in five years.
What rocks are unsafe to use?
This question is absolutely critical for safety, and the answer could prevent serious injury. Never, ever use river rock, sandstone, or any stones that have been sitting in water. These innocent-looking stones can turn into grenades when heated.
The problem is trapped moisture. Water expands when it turns to steam, and if that steam can’t escape quickly enough, the rock literally explodes. We’ve heard stories of stone fragments flying 20 feet from fire pits – not something you want happening during a family gathering.
Porous stones like limestone with visible holes should also be avoided, as should soft stones that crumble easily. Concrete blocks might crack from repeated heating, but they’re safe to use and cheap to replace when they do deteriorate.
Your safe choices include granite, dense limestone, fire brick, and purpose-made fire pit blocks. When shopping at your local stone supplier, just ask about heat resistance – they’ll steer you toward the right materials. Most quarries know exactly which stones work for fire pits and which ones don’t.
The bottom line? When in doubt, spend a few extra dollars on stones specifically rated for fire use. Your safety is worth more than the cost difference.
Conclusion
Building a rock fire pit transforms your backyard into something truly special – a place where stories are shared, marshmallows are perfectly toasted, and your family creates memories that last a lifetime. There’s something magical about gathering around a fire you built with your own hands, knowing that every stone was carefully chosen and placed.
The beauty of this project lies not just in the final result, but in the journey itself. Yes, you’ll save hundreds of dollars compared to buying a kit or hiring contractors. But more importantly, you’ll have that deep satisfaction that comes from creating something permanent and beautiful for your family to enjoy for decades.
Most homeowners find the 2-4 hour build time surprisingly manageable, especially when they see how quickly the project comes together once the foundation is properly prepared. The hardest part is often just getting started – once you dig that first shovel of dirt, momentum builds naturally.
At OutdoorX, we completely understand that not everyone has the time, tools, or inclination to tackle DIY projects. Life gets busy, weekends fill up, and sometimes you just want to enjoy your backyard rather than work on it. That’s where our experienced team comes in.
We’ve been changing outdoor spaces throughout Essex County for years, serving communities like Andover, Beverly, Boxford, Danvers, Essex, Georgetown, Gloucester, Ipswich, Lynnfield, Manchester-by-the-Sea, Marblehead, Newburyport, North Andover, North Reading, Peabody, Rockport, Rowley, Salem, Swampscott, Topsfield, and Wenham. We know the local soil conditions, understand regional building codes, and can steer the permit process seamlessly.
Our custom approach means your fire pit will be perfectly sized for your space and designed to complement your existing landscape. We source quality materials, handle all the heavy lifting, and ensure proper installation techniques that will keep your fire pit safe and beautiful for years to come.
Whether you’re rolling up your sleeves for a weekend DIY trip or ready to have professionals handle every detail, the important thing is taking that first step toward creating your perfect outdoor gathering space.
Ready to get started? Contact us today to discuss your vision and explore how we can help turn your backyard into the outdoor paradise you’ve been dreaming about.
