Paver Walkway Installation: 10 Powerful Benefits in 2025
Transform Your Outdoor Space with Paver Walkways
Paver walkway installation is a project that combines beauty and function to improve your home’s curb appeal and outdoor livability. For homeowners looking to quickly understand what this project involves:
Quick Guide to Paver Walkway Installation:
1. Planning: Measure area, choose pavers, calculate materials
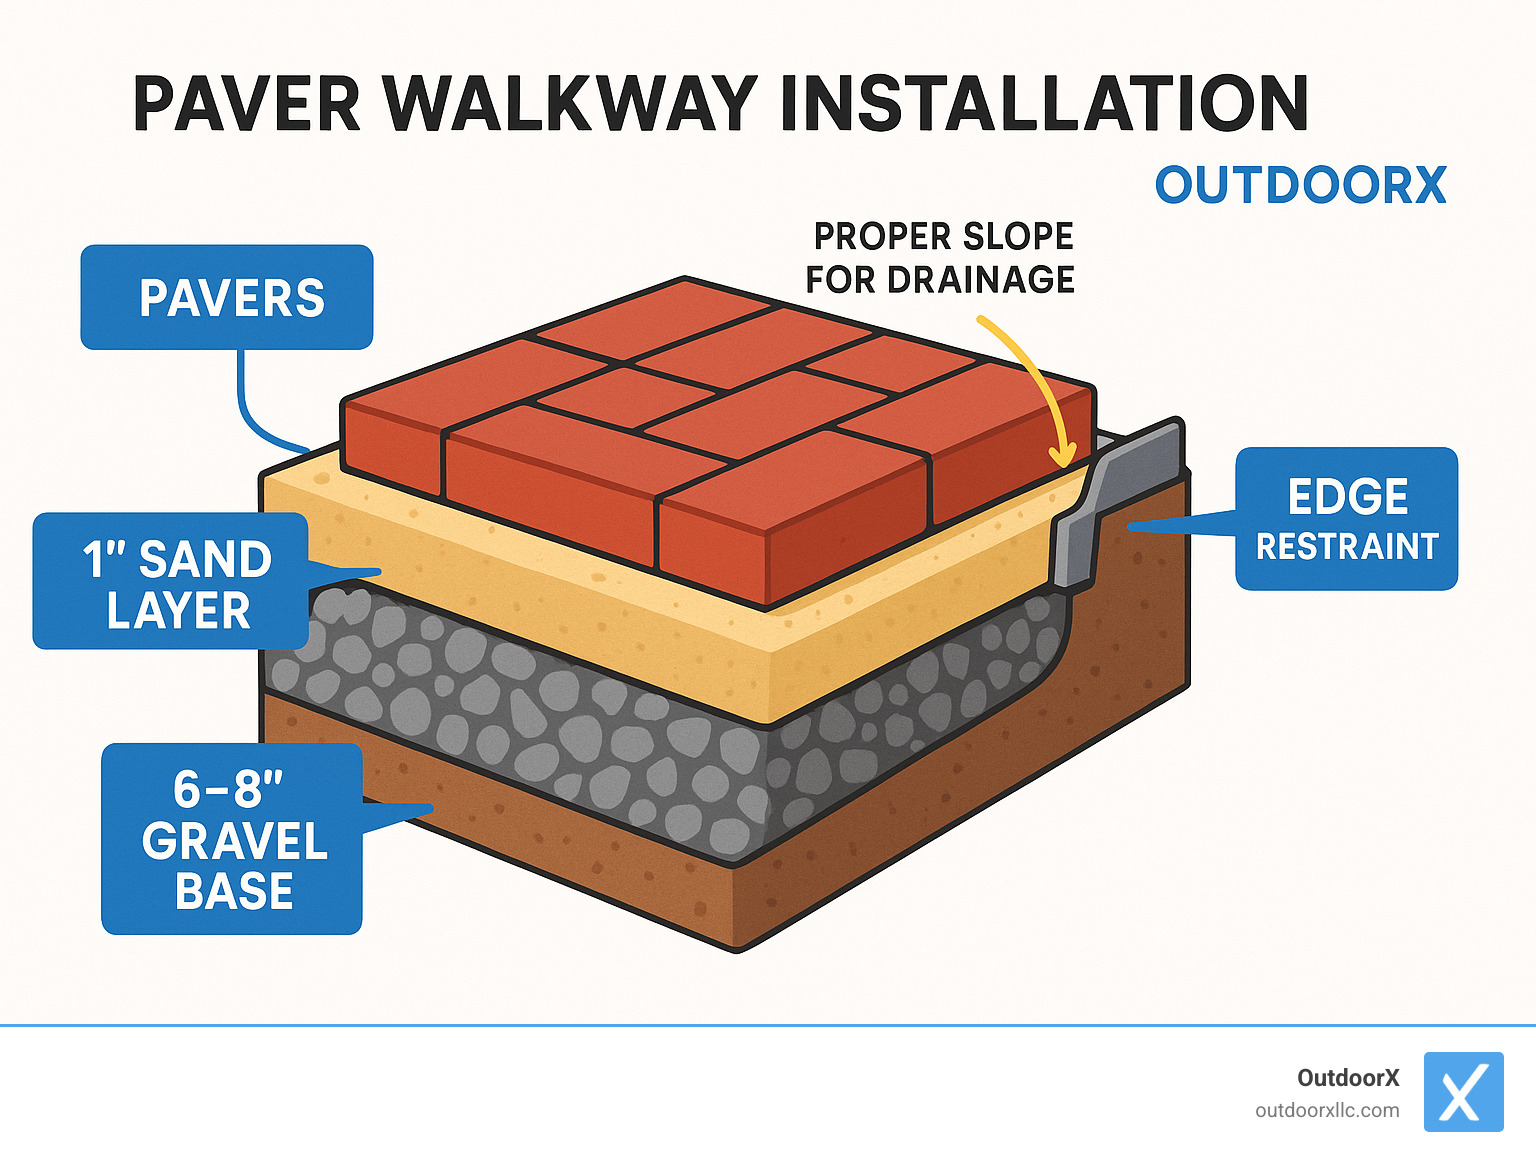
2. Preparation: Mark layout, excavate 7-9 inches deep
3. Base: Add 4-6 inches of gravel, compact thoroughly
4. Bedding: Screed 1 inch of sand perfectly level
5. Installation: Lay pavers in desired pattern
6. Finishing: Add edge restraints, sweep in polymeric sand
A well-designed paver walkway can last between 50-100 years with minimal maintenance, making it a smart investment for your property. Unlike poured concrete which cracks over time, pavers offer easy repairs by simply replacing individual stones as needed.
The national average cost to install a paver walkway is about $2,665, with most homeowners spending between $1,565 and $3,765. Professional installation typically runs $40-$50 per square foot, while DIY projects can significantly reduce this cost if you have the time and energy.
The beauty of pavers lies in their versatility and strength. Available in concrete, clay brick, or natural stone, they can create patterns from simple running bond to complex herringbone designs. The proper installation involves several critical layers working together to ensure stability and longevity.
Roger Cook, landscape contractor, offers this advice: “For DIYers, I recommend the running-bond pattern. It requires the fewest cuts, so it goes down the fastest.”
Whether you’re considering a front entrance path, garden walkway, or backyard connection, paver installation follows the same fundamental principles. With proper planning and execution, you’ll enjoy a beautiful, durable surface that improves your outdoor living space for decades to come.
Why Choose a Paver Walkway?
There’s something magical about a well-crafted paver walkway that transforms an ordinary yard into a welcoming outdoor haven. At OutdoorX, we’ve installed hundreds of walkways throughout Essex County, and we’ve seen how pavers consistently deliver the best long-term value and satisfaction for our clients.
One of our long-time customers in Hamilton put it perfectly: “My paver walkway isn’t just functional—it’s become the backbone of my garden design. Ten years later, it still looks as good as the day it was installed.”
The remarkable durability of pavers is their standout feature. With proper installation, a paver walkway can last an impressive 50-100 years, often outliving the very home it improves! This exceptional lifespan comes from their ability to flex slightly with ground movement without cracking, unlike rigid concrete slabs that inevitably develop unsightly fractures.
Main Benefits Over Other Materials
When comparing walkway materials, paver walkway installation simply outperforms the alternatives in nearly every category.
Concrete might seem cost-effective initially, but in our New England climate, freeze-thaw cycles guarantee cracks within a few seasons. Pavers, by contrast, include built-in expansion joints between each unit, allowing them to shift microscopically without damage.
Gravel paths might be quick to install, but they require constant maintenance as stones scatter across your lawn with every snowblower pass. Pavers stay firmly in place year after year.
Asphalt walkways literally soften under the summer sun and develop spider-web cracks by winter’s end. Pavers maintain their structural integrity regardless of whether it’s 90°F in July or 5°F in January.
Perhaps most importantly, paver repairs are remarkably simple. If a section becomes damaged or stained (think spilled barbecue sauce or motor oil), individual pavers can be lifted and replaced without disturbing the entire path. Try doing that with a poured concrete walkway!
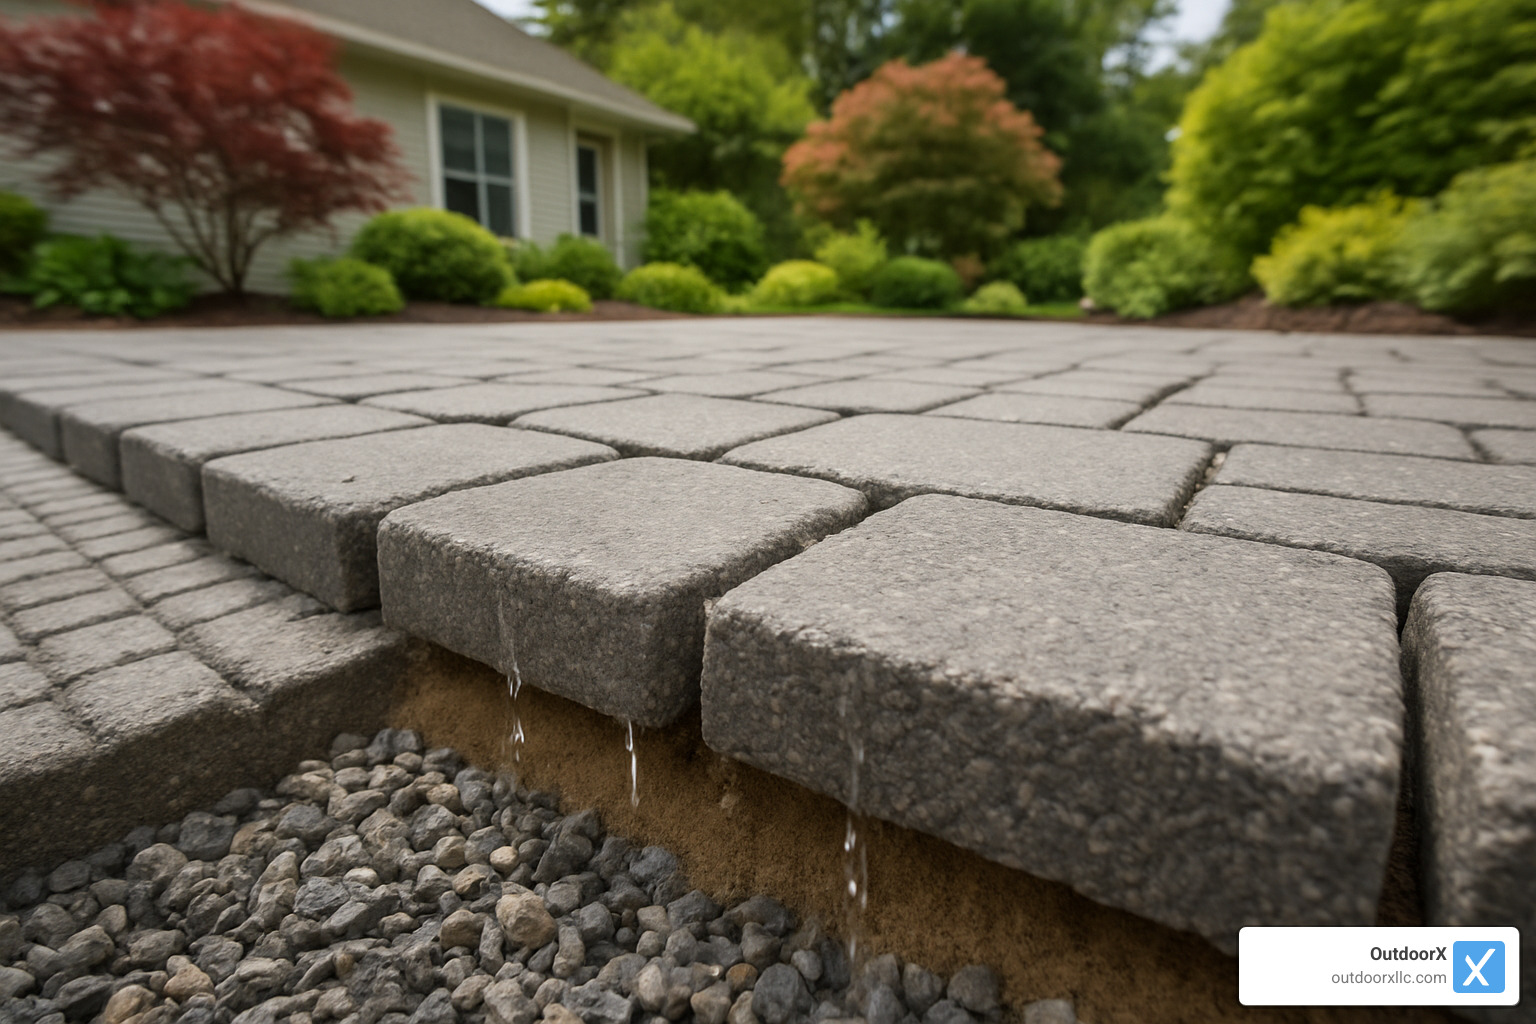
For environmentally-conscious homeowners, permeable pavers offer significant advantages. These specialized pavers allow water to filter through to the ground below, reducing runoff and helping with stormwater management—an increasingly important consideration as Essex County communities develop stricter drainage requirements.
Hidden Perks You’ll Love
Beyond the obvious benefits, paver walkways offer several delightful advantages that often surprise our clients after installation.
Boosted property value tops the list of unexpected benefits. A professionally installed paver walkway can significantly increase your home’s market appeal. Essex County real estate agents consistently rank attractive hardscaping among the top features that impress potential buyers and justify higher asking prices.
Safer walking surfaces become increasingly important as we age. The slightly textured surface of pavers provides better traction than smooth concrete, especially when wet. We’ve had numerous clients tell us how much more confident their elderly parents feel walking on pavers versus slippery concrete paths.
Weed control is another significant advantage. When properly installed with polymeric sand in the joints, paver walkways dramatically reduce weed growth compared to other walkway types. This means less time pulling stubborn dandelions and more time enjoying your outdoor space.
Adaptability sets pavers apart from permanent solutions like concrete. As your landscape evolves over the years, pavers can be reconfigured or expanded to accommodate changing needs—whether that’s widening a path or creating a new branch to that garden shed you finally built.
A recent client in Beverly shared: “After our paver walkway was installed last spring, we stopped worrying about guests tripping on our old, cracked concrete path. The pavers have stayed perfectly level through four seasons, and they look even better now that they’ve weathered slightly. Best investment we’ve made in our yard, hands down.”
Planning, Design & Budgeting for Paver Walkway Installation
The secret to a stunning paver walkway installation isn’t just in the final product—it’s in the thoughtful planning that happens before the first shovel hits the ground. At OutdoorX, we’ve seen how proper preparation prevents those “I wish I had thought of that” moments once your walkway is complete.
Before diving in, take a moment to consider what you really want from your walkway. Is it primarily functional, connecting your driveway to your front door? Or is it a meandering garden path designed for leisurely strolls? Understanding your walkway’s purpose will inform every decision that follows.
“Most of our Essex County clients are surprised by how much their initial vision evolves during the planning phase,” shares our design team. “That’s exactly as it should be—good planning reveals possibilities you might not have considered.”
Design Your Layout Like a Pro
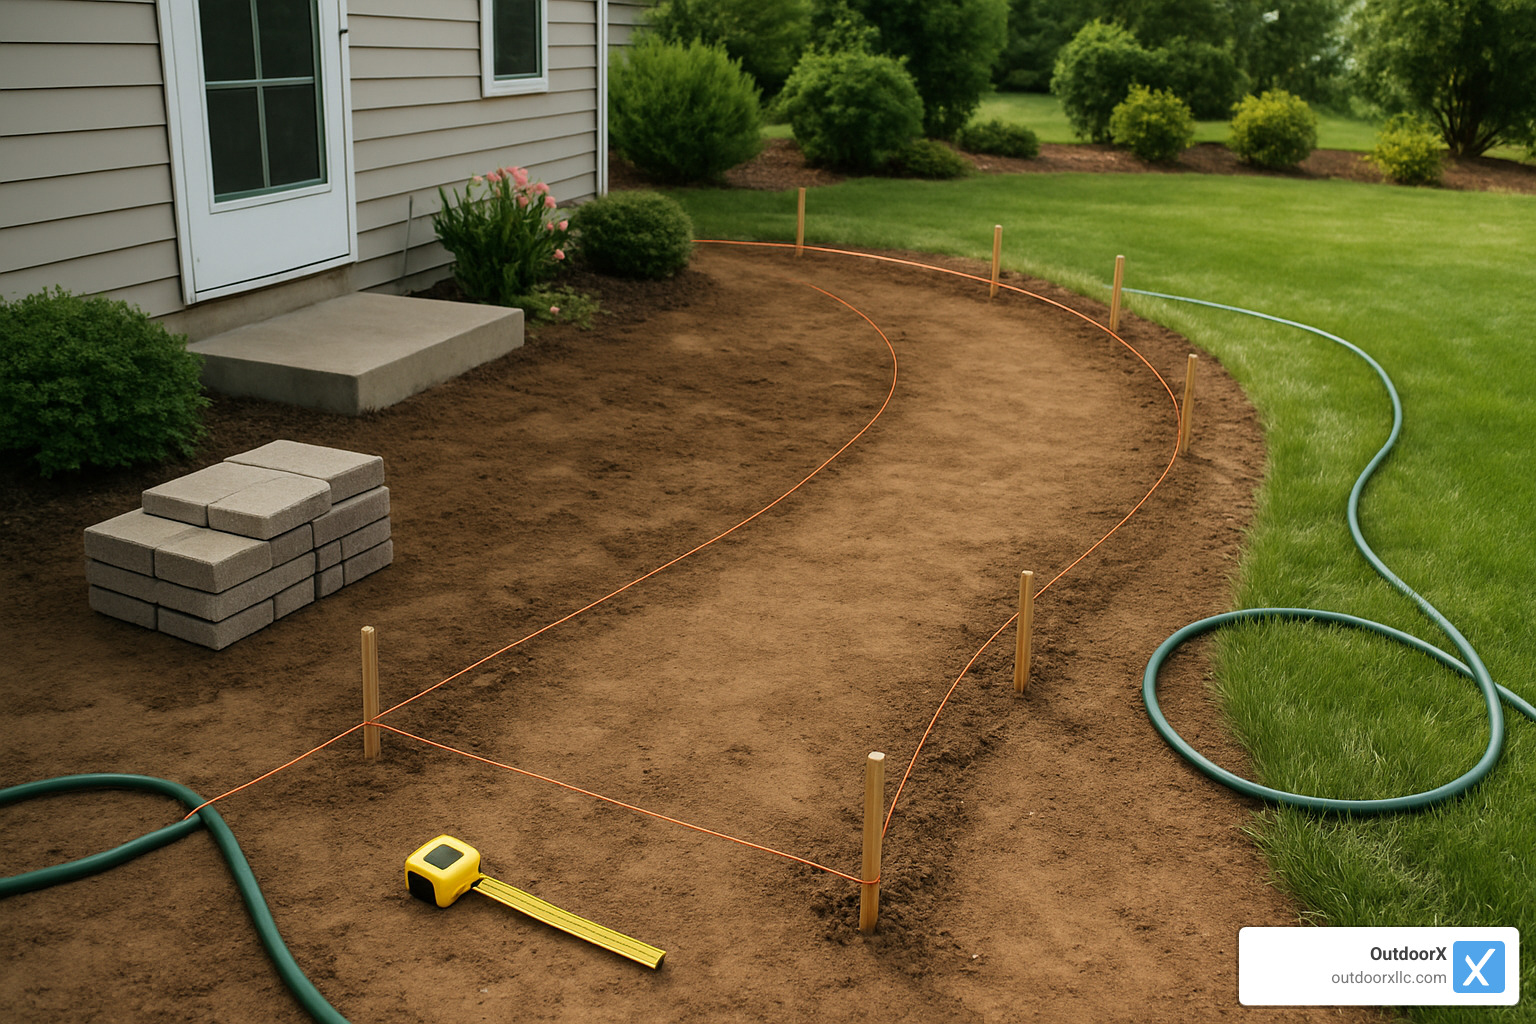
Creating a walkway that looks like it was always meant to be there requires a bit of visualization magic. Start by grabbing your garden hose—this flexible tool is perfect for experimenting with different pathway shapes. Lay it out, step back, adjust, and repeat until the flow feels natural.
Width matters more than you might think. While a 36-inch path works for single-file walking, consider going wider (48 inches minimum) if you want people to comfortably walk side-by-side. For homes with elderly residents or wheelchair users, wider is always better—aim for at least 36 inches with 60-inch turning areas.
Proper slope is crucial but subtle. Your walkway should gently drop about ¼ inch per foot away from your home or other structures. This nearly imperceptible grade prevents water from pooling or flowing toward your foundation—a particularly important consideration in our New England freeze-thaw cycles.
Once you’ve settled on a design, mark it clearly with stakes and string lines. For creating perfect right angles (essential for certain paver patterns), use the 3-4-5 method: measure 3 feet along one string line, 4 feet along the perpendicular line, and the diagonal between those points should be exactly 5 feet if your corner is square.
Don’t forget to plan for accent borders in contrasting colors or textures—these seemingly small details can dramatically lift your walkway’s visual appeal while clearly defining its edges.
Calculating Materials & Base Depth
Nothing derails a DIY project faster than running out of materials mid-installation or being left with expensive excess. Here’s how to get it right the first time.
Your base depth requirements depend on your local conditions. Here in Essex County, where freeze-thaw cycles are a fact of life, you’ll need a minimum of 6-8 inches of compacted gravel base. If you’re dealing with clay soil that retains moisture, consider going even deeper—8-12 inches isn’t excessive in these conditions.
For a typical walkway measuring 3 feet wide by 20 feet long (60 square feet), your shopping list should include:
- Approximately ¾ cubic yard of crushed gravel (about 20 cubic feet)
- Around 7 cubic feet of coarse sand for the bedding layer
- 60 standard-sized pavers plus an extra 10-15% for cuts and future repairs
- Enough edge restraints to secure the entire perimeter
- 1-2 bags of polymeric sand for joint filling
- Geotextile fabric to prevent base materials from mixing with soil
Always order extra pavers—about 10-15% more than your calculated area. This buffer accounts for inevitable cuts, occasional breakage, and gives you matching replacements for future repairs. Trust us, tracking down identical pavers years later can be nearly impossible!
For irregularly shaped walkways, break your design into simple geometric sections. Calculate each rectangle or triangle separately, then add them together for your total.
Average Costs & Factors (2024)
Budget reality check: what will your paver walkway installation actually cost? Based on internet averages (not OutdoorX rates), here’s what homeowners are typically spending in 2024:
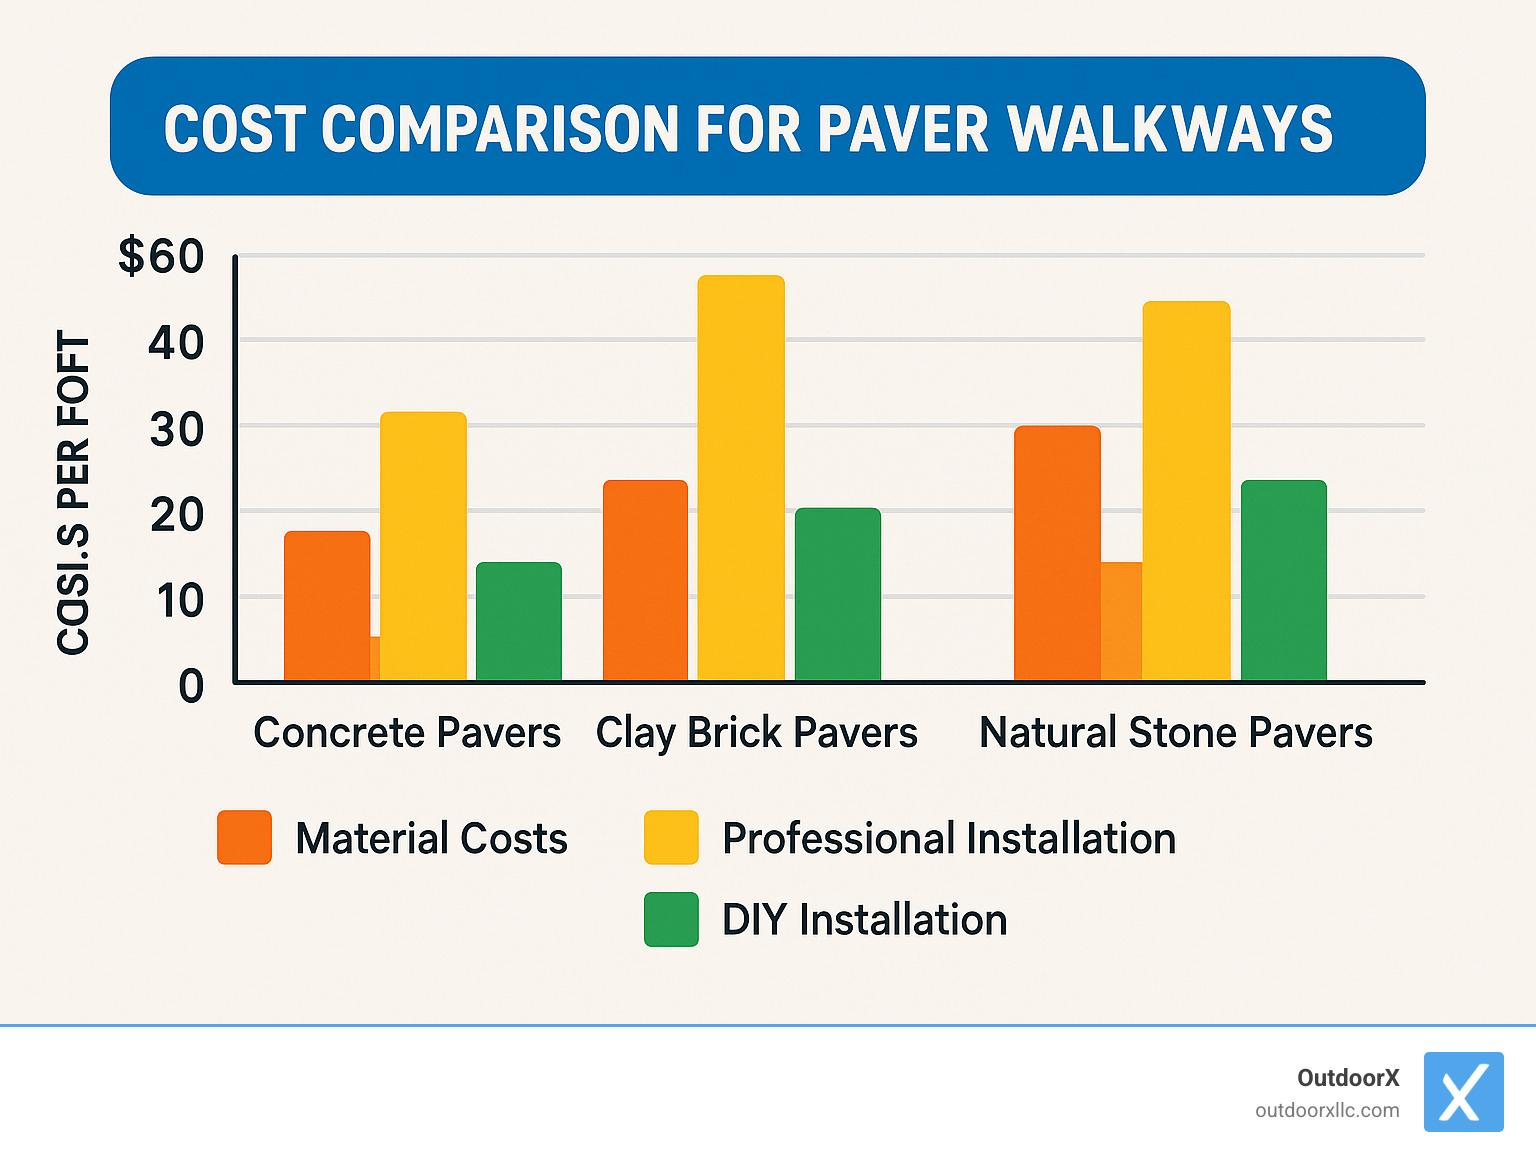
Material costs vary dramatically based on your paver choice. Concrete pavers might run $8-$15 per square foot, while clay brick typically costs $10-$30. Natural stone represents the premium option at $12-$50 per square foot.
Professional labor costs generally range from $40-$50 per square foot, covering everything from proper excavation to final compaction. If you’re taking the DIY route, your all-in costs might be as low as $3-$15 per square foot, depending on material choices and whether you need to rent equipment.
Several factors can significantly impact your total project cost. Complex designs with numerous cuts require more labor and create more waste. Drainage challenges might necessitate additional base preparation or installing drainage solutions. Steps, curves, and lighting add both beauty and cost to your project.
For a standard 60-square-foot walkway, budget anywhere from $1,565 for a basic DIY installation to $11,000+ for a professional installation using premium materials. Investing in quality installation typically pays dividends through extended durability and reduced maintenance needs.
For more information about our professional hardscaping services, visit our Hardscaping page to see how we can transform your outdoor space with expert craftsmanship.
Installing Your Paver Walkway (DIY vs Pro)
Whether you’re rolling up your sleeves for a weekend project or considering hiring our OutdoorX team, understanding the paver walkway installation process helps you make informed decisions. Let’s explore both paths to your perfect walkway.
DIY Paver Walkway Installation Steps
Taking the DIY route can be rewarding and cost-effective if you have the time and energy. Here’s your roadmap to success:
Start by calling 811 before any digging—this free service marks underground utilities and prevents costly accidents. Once cleared, mark your walkway boundaries with stakes and string, creating a visual guide for excavation.
Dig down 7-9 inches, accounting for your base materials and pavers. Remember to slope the excavation away from your home (that crucial ¼ inch per foot) to ensure proper drainage. Once excavated, compact the soil thoroughly—this often-overlooked step prevents future settling.
“The quality of your base determines the lifespan of your walkway,” notes a seasoned DIYer from Ipswich. “Skimping here is the biggest mistake homeowners make.”
Next, roll out geotextile fabric to prevent your base materials from mixing with the soil below. Add your gravel base in 2-inch layers, compacting each layer before adding the next. A good test: if you can drive a steel spike into the base easily, it needs more compaction.
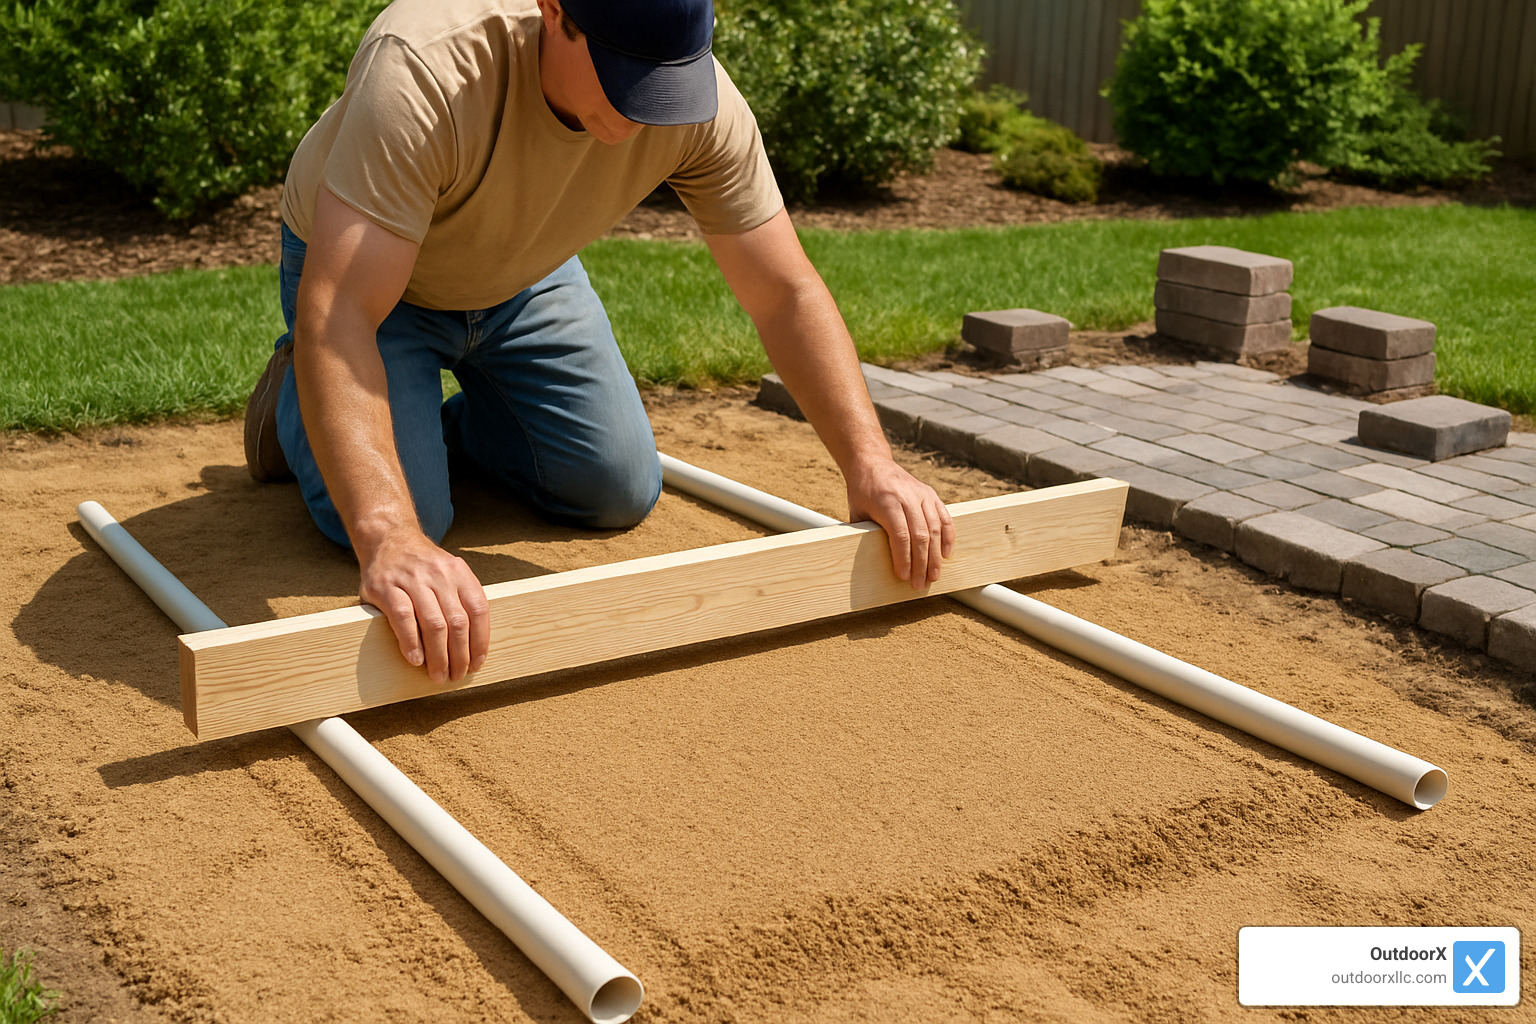
For the perfect sand bed, use a clever contractor trick: place 1-inch PVC pipes across your compacted base as guides, then spread sand between them. Using a straight 2×4, drag across the pipes to create a perfectly level sand surface. Remove the pipes and fill those gaps with additional sand.
When laying pavers, start from a fixed edge or corner and work outward. Set border pavers first if using them, then place field pavers in your chosen pattern. Avoid sliding pavers into place—this disturbs the sand bed. Instead, place them directly and tap to level with a rubber mallet. Stretch alignment strings every 10 pavers to keep your pattern straight and true.
For necessary cuts, measure twice and cut once using a masonry saw or paver splitter. Always wear safety gear—goggles, gloves, and a dust mask are non-negotiable when cutting pavers.
Once all pavers are placed, install edge restraints along the perimeter, securing with 10-inch spikes every foot. These invisible heroes keep your edges from spreading over time.
Finally, sweep polymeric sand into the joints between pavers. Run a plate compactor with a rubber pad over the surface to vibrate the sand deeper into the joints, add more sand as needed, then lightly mist with water according to the manufacturer’s instructions. Allow 24 hours of dry time before walking on your new masterpiece.
For more detailed instructions, The Home Depot offers an excellent guide on building a paver path.
Professional Paver Walkway Installation Options
While DIY installation brings satisfaction, hiring professionals like our OutdoorX team offers distinct advantages that many homeowners find well worth the investment.
Professional installers bring years of experience and specialized equipment that dramatically speeds up the process. What might take you several weekends of backbreaking work can often be completed by our team in just 1-2 days, with superior results.
“We initially considered DIY but ultimately hired OutdoorX,” shared one North Andover client. “The difference in quality compared to my neighbor’s DIY walkway is immediately apparent—especially in how ours has maintained its levelness through several freeze-thaw cycles.”
Professionals have access to commercial-grade equipment like excavators, plate compactors, and wet saws that improve both efficiency and quality. Plus, reputable companies stand behind their work with warranties that protect your investment.
Perhaps most importantly, professionals understand the nuances of proper drainage, soil conditions, and regional considerations specific to Essex County that affect installation success. We’ve seen countless DIY projects that looked great initially but developed problems after the first winter because these factors weren’t properly addressed.
When to Blend Both Approaches
A hybrid approach often offers the best of both worlds for many homeowners.
Consider hiring professionals for the most technical aspects of the job. Excavation and base preparation require both skill and equipment that most homeowners don’t have. Similarly, cutting complex shapes or installing steps might be better left to experienced hands.
“I rented the heavy equipment but did the installation myself,” explains a Beverly homeowner. “It saved me thousands while still giving me access to the right tools for the job.”
If you’re going fully DIY, renting equipment makes financial sense. A plate compactor runs about $70-$90 per day, a wet saw $60-$80, and a power tamper $50-$70. These daily rates are far more economical than purchasing equipment you’ll rarely use again.
Many of our clients take on the straightforward aspects themselves—laying pavers in a simple pattern, sweeping in polymeric sand, or handling the landscaping around the finished walkway—while leaving the technical foundation work to us.
This collaborative approach combines professional quality where it matters most with the satisfaction and savings of personal involvement—truly the best of both worlds for many weekend warriors.
Maintenance, Repairs, Permits & FAQs
A beautiful paver walkway isn’t just a “set it and forget it” project. With a little care, your investment will continue to improve your home’s curb appeal for decades to come.
Routine Care Checklist
Your paver walkway needs just a touch of attention throughout the year to keep it looking spectacular. Think of it as the occasional spa day for your hardscaping!
When spring arrives, take a few minutes to inspect your walkway for any pavers that shifted during winter’s freeze-thaw cycles. This is also the perfect time to check if any joints need additional sand. Come fall, a quick clearing of leaves and debris will prepare your walkway for the coming winter months.
“I give my paver walkway a thorough cleaning each spring, and it looks brand new every time,” shares a delighted Marblehead homeowner. “That 15 minutes of maintenance has kept it pristine for over a decade.”
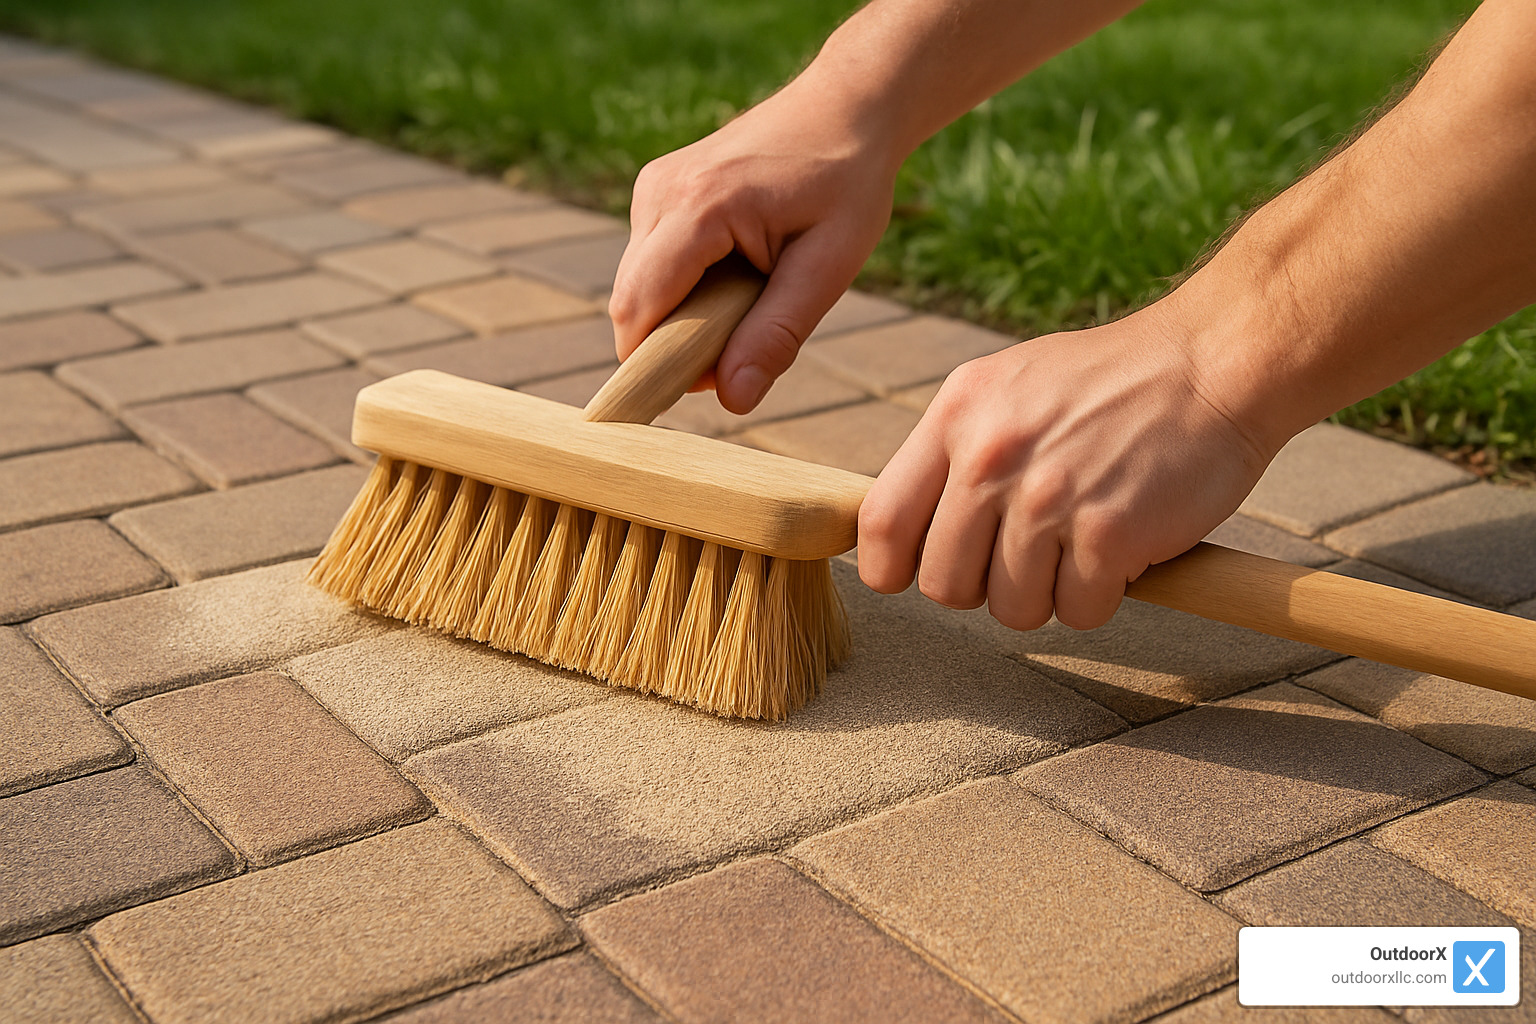
Regular sweeping prevents debris buildup, while an occasional rinse with your garden hose keeps dirt at bay. For those stubborn stains from barbecues or fallen berries, a mild detergent and soft brush will do the trick without damaging your pavers. Every year or two, consider a gentle power washing – just remember to use low pressure to protect those all-important joints.
Sealing your pavers every 2-3 years not only improves their color but also provides protection against stains and stabilizes the joint sand. Always clean thoroughly before applying sealer, and choose between wet-look finishes for vibrant color or natural-finish sealers for a more subtle appearance.
During winter, reach for plastic snow shovels rather than metal ones to avoid scratching your beautiful pavers. If you need ice melt, calcium magnesium acetate (CMA) is much gentler on pavers than traditional sodium chloride, especially if you’ve installed natural stone.
Quick Fixes for Common Issues
Even the most expertly installed paver walkway installation projects may develop minor issues over time. The good news? Most are easily fixed in an afternoon.
When you notice a paver starting to sink or become uneven, simply remove it and the surrounding pavers, add and compact additional base material or sand, then reset everything back into place. Finish by reapplying polymeric sand to the joints, and your walkway will look good as new.
Seeing unwelcome weeds peeking through? After pulling the visible offenders, consider applying vinegar or boiling water to kill any remaining roots. To prevent future botanical invaders, a fresh application of polymeric sand creates a hostile environment for seeds.
That mysterious white residue on your pavers? Don’t worry – it’s just efflorescence, a natural occurrence when minerals in the pavers rise to the surface. It’s temporary and harmless, but you can speed its departure with a mild vinegar solution, followed by a thorough rinse.
A Danvers client recently told us: “After five years, we noticed a slight dip forming where rainwater would pool. We lifted those few pavers, added more base material, and reset them—problem solved in under an hour!”
If you notice your edge restraints coming loose, simply remove the soil or mulch covering the edge, add additional spikes to secure them, and replace any damaged sections. This quick fix prevents your beautiful pattern from spreading and losing its crisp lines.
Permit & Drainage Essentials
Before breaking ground on your paver walkway installation, take time to understand what local regulations might apply to your project.
Many Essex County communities require permits for hardscaping projects, particularly those that might affect drainage patterns. If you live in an HOA community, you’ll likely need their approval as well. A quick call to your local building department can save headaches down the road. Some areas also have impervious surface limitations that could influence your design choices.
Proper drainage is crucial for the longevity of your walkway. Maintain that recommended ¼-inch per foot slope away from your home and other structures. For areas with known drainage concerns, consider permeable pavers that allow water to filter through to the ground below. Problem spots might benefit from French drains installed alongside your walkway to channel water away effectively.
“We installed a permeable paver walkway that directs water to our rain garden,” explains a Georgetown homeowner. “It solved our drainage issues while supporting local ecosystem health.”
Don’t forget the importance of geotextile fabric to prevent your base material from mixing with the soil beneath – this simple layer makes a huge difference in maintaining your walkway’s stability over time.
Many municipalities now offer incentives for installing permeable hardscaping as part of their stormwater management programs. These eco-friendly options not only reduce runoff but also benefit groundwater recharge, making them increasingly popular in environmentally conscious communities.
Frequently Asked Questions about Paver Walkway Installation
How long does a paver walkway last?
With proper installation and minimal maintenance, your paver walkway can be a once-in-a-lifetime investment, lasting between 50 and 100 years. This remarkable longevity makes pavers one of the most cost-effective walkway materials available. The key to this exceptional lifespan lies in quality installation, appropriate base depth for your climate, and simple seasonal maintenance.
How many pavers & base do I need?
Calculating materials accurately saves both money and frustration. For pavers, measure your walkway’s total square footage (length × width), then divide by the square footage of a single paver. Always add 10-15% extra for cuts and waste.
For base materials, multiply your walkway’s square footage by the base depth (in feet) to determine cubic feet of gravel needed. Your sand bedding layer will typically require about 1/3 the volume of your gravel. Edge restraints should equal your perimeter length plus 10% for good measure. For polymeric sand, a 50-pound bag typically covers 75-100 square feet of paver surface.
Is DIY really cheaper than hiring a pro?
While DIY paver walkway installation can save on labor costs (typically $40-$50 per square foot), the financial equation isn’t quite so simple.
DIY projects come with hidden costs: equipment rental ($200-$400 for a weekend), specialty tool purchases ($100-$300), and your valuable time (usually 2-4 weekends for a typical walkway). There’s also the learning curve to consider – mistakes might require costly corrections.
Professional installation offers distinct advantages: faster completion (typically 1-2 days), warranty protection, professional-grade results, and no equipment investment on your part.
For a standard 60 square foot walkway, the DIY approach might save $1,000-$2,000, but requires significant time and physical effort. For complex designs or challenging sites, professional installation from experts like our team at OutdoorX often provides better long-term value and peace of mind.
Conclusion & Next Steps
After exploring all aspects of paver walkway installation, you’re now equipped with the knowledge to make informed decisions about your outdoor space change. Whether you’re rolling up your sleeves for a DIY weekend project or considering professional installation, the investment in a paver walkway brings lasting beauty and functionality to your home.
Here in Essex County, we’ve seen how a thoughtfully designed walkway can completely change a property’s feel and flow. From the coastal charm of Gloucester to the historic streets of Andover, our OutdoorX team has installed walkways that not only withstand New England’s notorious freeze-thaw cycles but actually improve with age, developing character and patina over the decades.
One of our Ipswich clients put it perfectly: “Our paver walkway isn’t just a path from point A to point B—it’s become the backbone of our entire landscape design. I wish we’d done it years earlier!”
The secret to a truly successful paver walkway isn’t just in the materials you choose, but in the careful preparation beneath what meets the eye. That solid foundation—properly excavated, carefully leveled, and thoroughly compacted—is what separates a walkway that will last for generations from one that might need repairs after just a few seasons.
If you’re considering tackling this project yourself, renting the right equipment and taking your time with the base preparation will pay dividends for decades. And if the scope of the project feels overwhelming, even experienced DIYers sometimes call in professionals for the most technical aspects.
For those preferring to leave it to the experts, OutdoorX brings decades of combined experience to every project. Our team understands Essex County’s unique soil conditions, drainage challenges, and aesthetic traditions. We pride ourselves on creating walkways that look like they’ve always been part of your landscape—natural extensions of your home’s character and your outdoor lifestyle.
Ready to take the next step toward your dream outdoor space? OutdoorX specializes in creating beautiful, functional hardscaping solutions throughout Essex County. From initial design conversations to the final sweep of polymeric sand, our team is committed to bringing your vision to life with craftsmanship that stands the test of time.
Contact us today for a complimentary site visit and find how we can transform your property with expert paver walkway installation that combines beauty, durability, and value. Your journey to an improved outdoor lifestyle is just a conversation away.
More info about hardscaping services
